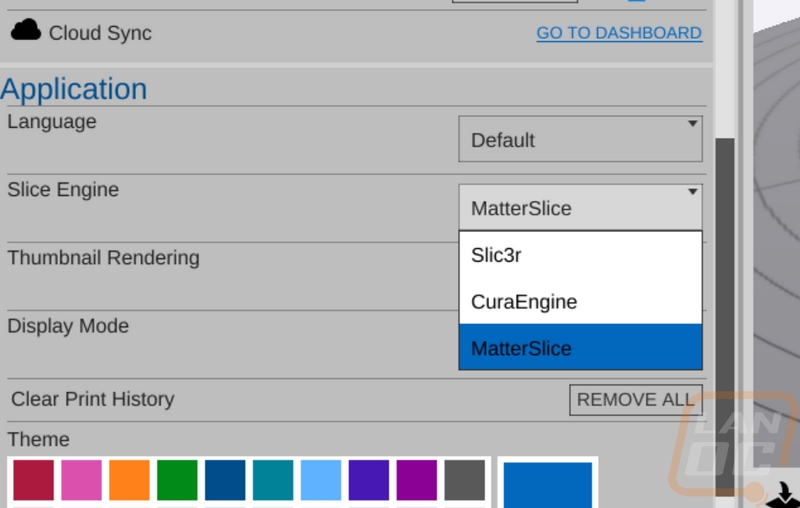
For over 7 months of printing on the SeeMeCNC Eris’ and the Rostock MAX v3, I have been using the suggested software MatterControl. Setup was easy because they work directly with SeeMeCNC and it had the profiles for both printers. Beyond that, it was easy to use, but over time I started to notice more and more limitations and I was really curious what else was out there. Well, one of the more popular programs for handling most 3d printers is called Simplify3D. They happened to be based out of Ohio like we are, so I reached out and they send over a copy and I have been testing it alongside my testing of the Rostock MAX v3. So today I’m going to dive in and check out what their software is all about.
Product Name: Simplify3D
Review Sample Provided by: Simplify3D
Written by: Wes
Screenshots by: Wes
Settings and Configuration
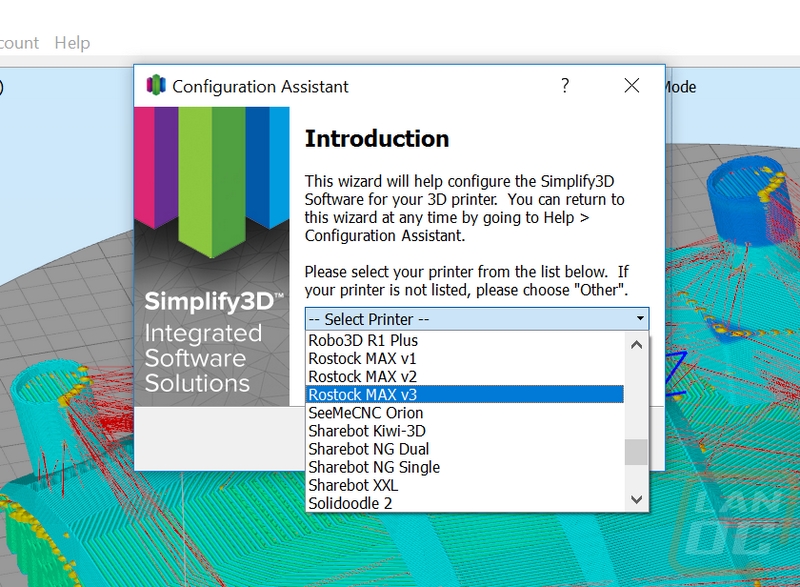
I didn’t immediately jump into Simplify3D, I was in the middle of testing the Rostock MAX v3 so I didn’t want to introduce any extra variables, but anytime I had a chance to print things that didn’t relate to my testing I spent time messing around in Simplify3D trying to get a feel for the software and working on getting things tuned. When you first start up the program it will run a wizard that checks online to get a list of all of the printer profiles available. Once you select your printer it imports a basic profile and from there you can make tweaks and changes as needed.
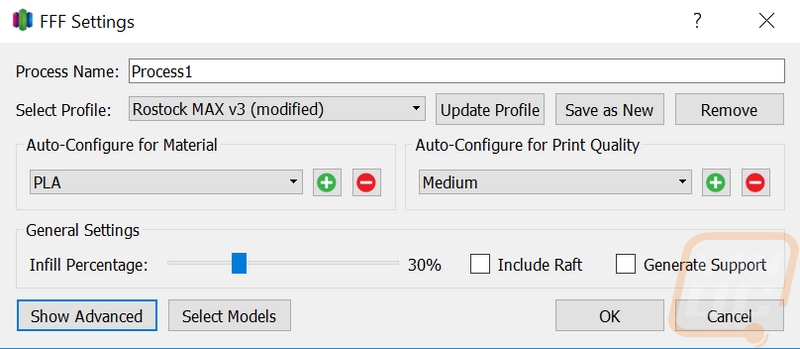
Simplify3D starts with a basic mode where you just select from the pre-configured material types and the quality levels. You also have the option to turn on supports and change the infill percentage. This is great for a school or someone who wants to get everything tuned perfectly then keep the settings simple. I, however, needed to get into the advanced settings to get things working.
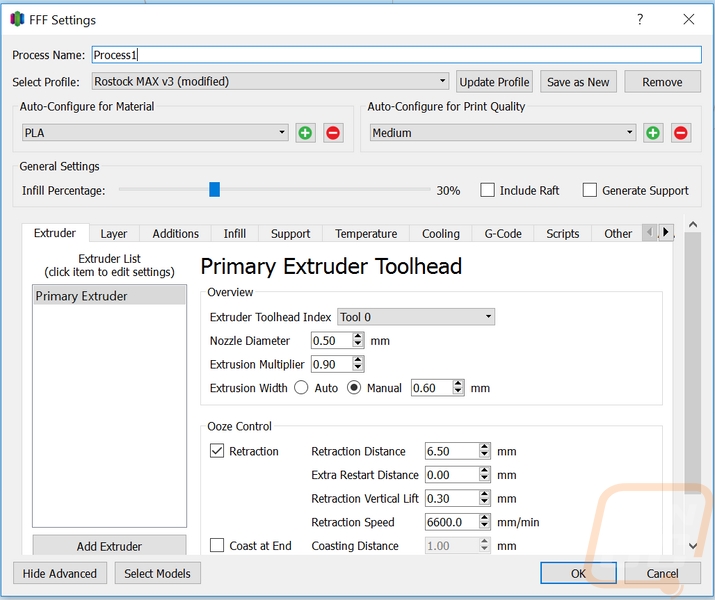
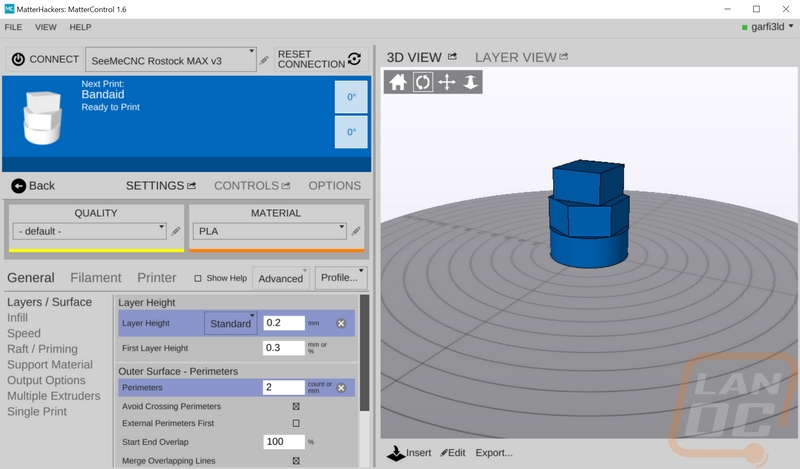
Well opening up the advanced settings keeps all of the original options but now gives you a whole selection of tabs to flip through. The first tab just has a few main settings for the printer configuration like the nozzle size then at the end are the retraction settings. Compare this to MatterControl’s settings in the photo below it's clear that while MatterControl has a lot of settings, Simplify3D has even more. That said MatterControl is easier to navigate and it also highlights any settings you change from your base profile and makes it easy to take the setting back to stock later.
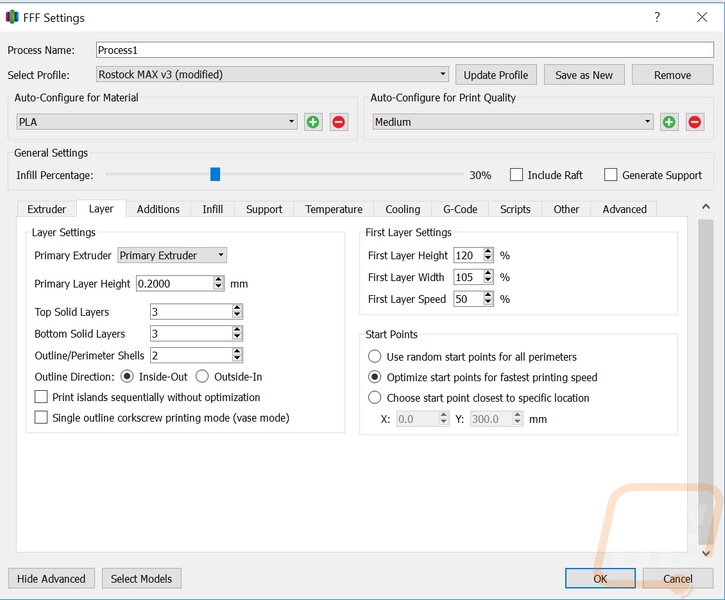
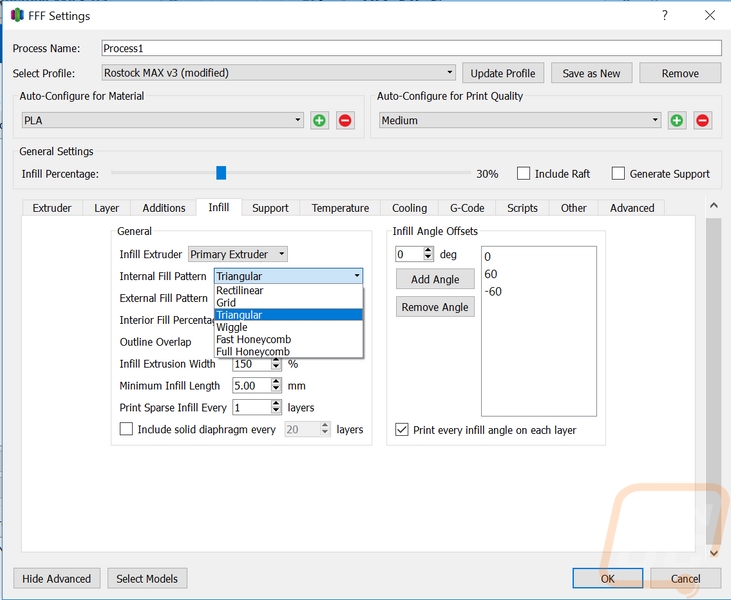
On the Layer tab, we finally start to get into key settings that will most likely get tuned a lot. Here we can change the layer height. We can also set the number of top, bottom, and perimeter layers/shells. The top and bottom layers have to change depending on how thick your layer height is and also depending on your infill configuration. The first layer speed, height, and width options are all here but I’m not really a big fan of the use of percentages. I would much rather be able to say I want my first layer to be .3mm thick and then set the actual speed, not just half of a number that isn’t on this page. We also have a few important options like Vase mode and the option to change where the start points are. The starting point option plays a big role in how good or bad your print can look and how long it takes it to print. Having the option to actually set the starting point as a manual location is nice as well to hide a seam on the back of a print for example.
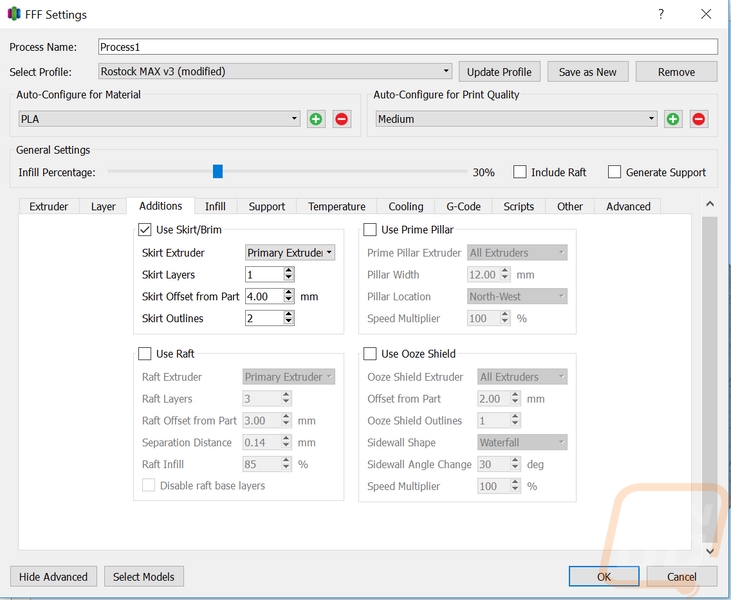
The additions tab is all about different options you can add to your prints. There is the standard skirt/brim option for priming your hotend or giving the print a little more contact area. There is also the option to turn on a raft. Those are both standard and were available on my previous software. The other two options, on the other hand, are a little more unique. You have the prime pillar option that prints a tower next to your print to prime the color, this is mostly for printing in multiple colors with one extruder. The Ooze shield options are also for multi-color or material printing. It creates a shell around your print for when you are using two extruders to protect the print from plastic dripping onto it from the recently used hotend. All of the options have just about every option you can think of, hell you can even change the shape of the ooze shield.
Next is the Infill tab. Here you can select what extruder you would like to print your infill, so if you want to run a cheaper material inside of your print or get creative with a bright color infill inside of a transparent exterior you can if you have a dual extruder setup. But what really caught my eye were all of the infill patterns. I will dive into those later, though.
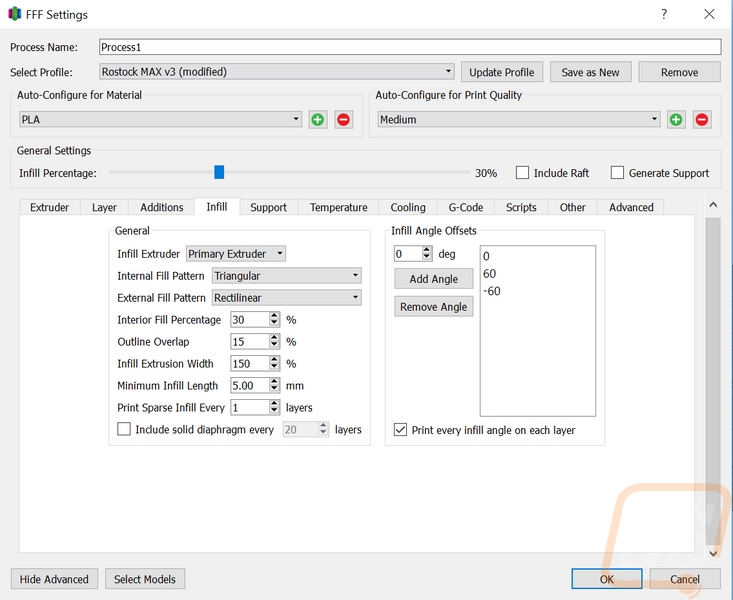
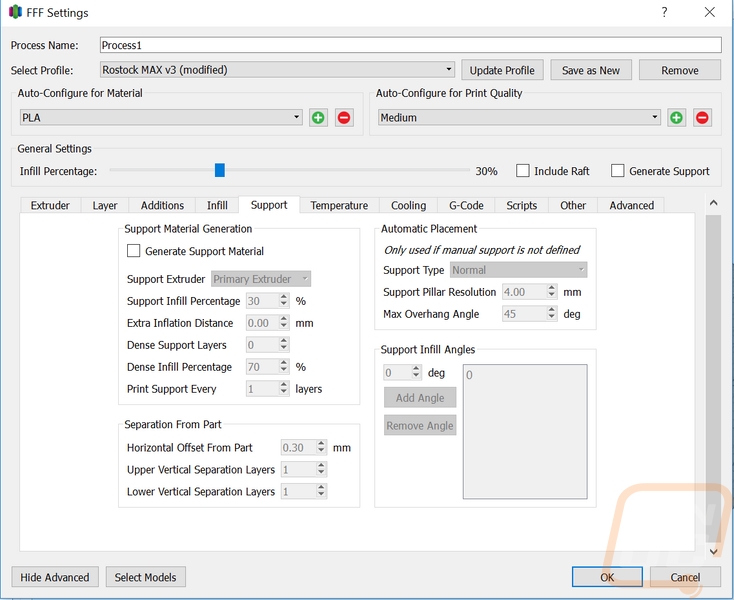
Supports get their own tab and beyond the option to turn supports on or off you can really dive into the settings to get your supports dialed in. This includes cost saving options like being able to print a support layer every other layer and also to change the support infill angles to better match the part. If you add additional angles you can also make stronger supports for when you need supports to run extra high up on a print.
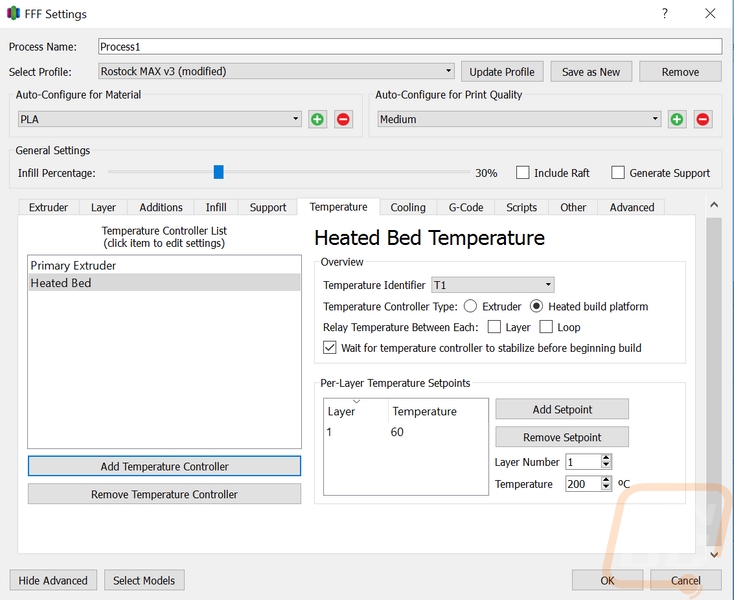
The temperatures page was a lot more difficult to work with than MatterControl. Simplify3D lets us add temperature controllers and point them to identifiers being used and that is a lot more detailed than MatterControl. But when you just want to change your print temps slightly it’s a little harder to figure out where to do it. Of course on the flip side of things you can actually go in and set the temperatures on a per layer basis, so you can heat things up or cool things down as you print. This makes it easy to do print tests covering a range of temps to test a new filament.
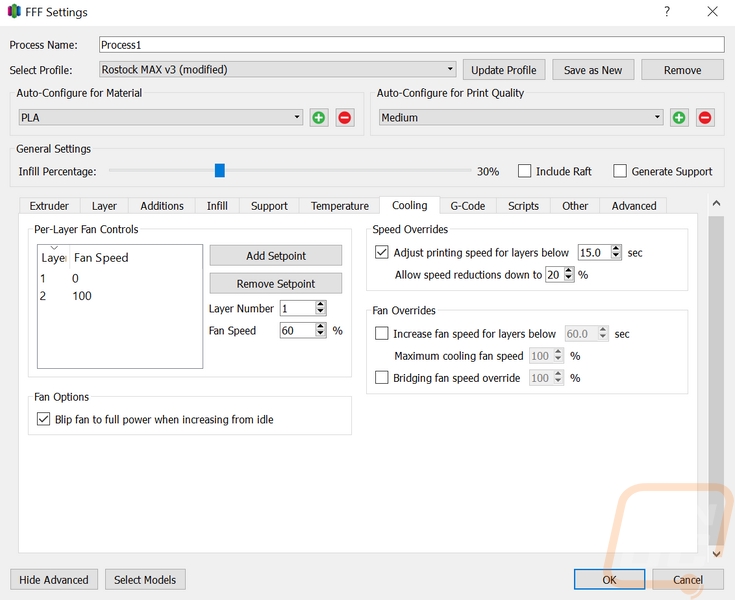
Like the temperature tab, the cooling tab has the option to change fan speeds on any layer, not just a first layer variable like MatterControl. There are also fan overrides for layers under a specific time and for bridging. This is also where we will find the speed options for small layers aka the layers under X time variables. Like the other speed options, I’m not a fan of this not letting me set a specific speed, having to go back to the other tabs to see my overall speeds then doing the math isn’t the most convenient.
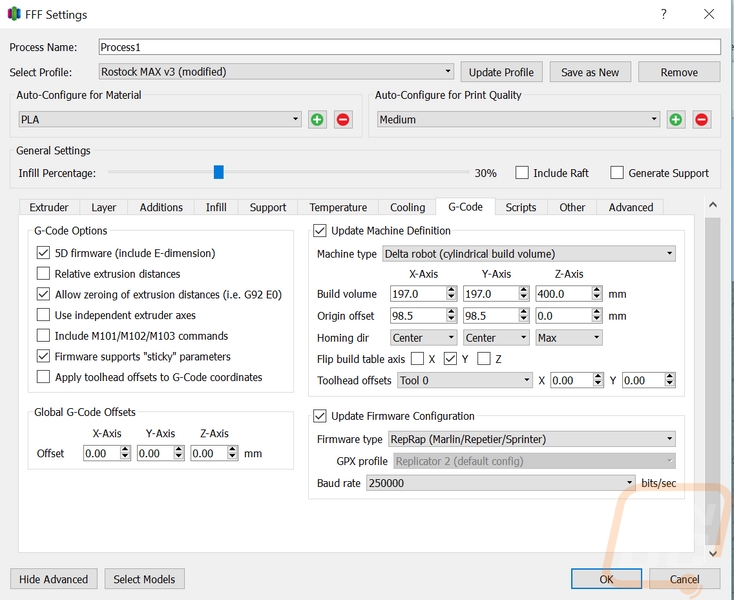
The G-Code tab might be better described as a printer settings page. Here you can setup your machine definition and settings and also setup your firmware configuration options. The rest of the options are g-code variables but are all also related to your base printer configuration. Once you setup this page you most likely won’t be back in it often.
The Scripts page is more of an extension of the previous tab. Here you can input the different scripts your printer uses for startup and ending.

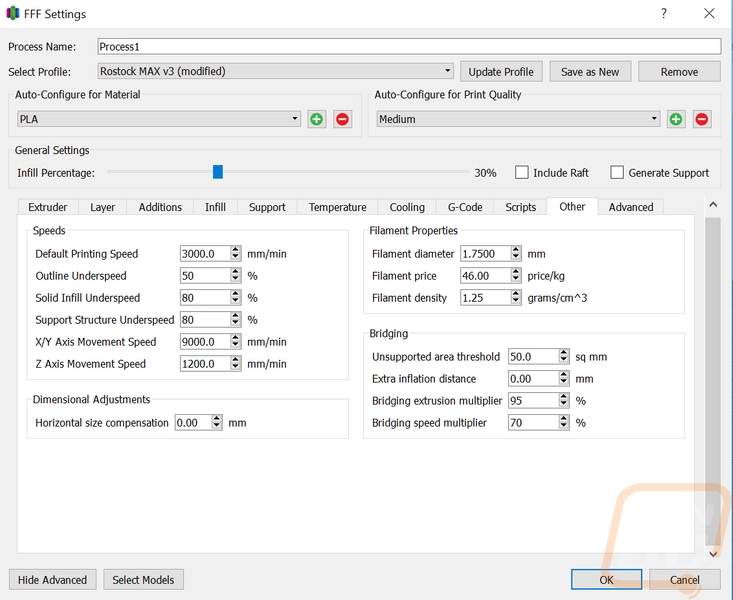
The “other” tab is where they hide away the speed configurations for your printer. Like on the other pages, half of the settings are percentage based where I would prefer to just input a speed for each setting. On top of that, the whole mm/min was a big change for me as well, I was used to MatterControl’s mm/s speeds. Converting everything over required multiplying everything by 60 then, of course, figuring out the percentages for the oddball options. They also tucked in the filament properties in here and a whole selection of bridging options.
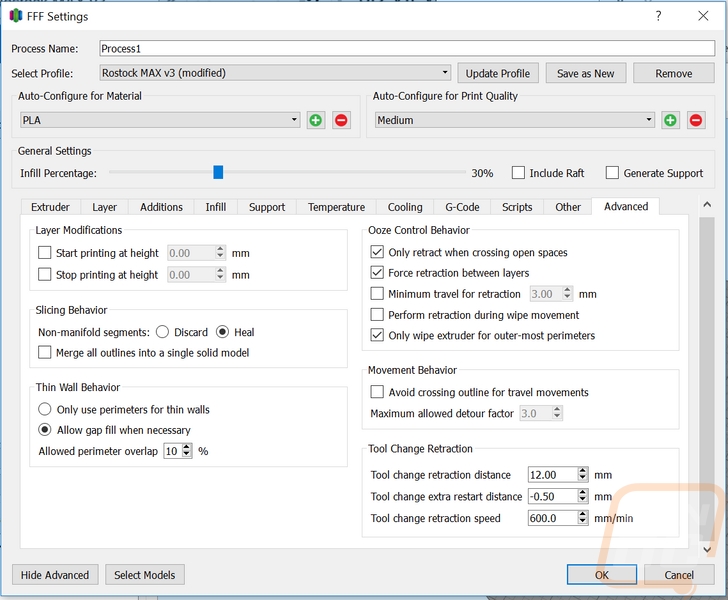
The advanced tab is really more of an “other” tab. There are options on this page for just about everything and they are all tossed in together. This is basically the junk drawer for the settings. Over half of the options are basically retraction settings and ooze control options. The rest are things like how to handle thin walls and how to handle non-manifold segments.
Features and Usability
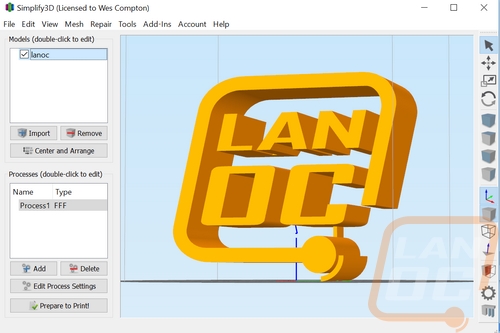
Once past getting the software setup for our printer and going through the extreme amount of options (I had to actually split it into a difference section because there were so many) we can finally get into some of the features of Simplify3D and see what set it apart from the previous software I was using. To do that I should first start off with a rundown of the overall layout when you open up the software. When you boot it up you will have an empty build plate over on the right that is shaped to match your printer. With some printers, it will even have a 3d rendering of the rest of the printer as well. On the right, you have a few controls to pick from. The first few move your view, move the print around on the printer, one will let you change the direction the print faces, and there is a scaling option. The click to scale option lets you drag the print bigger. When doing this there isn’t any information on how big you have made it but there is a place to do that and I will show it here in just a minute.
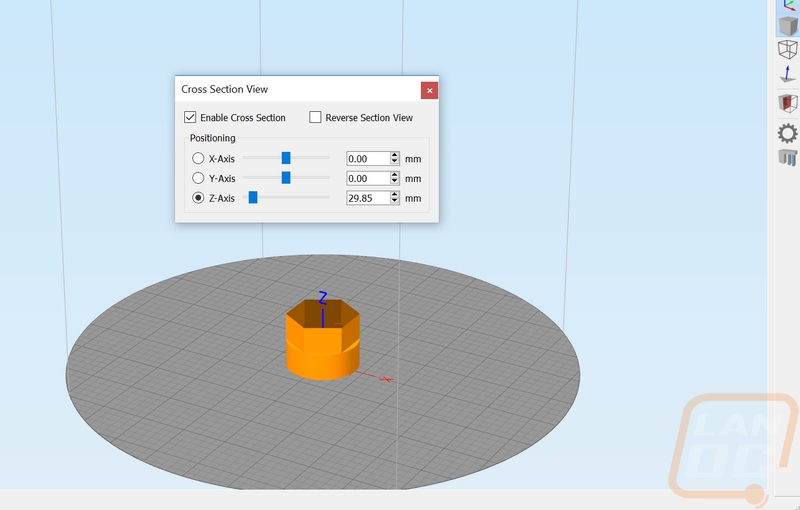
The rest of the options over on the right let you pick default viewing angles and turn on a wire framed view. There is also an option to click and cut into your print to see inside. This is perfect for checking out an internal view of a print for example.
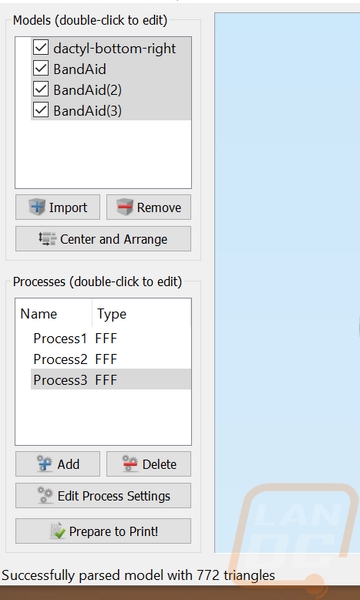
The left side of the screen has two main boxes with import and remove options on one and add and delete on the other. The top box will list all of the models on the print surface that you are working with. Down in the bottom box is the processes listing. The idea of a process was a little weird to me at first because MatterControl basically just has one and that’s it. But this is actually a powerful tool. Each process is where you configure print specific settings like infill, supports, layer heights, and everything else you see in the previous section. Most of the time you will only be working with the one process, but if you are printing multiple items, maybe you want to give one more infill or change the print speed for it. You can create additional processes and then tell the software what models to attach each process too. If that isn’t cool enough, you can also group the processes together after setting your different infill and make changes to the group that you want to apply to all of the processes.
If you need to dive into specific details for one of your models you can double click it and open up everything over on the right. This is where you can rotate your print on the build plate by angles or change scaling by actual measurements or percentages. Basically the entire view and edit part of MatterControl is all here and it’s easier to work with (not to mention faster).
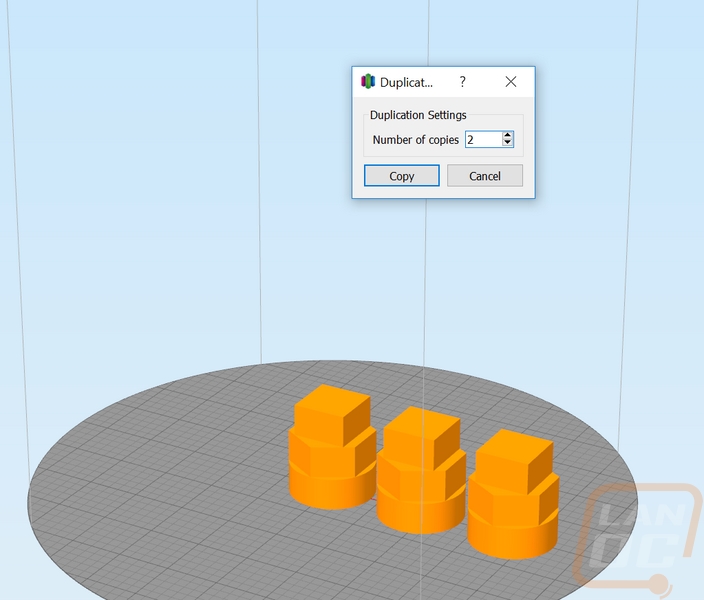
Flipping through the drop down menus I found that some of the options are already available in the buttons on the main screen like the center and arrange models option. But there were a few other things in the edit dropdown of interest. For starters, there is a scale inches to millimeters’ option that should really come in handy. If someone designs a model in inches and your printer is setup for mm when you open it up it won’t be the right size so a quick option to fix it without having to do the math is nice. The scale to maximum size is also a cool option to fill up your print space when you just want it to be as big as you can print. The duplicate model's option is nice, normally you have to copy and paste but this lets you put in a number and get multiple copies all at once.
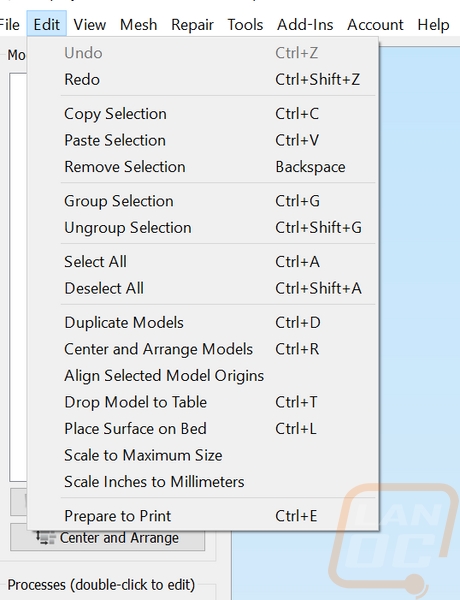
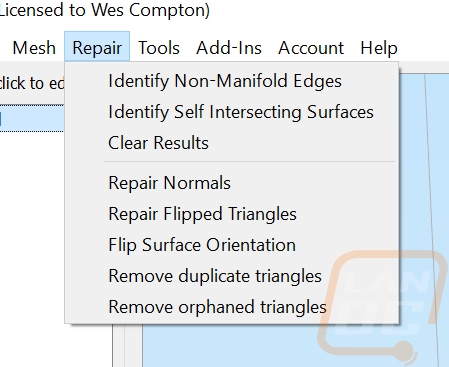
One thing I didn’t get to mess with much in my testing were the repair options. All of my designs worked fine, but it is really cool to have a list of one-click repair options to avoid having to open up Meshmixer or a similar program to repair the design. MatterControl had nothing like this.
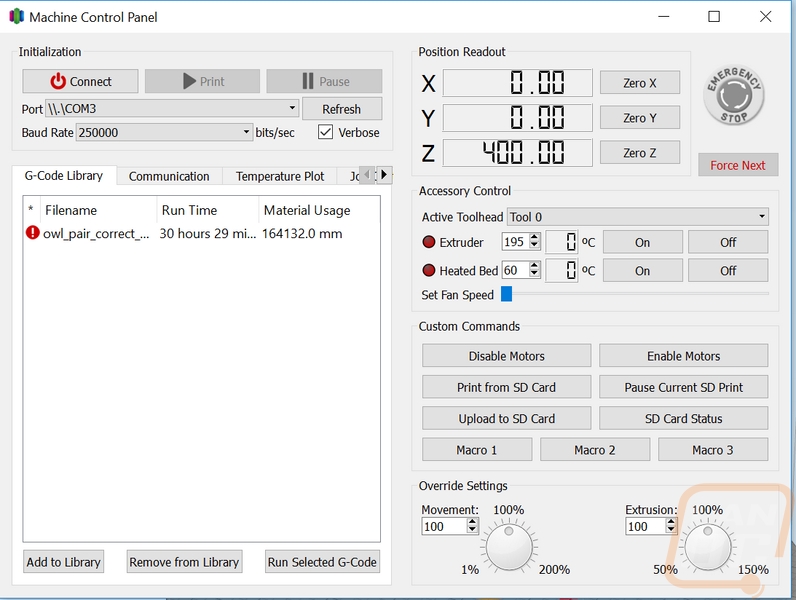
Okay, so when it comes to actually controlling your printer there aren’t any visible options right in the normal Simplify3D software. This is an area where MatterControl had better integration and you could at least see temperatures and stop and start from any page. With Simplify3D you have to open up the control panel and then from there you can get into things like turning the extruder or heatbed on or turning the steppers off to manually move something. It would be nice if you print from USB if this would automatically pop up or be better integrated into the software. That said everything you need is there as long as you know where to look to find the control panel itself.
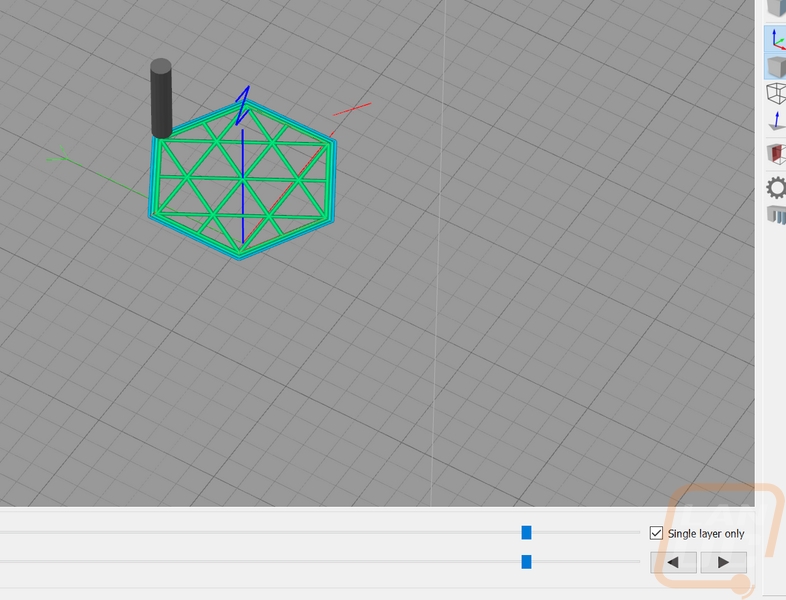
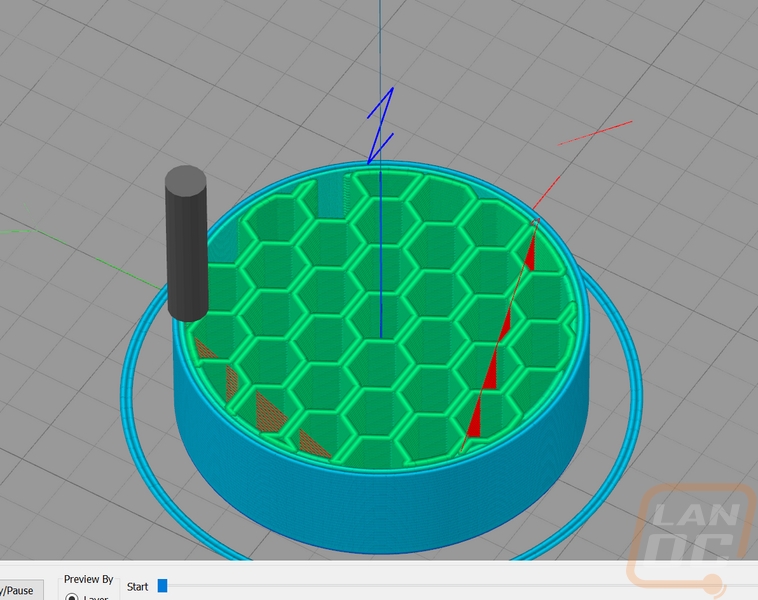
I think the biggest thing that people point out with Simplify3D that is different than all of the other programs is their support generation tool. With MatterControl, for example, you just turn supports on in the settings then you have to generate or print the file to be able to see how the supports are going to look and even then you have to turn on 3d mode to get anything close to what Simplify3D. The software has the same auto support settings but when you turn the option on it shows you right in the preview window what the supports look like. Even cooler though, you can actually go through and remove supports if you think they aren’t needed by clicking on the remove support button and then clicking on each tower. The same goes for adding your own supports. As you can see in the photo below I manually added the supports on the right and the supports on the left were generated. You can also export and import support structures if you need to only sometimes use a layout on a specific file.

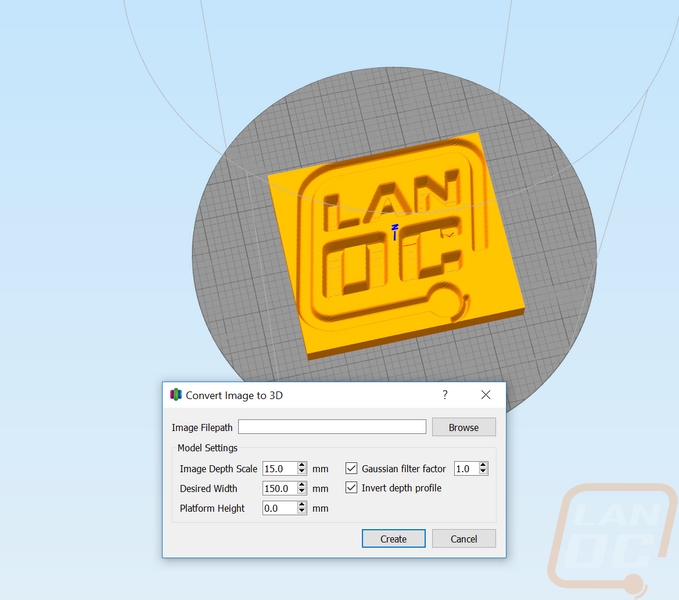
There is also a Convert Image to 3D option in the add-ins menu. I spent a little time messing with it and I will say it is most likely not what you are expecting. For example, I was hoping to be able to just import a LanOC logo and print it but even after going through the settings for a while I couldn’t get that. But what you do get is a simple option to be able to made custom 3d printed shades. You print these in a light color like white and then you can import a photo of someone and it will correctly add the photo so that when you put light behind the print you will see their picture. There are tools online to do this but this is a quicker way to do it.
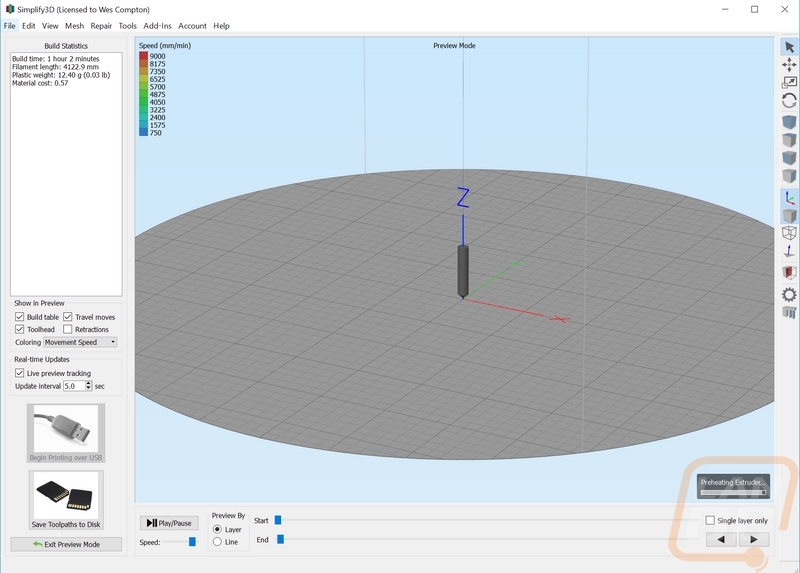
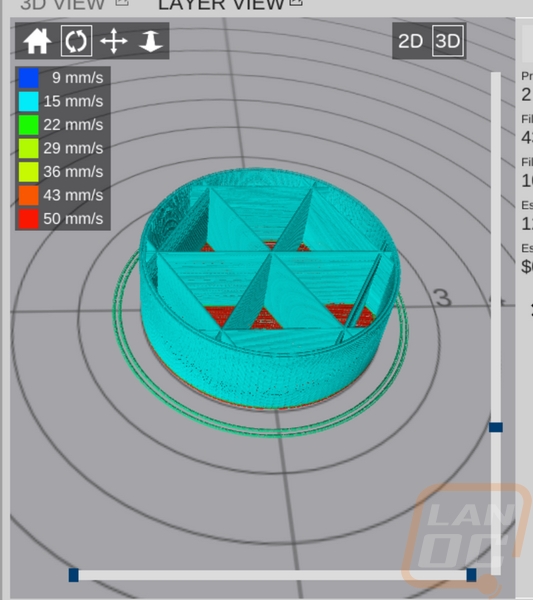
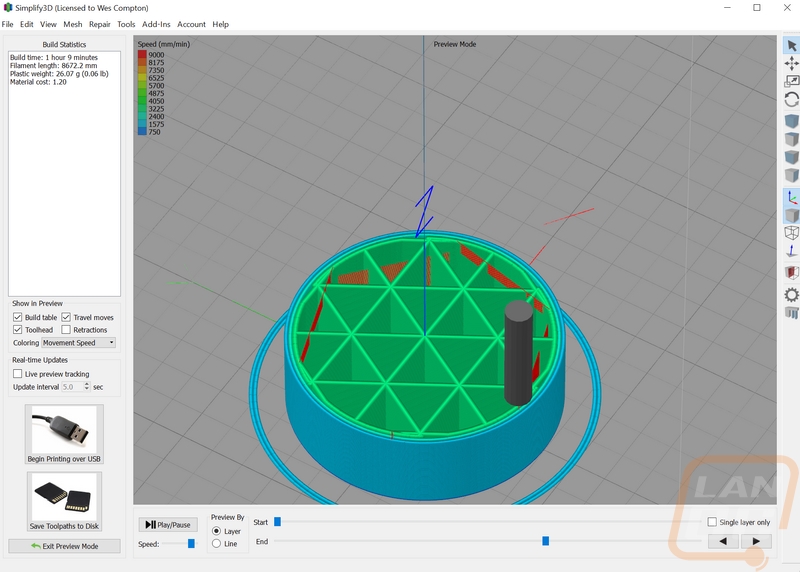
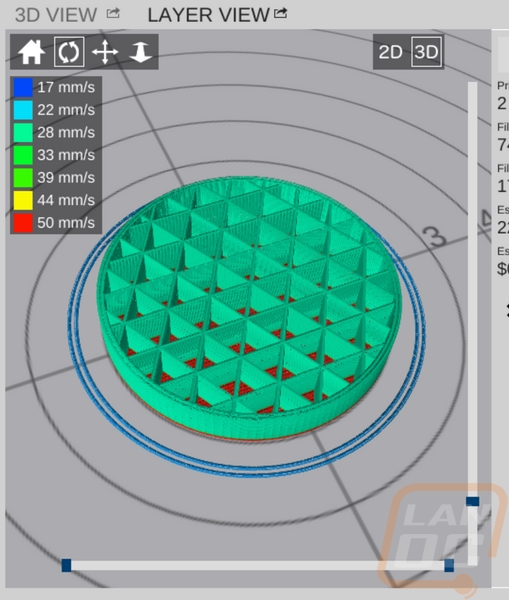
So once you know what you want to print you click the print preview mode and it opens up a page similar to before. Up in the top left corner it will let you know how long the print will take with your current settings, how much filament it will use, and if you input the correct filament costs it will even tell you exactly how much the print is costing you. The 3d preview image will show all of the movements the print needs and by default, they are color coded by speed. You can also switch to a mode that breaks down each component into what it is, so things like supports will be one color, infill another, etc. I like the movement speeds just to keep an eye out for any big slowdowns due to small areas. You can turn live preview on or off and change how often it updates. You can also play through the print at different speeds to show you how the print will go. There are also two bars down on the bottom, you can slide them to change the start and end points shown in the preview, so moving the end point will let you look to see what your infill looks like. If you prefer to look at individual layers you can do that as well with the option over on the right. Then once you are ready to go you can pick from printing over USB to the printer or save the g-code to an SD card to move to your printer. SD card is safer in case of windows updates on long prints but USB is quicker.
Performance
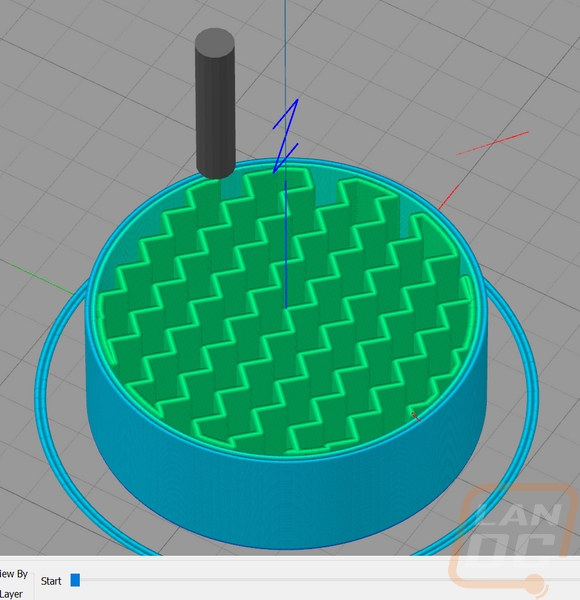
So now that we have everything setup and we have run through some of Simplify3D’s key features I started in on my actual testing. Now keep in mind I did a lot of this over a few months, but after I finished up my review of the SeeMeCNC Rostock MAX v3 last week I jumped straight into a few final tests. The first thing I wanted to talk about was infill. Both Simplify3D and MatterControl have a drop down menu of different infill patterns you can use, but I was surprised by a few of the options. In the past, I have stuck with triangular infill on just about everything I have printed with the exception of a few of the transparent prints where I toyed with honeycomb because of its aesthetics. Well with Simplify3D I was really impressed with their fast honeycomb that actually prints half of the honeycomb in one direction on one layer and then the other half on the next layer. This gives it good strength but saves print time and a lot of material as well. There is actually the option to set the number of layers skipped between infill layers on all of the types, so you can toy with it to save material. Then on top of the standard lines, squares, triangles, and honeycomb infills that both programs had Simplify3D had a weird zig-zag line infill and MatterControl had a weird cylindrical infill. Both designs don’t seem like they would do a very good job of supporting from every directly.
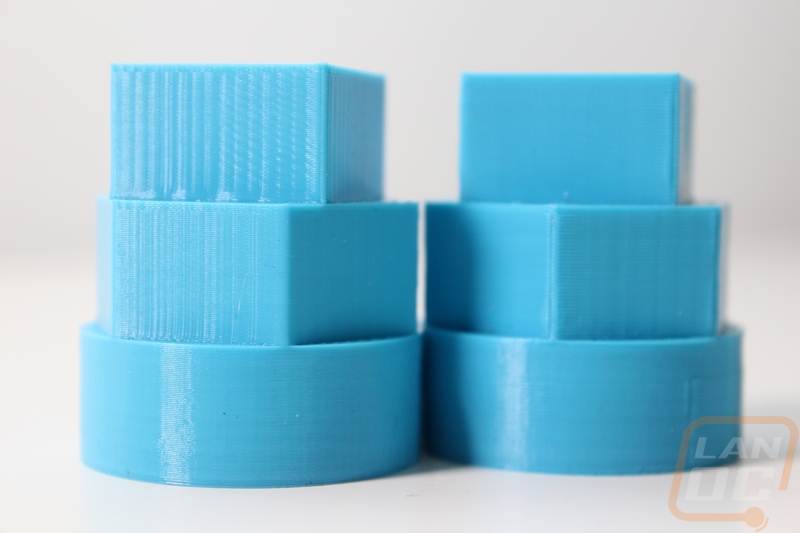
When doing my testing I noticed another weird thing with the infill as well that I felt important to point out for anyone switching from MatterControl to Simplify3D or the other way around. When setting my triangle infill to 10% like I prefer I noticed that the two programs had two different ideas of 10%. You can see from the image below, the 10% on MatterControl (second picture) has more support than Simplify3D, so make sure you are getting what you had planned.

Here is 30% infill on both as well (Simplify3D first, MatterControl is the second image)
Of course, infill is only a fraction of the software. What stood out to me the most with Simplify3D was just how quick and responsive it is. Loading models were almost instant but I was most impressed when it renders all of the supports and creates the g-code to print. In MatterControl, especially recently big files would sometimes take so long that I would tab out and wait or it would even sometimes just crash. Simplify3D, on the other hand, is instant all of the time, it’s like a completely different PC when working with it. Simplify3D also seems to be closer to its estimated print times as well, making it easier to plan around prints.
That said when going to print from USB I did notice it takes longer for Simplify3D to get my printer heated up. MatterControl will start heating up both the extruder and the heatbed but the default setting (at least for the Rostock MAX v3) is to heat each up individually.
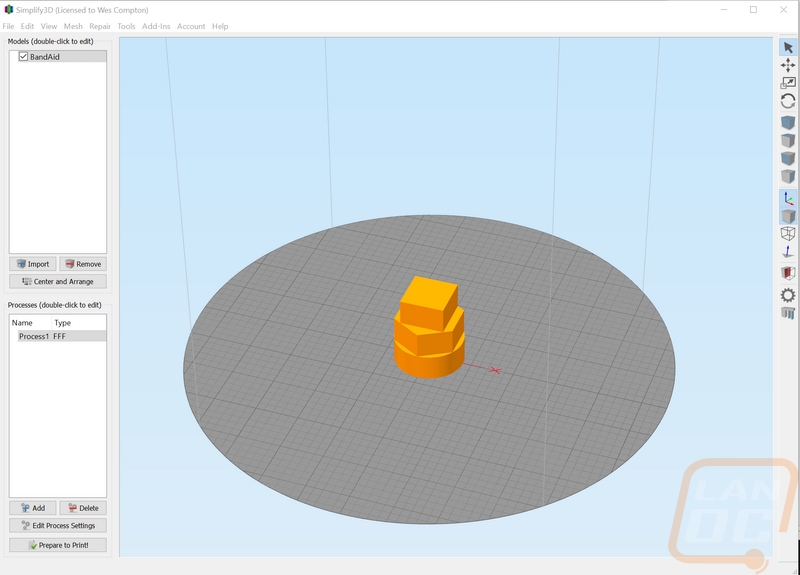
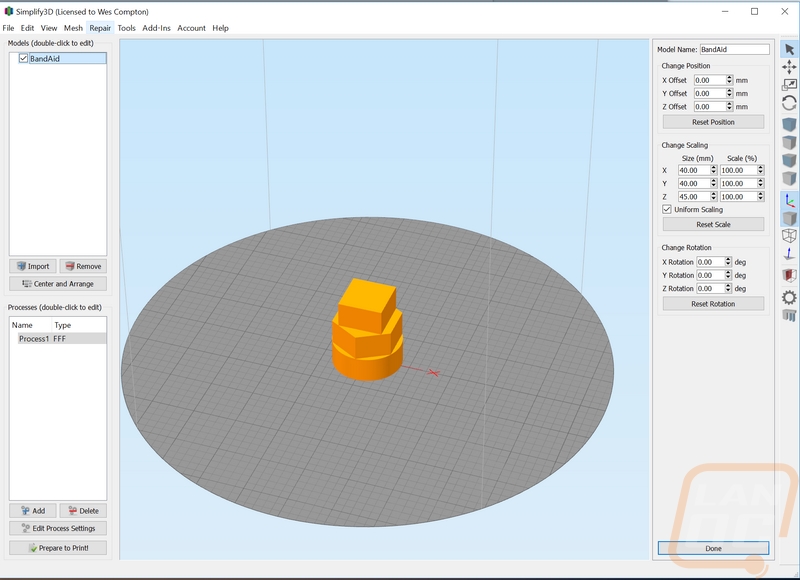
One of the big things I mentioned in my Rostock MAX v3 review was the vertical banding I see on prints with the delta printer. Part of the issue is the controller, but I also know that depending on what slicer you go with you will see different results as well. With MatterControl you can pick from a drop down list of slicers but I normally would use MatterSlice because it performed best for me. With Simplify3D they use their own slicer and I had heard good things about its print quality so I setup a print test to see how they compared with the vertical banding in mind. I printed the “Bandaid” print that is shared on the SeeMeCNC forums for slicer testing and here are the results. The model on the left is MatterControl and on the right is Simplify3D. Now the new slicer wasn’t the end all be all, I do still have banding but there is a noticeable difference with both running at the same print speeds on the same model.
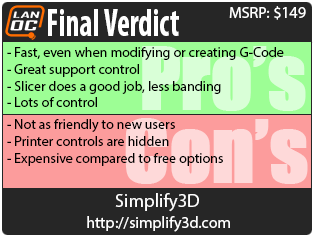
Overall and Final Verdict
So at the end of the day, Simplify3D answered a bunch of questions but also left me with a few more. Going in, I had heard good things about the software but wasn’t really sure what to expect. MatterControl had basically been my only interaction with 3d printers and I was really comfortable with it. That said there were night and day differences between the two programs. The speed and smoothness of Simplify3D being the main one. I was able to make changes and modify things right in the software when MatterControl had a pop program that required you to save the file then go back and open it back up in the software. Things, like rendering the 3D models and creating the G-Code to print, were instant on Simplify3D where it would sometimes take 5-10 minutes on a big file for MatterControl. But I was also impressed with the additional controls for supports, being able to add or remove them on the fly, and also being able to see them without generating the G-Code. Then of course with the level of options in the settings pages, I found out I could have even more control over my prints. But it was the slicer performance that improved the vertical banding that made me the happiest.
All of that control did, however, come at a price. Simplify3D isn’t the easiest for a new user to jump in and use. While they do have a quick setup for most printers and a basic mode as well, just navigating the settings menus didn’t seem to live up to the standard of the rest of the software. Especially when dealing with print speeds where a lot of the settings are based on percentages that will have you flipping back and forth between pages. The integration with the printer controls was also a little lacking. If you print from the software you have to go through the menus and find the printer controls to check your temperatures or to even stop the print at all.
All in all the software is great, though, even the navigation issues stop being an issue after you use the software for a while. However, at the end of the day, I did have to do a little extra reflecting to figure out if I felt the software was worth the month. You see, with the price at $149, Simplify3D hits you in the wallet a little when you pick it up. This is especially true when you consider that most of its competition are free programs. Now I don’t think buying your software is bad at all, in fact for businesses especially its important to be able to rely on actual support and that is part of what you are paying for. I would just prefer the software to be a bit easier to use if I’m spending that much on it. Looking back I could still be happy with the free software, but you do get your money’s worth with Simplify3D. Especially if you are running multiple brands of printers, having a consistent program to use across all of your machines is a big plus. So for the hobbyist users out there wondering if you should switch If you have the extra money you will enjoy it. If you have to decide on filament or software, I would wait and consider it later on.