I don’t think there is anything in PC hardware that I like more than when the community creates their own products. You mostly see it in the more hardcore enthusiast markets because there isn’t as big of a market for companies to throw money at but the interest is there. So with things like keyboards, Small Form Factor builds, and overclocking we have seen over the years the community as a whole put input into a design and someone or a small group step up and produce and evolve that product. Often those designs are on a different level in build quality and often extremely expensive as well. For the overclocking market, with this, there have been overclockers making their own pots, ways to delid CPUs, and even mounts to run CPUs without their heatspreader for better temps. Well, the Open Benchtable has that same history. It started with HWBOT and OverClocking-TV and later Streacom joined in for the production side of things. Well Streacom, after talking with Open Benchtable, sent over their BC1. On its surface, it is a test bench, but it is a unique take on one that I have been excited to check out and today's the day. Let’s take a look!
Product Name: BC1 Open Benchtable
Review Sample Provided by: Streacom
Written by: Wes Compton
Amazon Affiliate Link: HERE
|
Specifications |
|
|
Motherboard compatibility |
XL-ATX, E-ATX, ATX, Micro ATX, Mini ATX, Mini ITX |
|
Motherboard standoffs height |
25 mm |
|
Rubber feet |
Yes |
|
Compatibility with fans or radiators (via brackets) |
240 mm, 140 mm, 120 mm, 92 mm, 80 mm |
|
Storage drive support |
Yes (up to 2x drives) – 2.5″ and 3.5″ |
|
Psu support |
Yes, ATX 12V / BTX, ATX large and ATX-EPS |
|
Psu weight |
Maximum 10 kg |
|
Bracket design |
New generation |
|
Load capacity |
25 kg per table / 5 kg spread on two brackets |
|
Material – table |
100% AL5052 Aluminum (heavy duty) |
|
Table finish |
Sandblasted 80 grain, “white matt”, “black”, “red” anodizing |
|
Material – screws |
100% SS304 Steel |
|
Inventory |
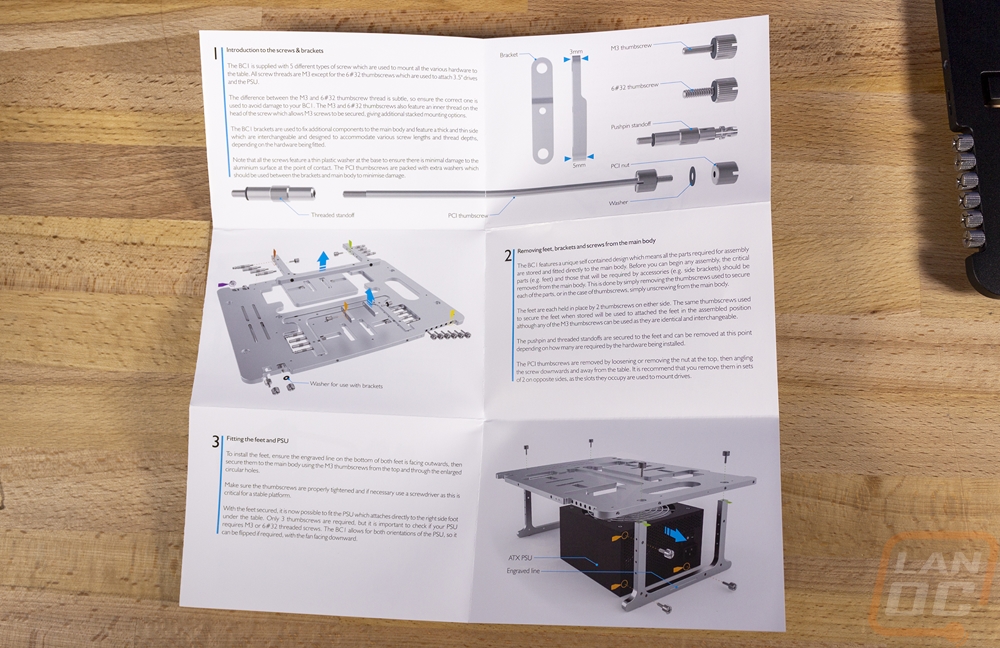
1x Manual 14x M3 thumbcrews 6x 6#32 thumbcrews 8x Standoffs 8x Pushpin standoffs 4x PCIe thumbscrews 4x AiO / Fan brackets 1x Traveller protection sleeve |
Packaging
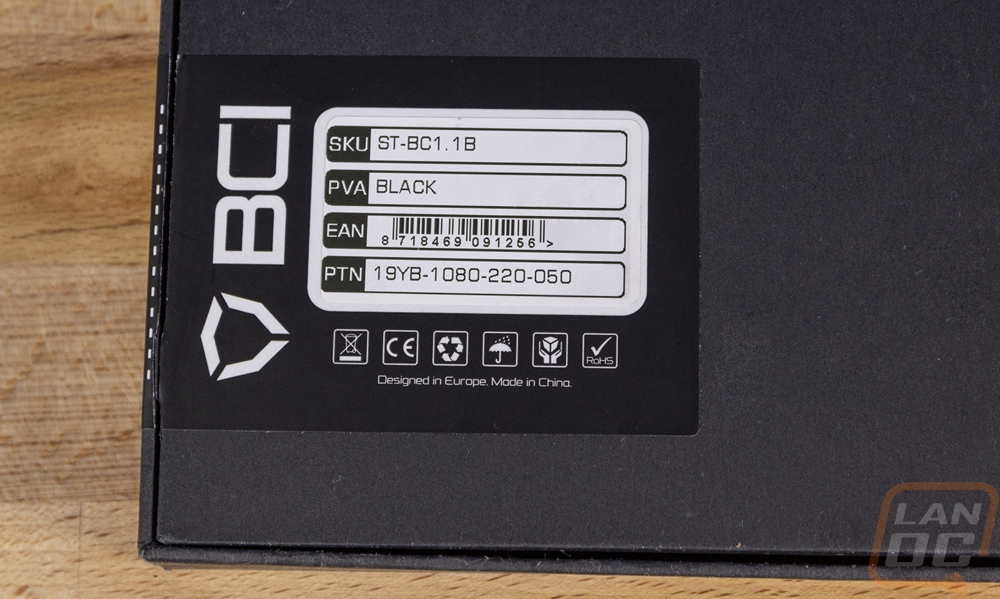
The Open Benchtables best feature is that it breaks down flat and that also ends up being a huge help when it comes to the packaging because the box doesn’t have to be big or complicated. It’s like a box you would get an important plaque in. All blacked out except for the BC1 and OpenBenchtable on the front with a chrome finish. Ours did come in with one corner banged up but it protected the benchtable perfectly. Around back it is black as well but there are three stickers. Two just have instructions to cut to open and then the third has all of the important information. This includes the SKU and UPC as well as the color of our table which happens to be black. The BC1 name is there and the logo is a Streacom logo.
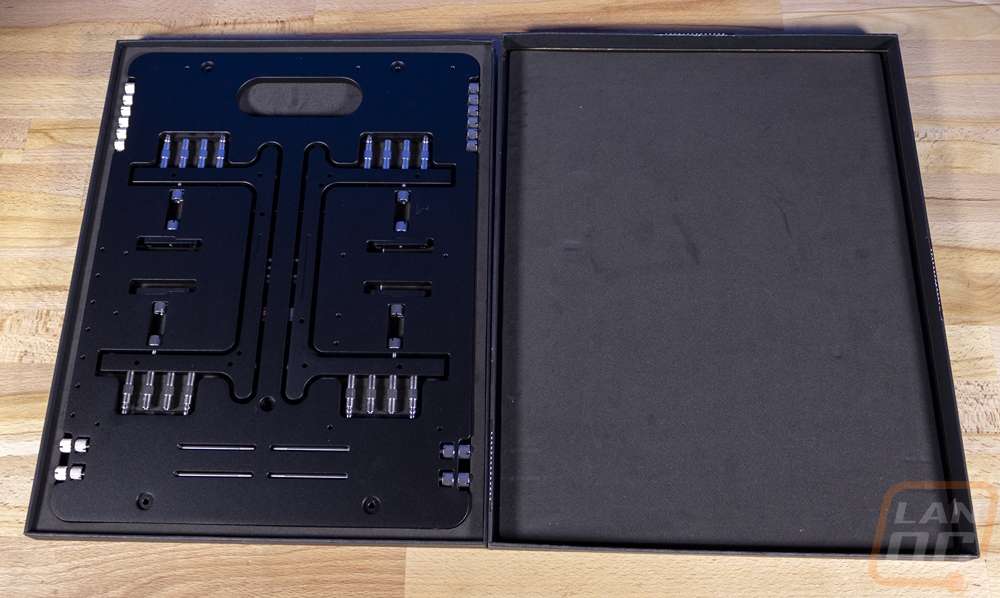
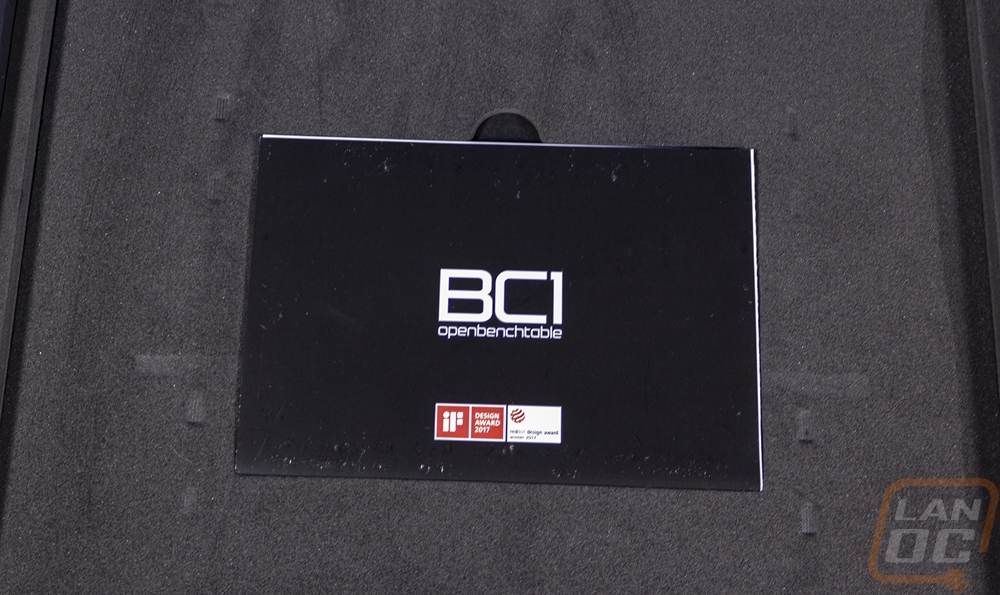
Once you break the seals you can pull the top of the box off and inside you find the Open Benchtable with foam on the top and bottom to keep it from moving around. After you pull it out, they also have a small instruction manual tucked up under the bench in its own cutout. The instructions are a two-sided color printed paper that breaks down each of the components and their uses.
Photos and Features
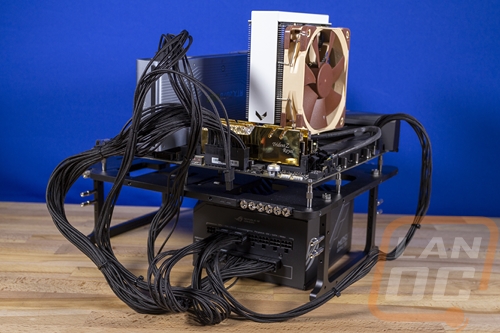
Unlike a typical case or testbench, the Open Benchtable’s biggest and best feature is that it comes flat packed. But this isn’t flat packed like a CaseLabs case came in, no it is designed to ship flat so you can break it back down to flat again in the future for storage and transportation. This might seem crazy for anyone who has their PC setup at their desk and has never taken it anywhere but when it comes to testing and overclocking often you don’t have things set up ALL of the time. A lot of tech events like tradeshows, press events, and sometimes even a LAN or two have had overclockers there showing off what can be done on that companies hardware. Same for reviewers like myself, I sometimes have one bench setup but around a big launch, I may have multiple all setup. Being able to pack the bench away nearly in an envelope is huge for space.
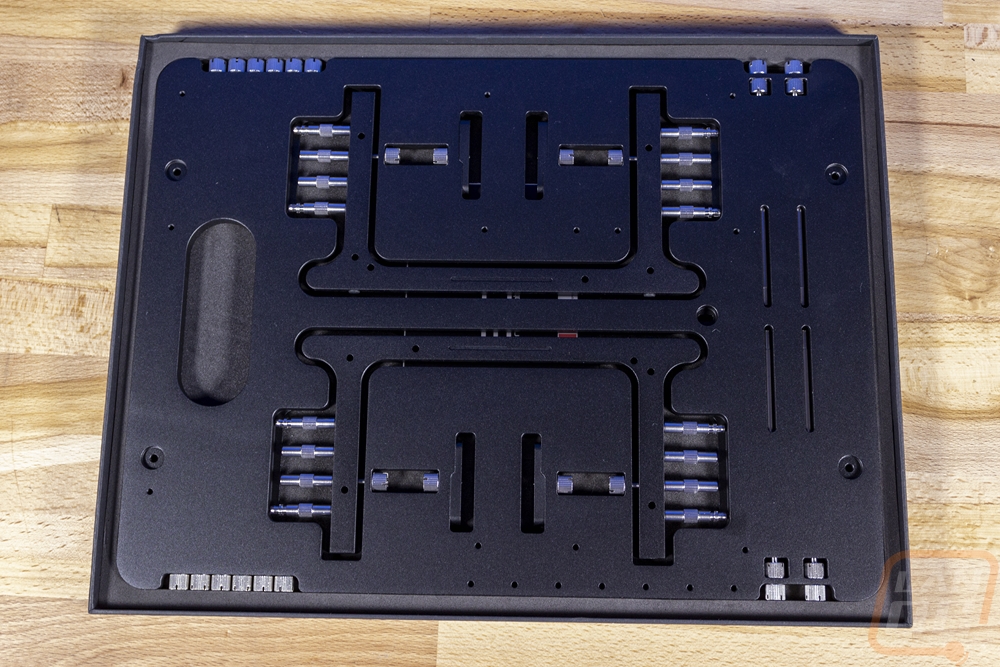
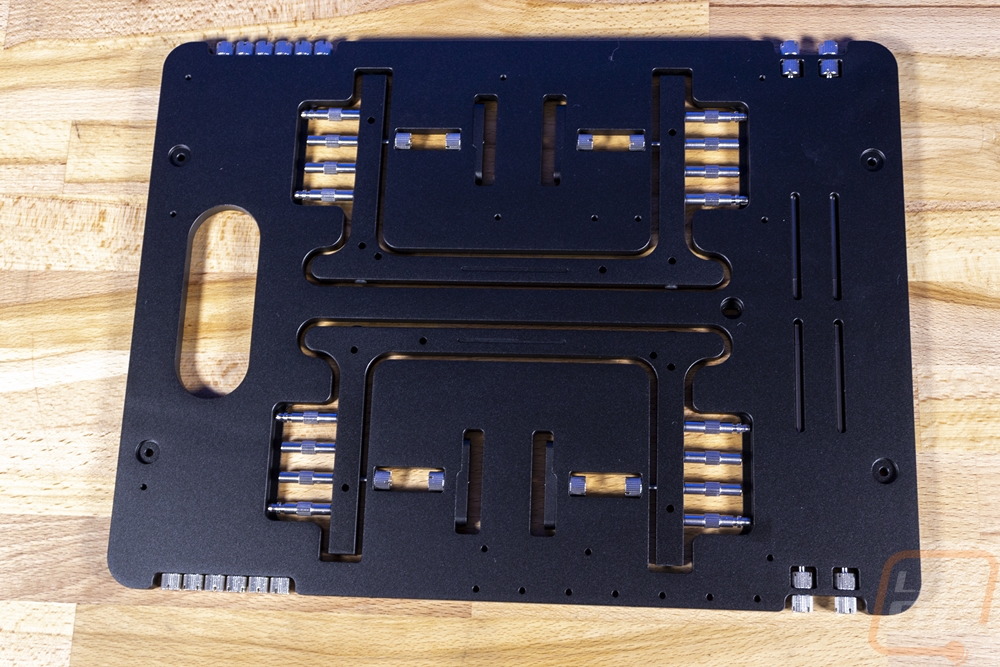
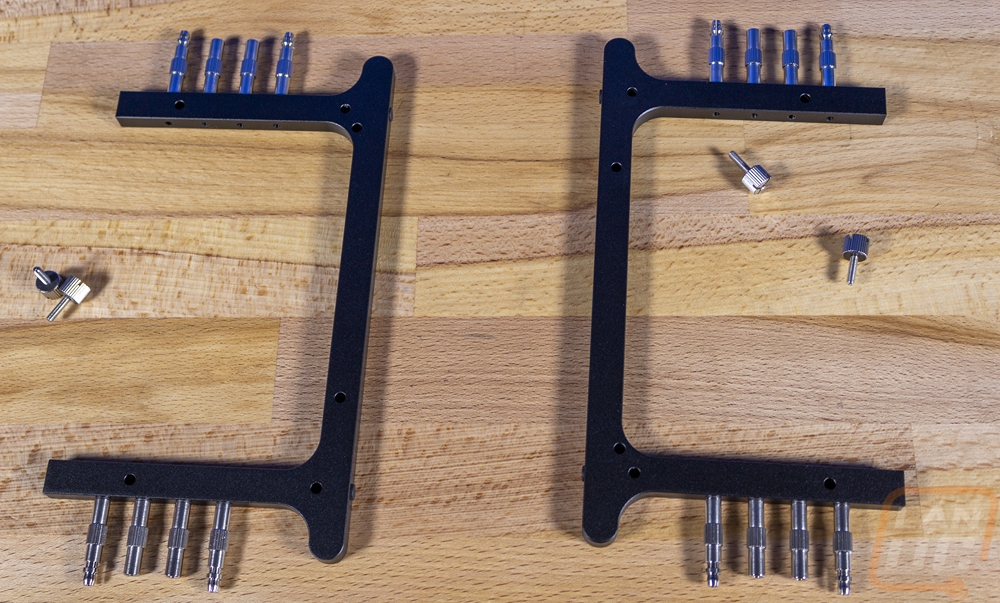
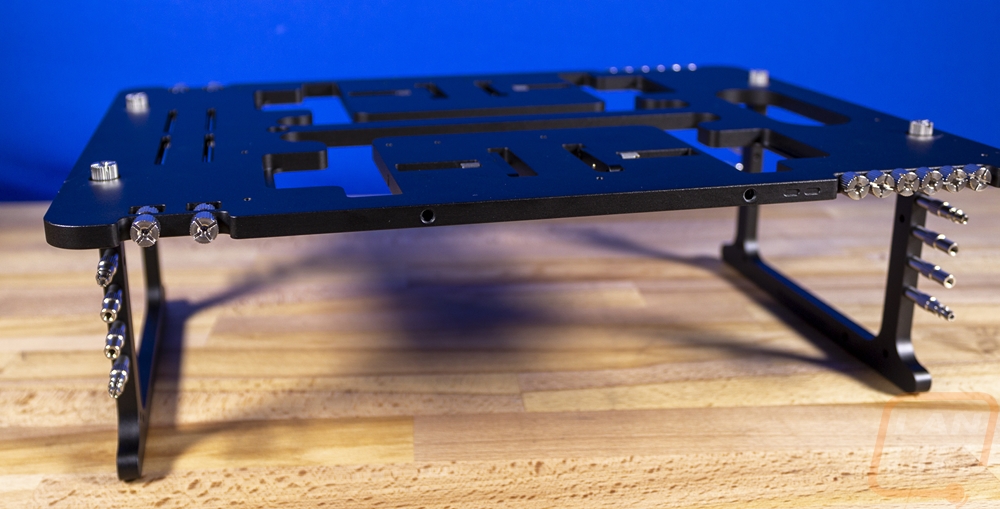
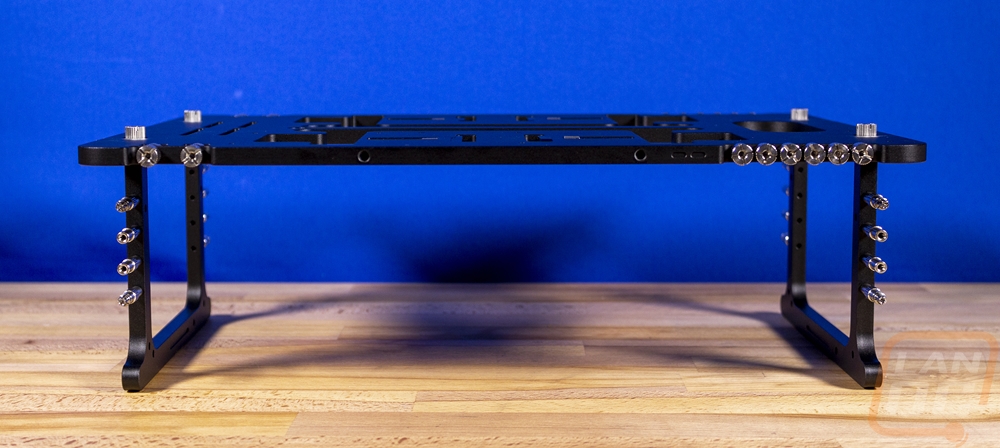
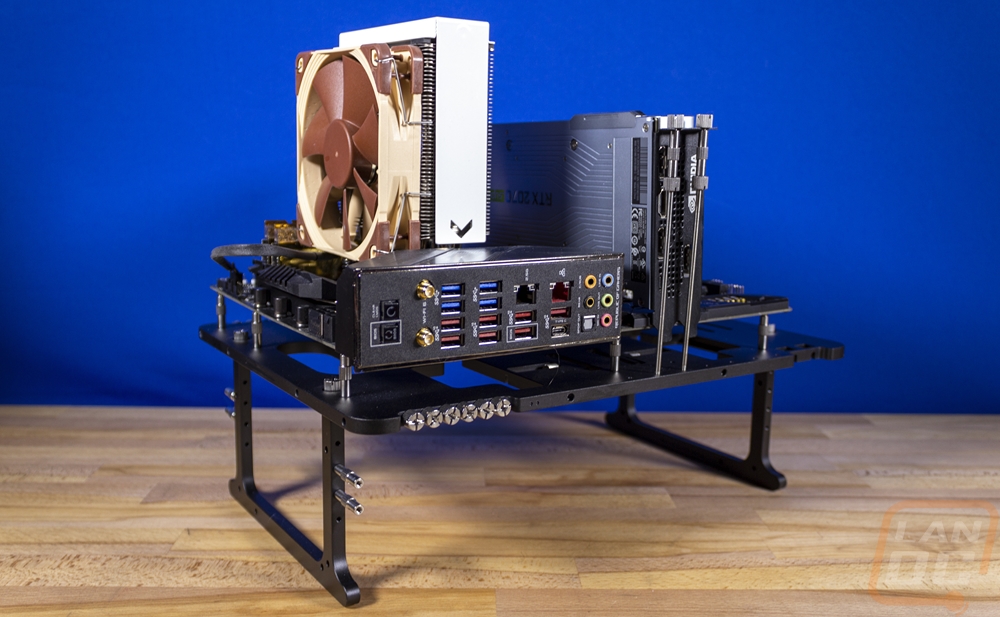
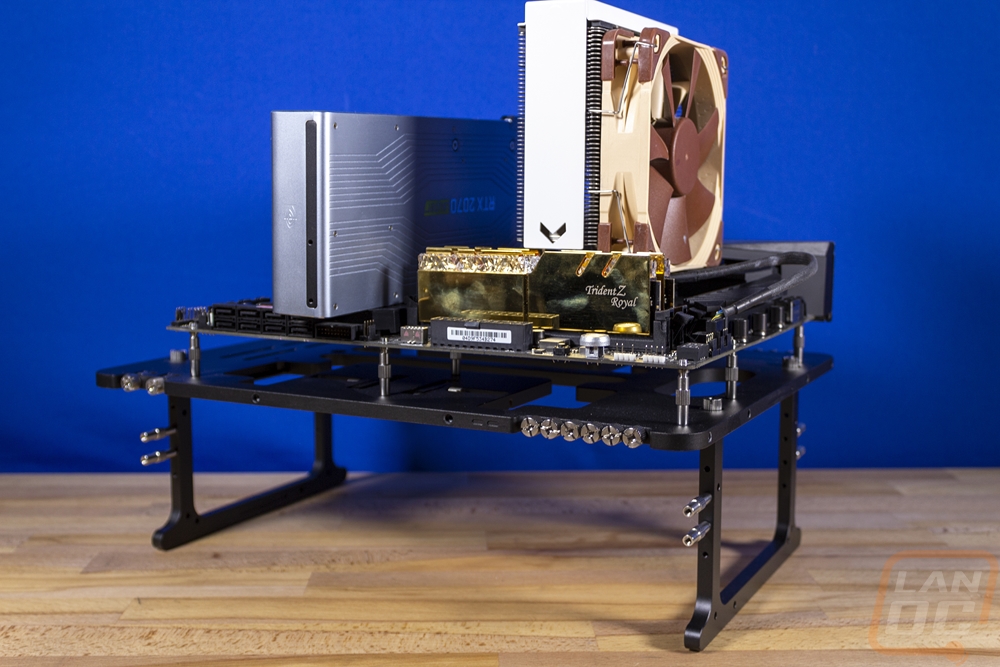
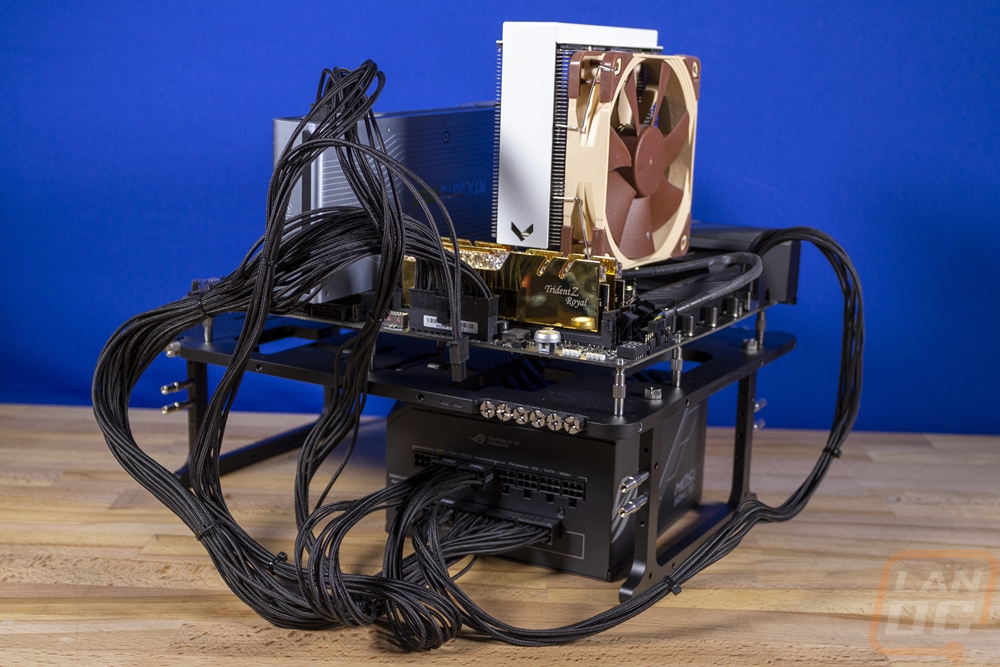
So the BC1 is machined out of AL5052 aluminum which has a lot of magnesium and is extremely heavy duty and is just a hair more than 8mm thick. It is 260mm wide and 370mm long as well which for us Americans is 14.56 inches long and 10.2 inches wide and .31 of an inch thick. You can get the BC1 in a natural aluminum or they have both black and red anodized finishes. The black is what we have here but the red looks amazing as well. The design has a large cutout for a carrying handle and then cutouts near the center to fit both of the U shaped legs. Each of the legs is held in place with two thumbscrews which are also what you use to attach the legs to the main plate. The legs also come with all of the motherboard standoffs as well as the standoffs for the PCI brackets as well.

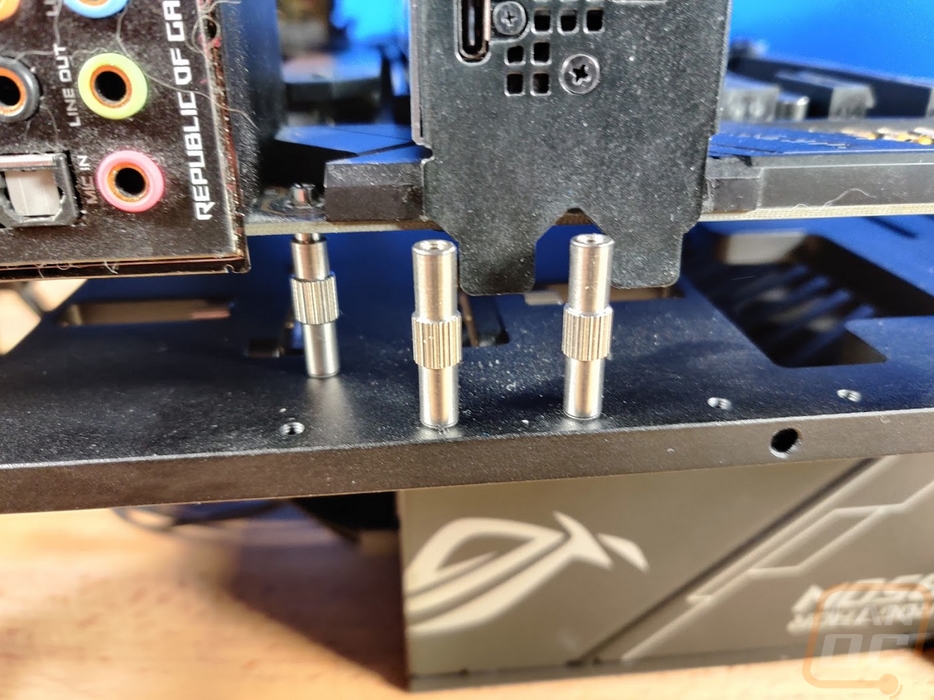
Once you pull the four thumbscrews out this is what you end up with. Two sets of legs and four thumbscrews to install the legs with. This is a better look at all of the standoffs as well. The longer standoffs are what they call a pushpin standoff and they have a design that you can push a motherboard down in to and lock in place. The other half are more of a traditional style that you can also use which lets you use the included thumbscrews to mount a motherboard more permanently.
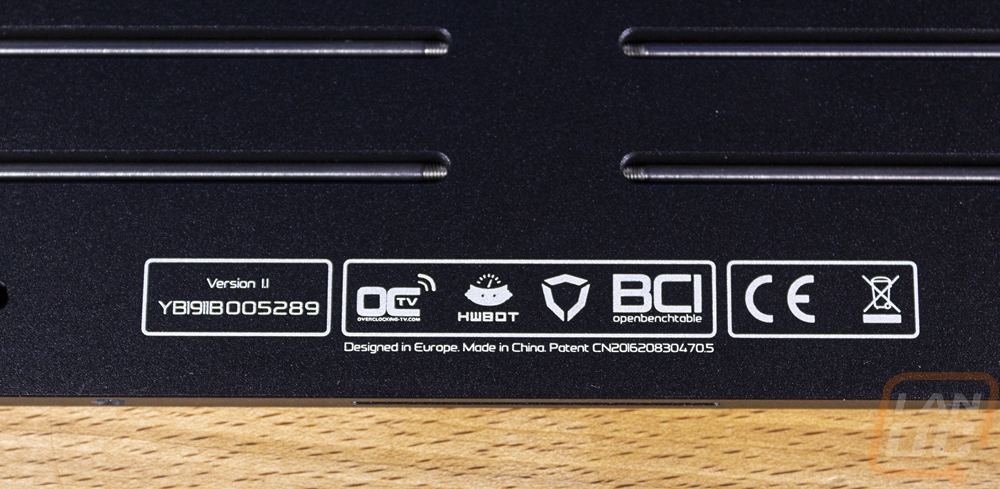
I think one of the best parts about the Open Benchtable is its limited branding. I feel like if a lot of today's companies made this, they would have their brand on it all over the place. But you can find only one spot with information at all. At the end on the underside, they have the Overclocking TV, HWBOT, Streacom, and Openbenchtable.com branding along with their patent number and a version number (ours is a 1.1) and a serial number that I initially thought might be a stardate or something.
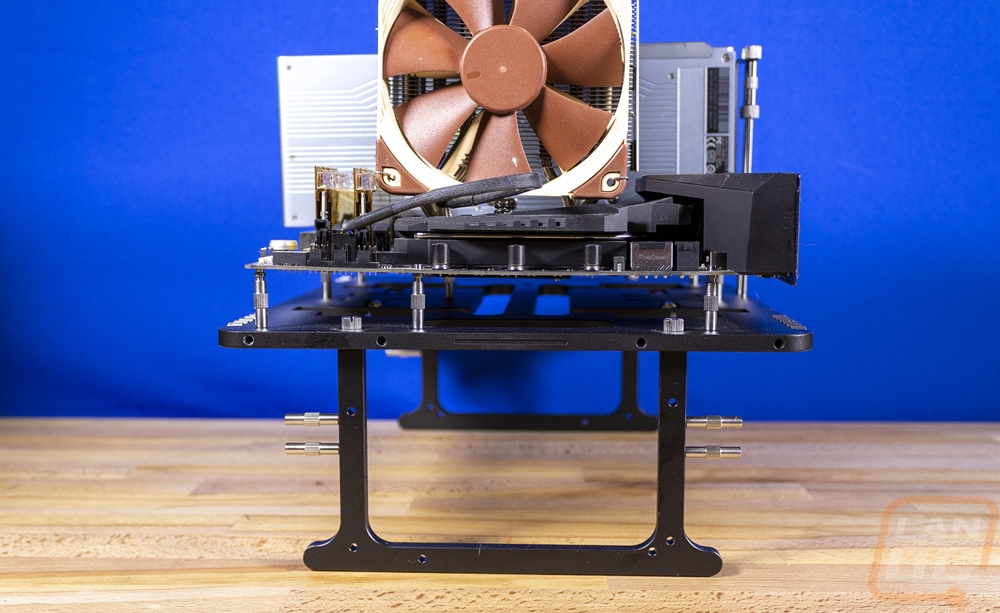
The side profile helps put the overall thickness into perspective. You can also see four mounting holes that can be used with included mounts to install fans or even an AIO cooler.
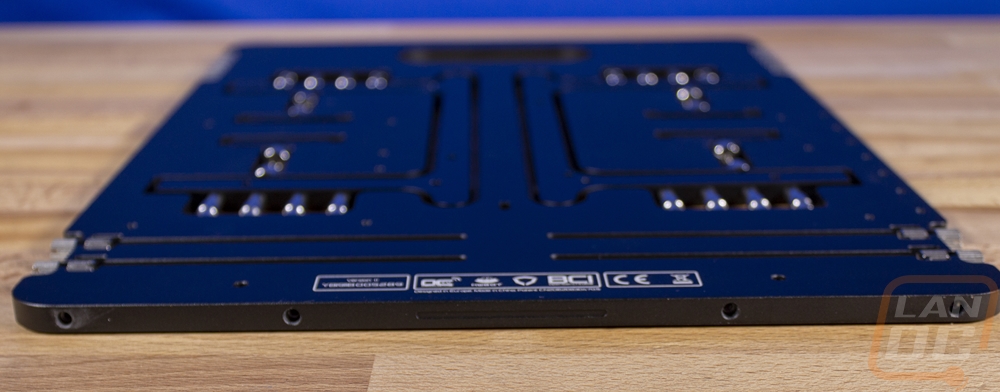
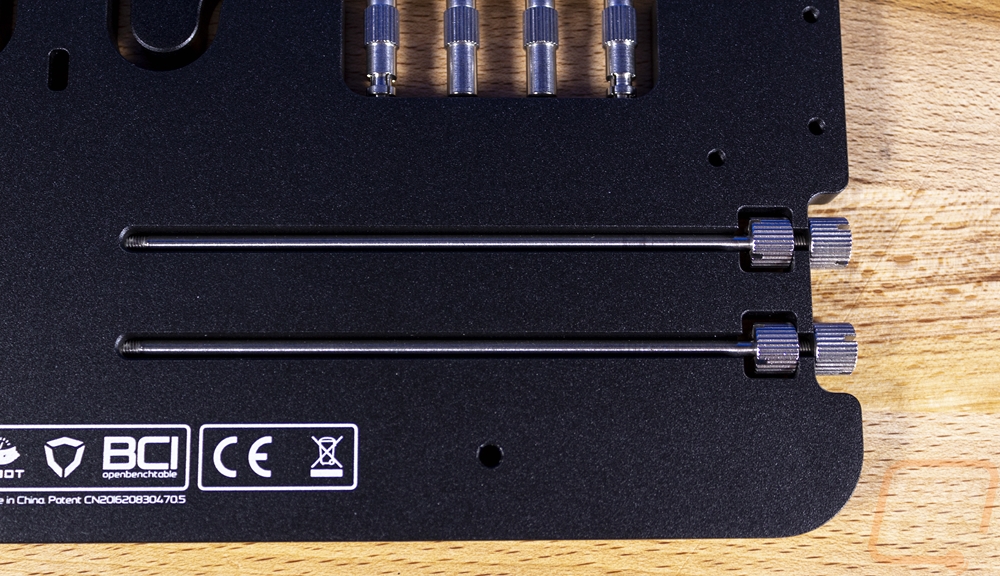
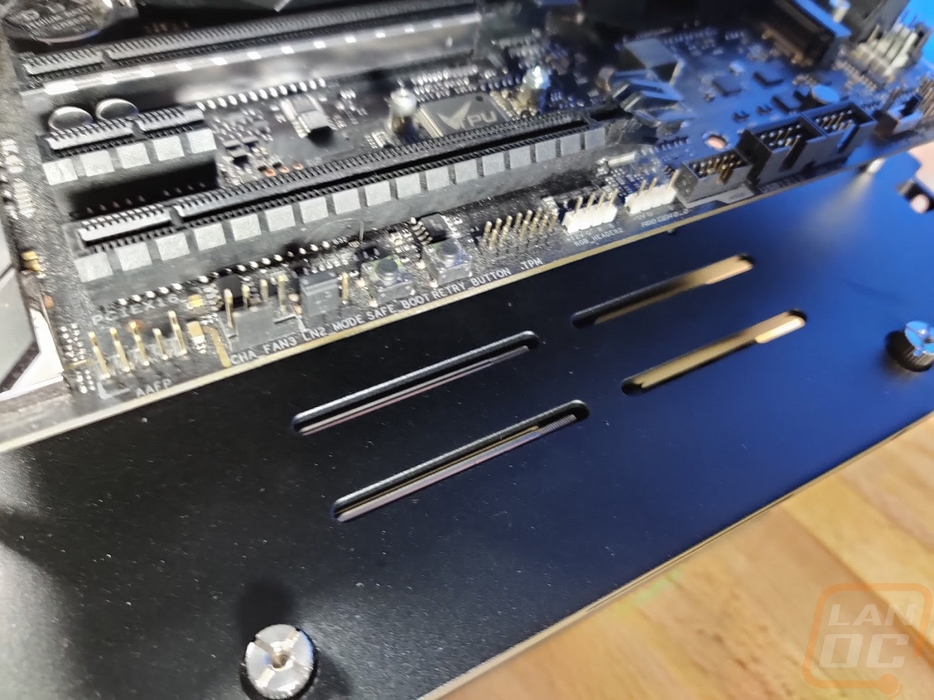
Just above the one branding location, they have tucked away four threaded rods which are the mounts for your PCI devices. They are held in place with the same thumbscrews that would also hold your devices in place as well. This makes things simple and you don’t need to track down specific thumbscrews. Which is important because these are unique only to this. They are a thumbnut (boy that sounds weird to say). The rod just lays over top of a lip on one end and then is locked in with the nut.
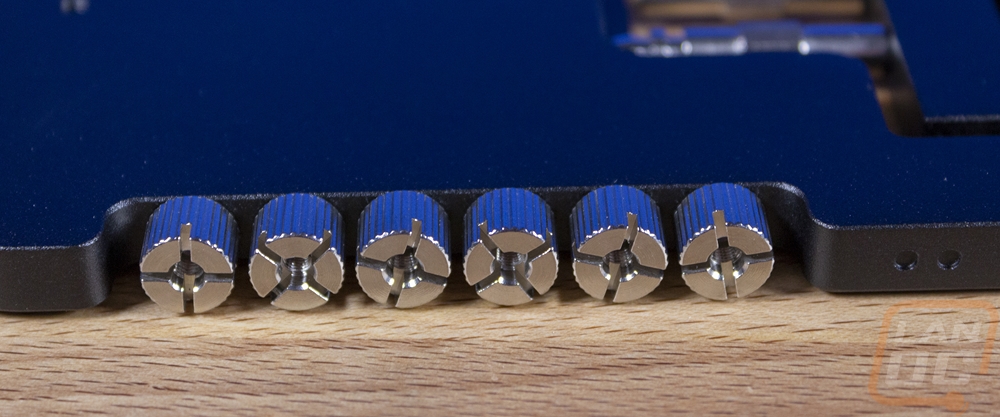
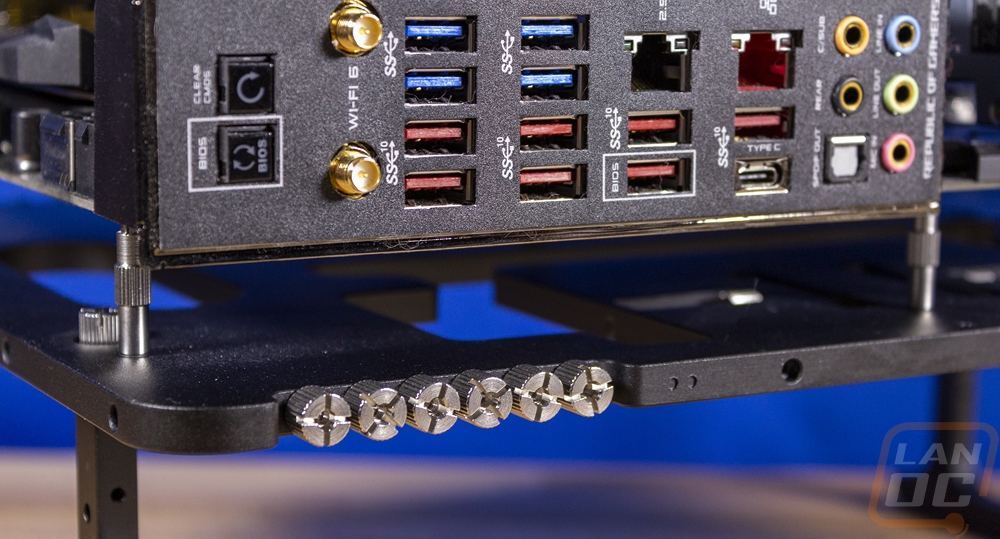
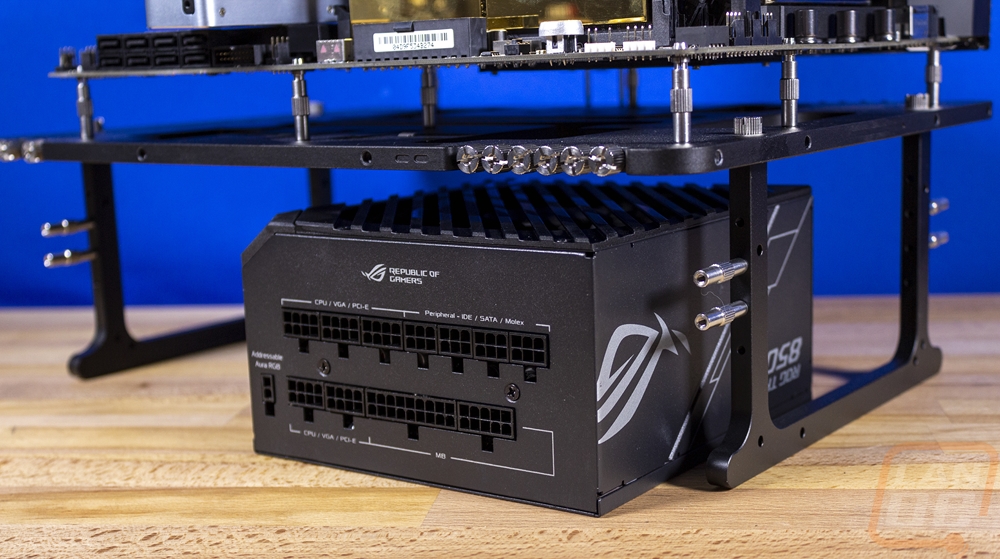
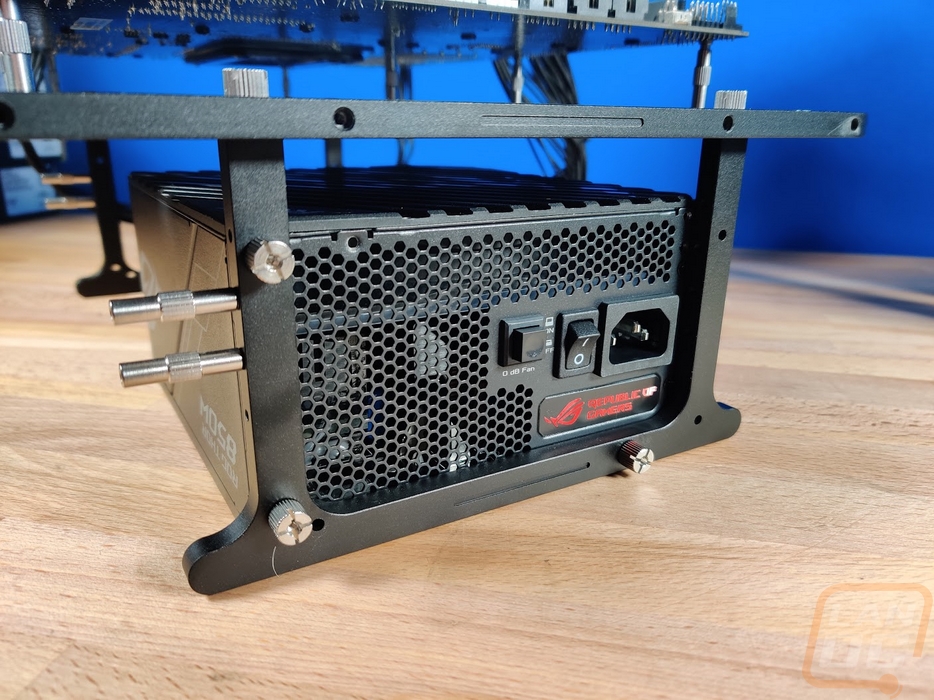
Both sides of the BC1 have a set of six thumbscrews all together. One side is filled with the M3 threaded thumbscrews and the other has 6#32’s. The 6#32 are for installing your power supply and both 2.5 and 3.5 inch hard drives and SSDs. The M3’s are for everything else. They all also have an M3 thread inside of the top which can open up other mounting options.
Here is a look at the BC1 setup with just the legs attached. There is an engraved line on both legs that needs to be facing out. I didn’t do that initially, but it is important for being able to install your power supply. If I were following the instructions, not only would I know that but I would also be installing the PSU first and would catch the issue right away. Not all the way at the end like I did. Now I have had a lot of different test benches and they have all had different unique designs but they don’t get much more compact than the BC1. At least with the bare setup. One could argue that the standoffs are a little tall. But I love that the base frame is just two sets of legs attached to a heavy-duty plate.
Because I will most likely be swapping hardware out I opted to use the pushpin standoffs. They install easily because of the grip on their sides. From there you just have to drop your board down on to the bench. They do have mounting options for ITX, mATX, and full ATX, and because the design is open larger eATX boards are also supported as well. You do want to make sure you push down on the pin. You can see in the picture below how I didn’t have one installed and how it bends up on the board.

The whole setup for the PCI brackets initially through me for a loop. Again because I didn’t read the instructions like I normally do. But I installed the rods right into the bench and fought with them because they wanted to cross thread or so I thought. I even managed to get it to work as you will see in pictures farther down. But I soon realized that the correct way is to install the M3 threaded standoffs and to thread the rods down into that. Like I said before I think the standoffs as a whole are a little tall and because of that, they do have to do this weird solution for these. Its not the only test bench that I have used that uses the rods for PCI brackets and they are never perfect. But they do support your devices if needed. I would almost prefer two rods and one machined plate for the top.

The PCI bracket rods are actually really integral in the overall design though. You don’t realize it at first, but the slots that they mount in also end up doubling as hard drive and SSD mounts. They hang the drives from their side. This is cool and eliminates the need for any extra brackets or cages which makes the flat-pack design possible.
So like I mentioned before there are mounting holes on the outside edge. They are on all four sides in fact and this is because the Open Benchtable has flexibility with the four included brackets to allow you to mount fans to blow across the bench or to integrate a full AIO cooler.
Honestly a lot of test benches that I have used just have an area for your PSU down at the bottom. Some even just include a foam pad and hope nothing moves around. I was expecting the Open Benchtable to be similar. In fact, I even initially tossed it up under the bench when I wired everything. Then after looking I realized there were mounting holes in the legs. Of course, my initial build had the lags flipped around and the holes wouldn’t line up. But once I worked past that (seriously just put the etched lines out) you can mount a power supply in the bottom with three included thumbscrews that lock it in place well. The simple shape of the legs doesn’t get in the way of any ventilation or block the power plug or switch. You do want to mount the fan up, so for some PSUs that does mean the side graphics will be upside down including the LED readout on the side of this Thor PSU. But airflow is important and this allows for that to happen.
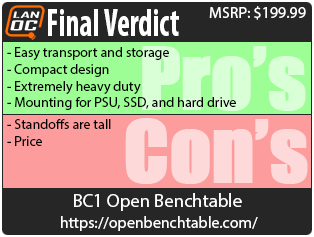
Overall and Final Verdict
Like I said at the start, I love community designed products, and the collaboration that has created the BC1 Open Benchtable is amazing. This is another example of a need that just wasn’t getting filled and people going out of their way to create it. In fact, even beyond the Open Benchtable itself, the community has also created 3D printable designs to expand on the original design. Even going as far as to make it harder for Linus to drop things and to allow for a horizontal 350 radiator mount. All of that just expands on the base design which is impressive in its own right. I honestly would have never thought to create a test bench that can be broken down into a flat panel with a handle on it. This is perfect for transportation and especially for storage when an open bench isn’t needed. I can imagine repair businesses having a few tucked away for when things get busy, overclockers as well, and of course reviewers. I know personally, I keep our GPU/storage testbench up all of the time and have another that I swap things out on. Swapping to this can open up more space in the office in between launches.
But even if you use it all of the time. The design is a lot nicer than a lot of the other benches due to its compact design. It isn’t tall, they have the design just slightly taller than a PSU with the exception of the motherboard standoffs which could be shorter. It isn’t much larger than a normal ATX motherboard as well but it does still have the ability to attach fans or a radiator. Even having the PSU mounted isn’t something that every testbench has. Even with the small design, they did still slip in two mounts for an SSD or hard drive. I was also impressed with how heavy duty the open benchtable is as well, most other designs use sheet metal or even plastic and this is a thick AL5052 aluminum and they use proper stainless steel for the standoffs and screws. My only complaint about the design was with the standoffs and that is a very small complaint. The rest of my issues all stemmed from me not reading the instructions on my first use.
The price for the Open Benchtable. Well, it isn’t cheap lol. It will run you $199 for the black or red versions. You can save a little with the silver model which is $189. But overall this isn’t a cheap product. But being made out of AL5052 and being billet, especially at that size is expensive. I still consider it a con but I do understand why the price is that high. One thing is for sure, you aren’t going to break it short of cross-threading something.