Those of you who come around often, will have most likely figured out that I have a thing for small form factor PCs. I have been building small PCs with big video cards for years, even before Mini-ITX became the norm. Trying to pack the fastest hardware into the smallest possible case is challenging, but also rewarding when you don’t have to break your back carrying a huge PC into LANs. I know a few of you have been catching on to this, I have been seeing LAN rigs showing up a lot on my Facebook and at the LAN. Well when Intel launched their NUC I couldn’t wait to get my hands on one, well my wife just happened to win one at a LAN. So today I’m going to check out what the NUC is all about and put it together with some cool hardware from Kingston and a Harmony Smart Keyboard from Logitech to help put it to use as an HTPC.
Product Name: Intel NUC D34010WYK
HyperX Impact 1600MHz 16GB SO-DIMM
Kingston mS200 240GB mSATA SSD
Logitech Harmony Smart Keyboard
Review Sample Provided by: Kingston and Logitech
Written by: Wes
Pictures by: Wes
|
HyperX Impact 1600MHz 16GB SO-DIMM Specifications |
|
|
Part Number |
HX316LS9IBK2/16 |
|
Capacity |
16GB (2x8GB) |
|
Form Factor |
SO-DIMM |
|
Memory Type |
DDR3L |
|
Memory Speed |
1600MHz |
|
Latency |
9 |
|
Buffered or Unbuffered |
Unbuffered |
|
Voltage |
1.35V/1.5V |
|
Timings |
9-9-9 |
|
Kingston mS200 240GB mSATA SSD |
|
|
Part Number |
SMS200S3/240G |
|
Capacity |
240GB |
|
Form Factor |
mSATA |
|
Interface |
SATA Rev. 3.0 (6Gb/s), SATA Rev. 2.0 (3Gb/s), SATA Rev. 1.0 (1.5Gb/s) |
|
Encryption |
AES 128bit |
|
Sequential Read/Write |
540 MB/s / 530MB/s |
|
Maximum 4k Read/Write |
up to 72,000 / up to 40,000 IOPS |
|
Random 4k Read/Write |
up to 21,000 / up to 41,000 IOPS |
|
Power Consumption |
0.4W Idle / 1.2 (TYP) Read / 1.8 W (TYP) Write |
|
Storage temperatures |
-40°C ~ 85°C |
|
Operating temperatures |
0°C ~ 70°C |
|
Dimensions |
50.88mm x 30mm |
|
Weight |
6.86g |
|
TRIM |
Supported |
|
Vibration operating |
2.17G Peak |
|
Vibration non-operating |
20G Peak |
|
MTTF |
1,000,000 Hrs |
|
Warranty/support |
three-year warranty with free technical support |
|
Logitech Harmony Smart Keyboard |
|
|
Part Number |
915-000225 |
|
Technical Specifications |
-Harmony Smart Keyboard Harmony one-touch Activity-based control (up to 6) Controls up to 8 devices Integrated touchpad for navigation on PC, Mac, and PS3 Type and navigate on PC, Mac, Apple TV, Roku, TiVo, Xbox, and PS3 -Harmony Hub Bluetooth connection to PC, Mac, Apple TV, or PS3 Compatible with over 225,000 devices and 5,000 brands of AV equipment Control devices behind cabinets or walls -Harmony App Easy setup via smartphone Display up to 50 favorite channel icons Gives your smartphones the power of a Universal remote Personalize each smartphone in the house |
|
Required for Setup |
-Harmony App (download from Apple App Store or Google Play) -iPhone® 4S or later, iPad® (3rd generation or later), iPad Mini®, iPod touch® (5th generation or later) with iOS 6.0 or higher or an Android device with Android 4.0 or later -Bluetooth -Internet access -Wi-Fi |
|
Warranty Information |
1-Year Limited Hardware Warranty |
|
Package Contents |
Harmony Smart Keyboard Harmony Hub 2 USB receivers USB extender Power adapter IR blaster USB cord |
|
Intel NUC D34010WYK |
|
|
Form factor |
UCFF |
|
Processor |
4th generation Intel® Core™ i3-4010U processor (soldered down) with active fan heatsink |
|
Memory |
Two SO-DIMM slots supporting up to 16 GB of 1600/1333 MHz 1.35V DDR3L memory (Note: 1.5V DDR3 memory is not supported) |
|
Display |
One mini DisplayPort* 1.2 with audio support One mini HDMI* port 1.4a with audio support |
|
Audio |
Intel® High Definition Audio (Intel® HD Audio)1 subsystem in the following configuration: -8-channel (7.1) digital audio via HDMI 1.4a output and via one DisplayPort 1.2 connector -Headphone/microphone jack on the front panel |
|
LAN support |
Intel® Gigabit Ethernet Controller |
|
Peripheral interfaces |
Two USB 3.0 connectors (front panel) Two USB 3.0 connectors (back panel) Two USB 2.0 ports (internal headers) One SATA port (internal header) Consumer infrared sensor on the front panel |
|
Expansion capabilities |
One full length mini PCI Express* slot with mSATA support One half-length mini PCI Express slot |
|
Included in the box |
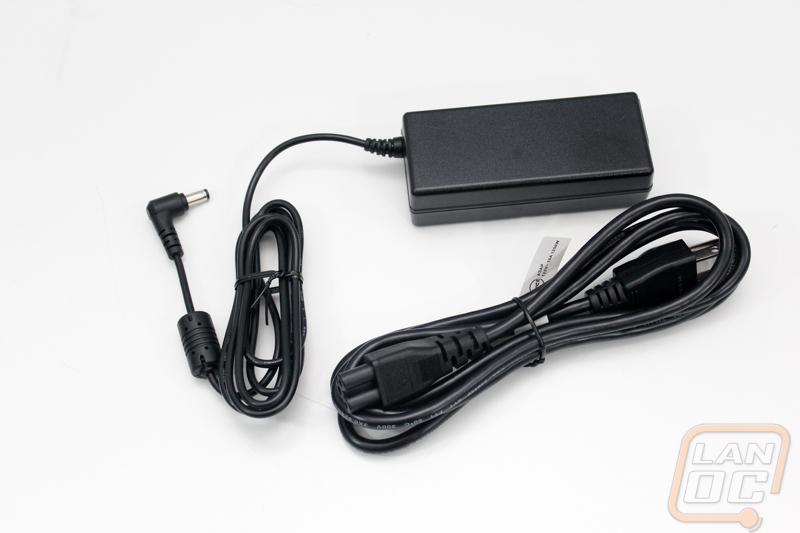
19V, 65W power adapter (brick) Power cord options (Types B, E, G, or no cord) VESA* mounting bracket Integration guide Wireless antennae (integrated into the chassis) Intel Core i3 logo |
|
Warranty |
3-year limited warranty |
Packaging
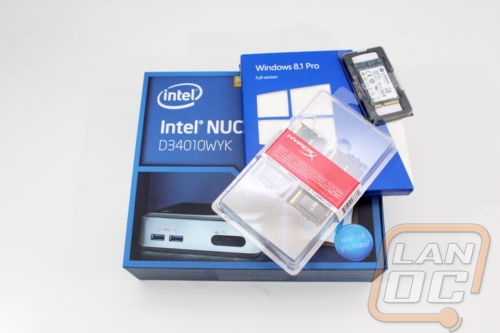
To get things started, let’s take a look at how all of our components will come to you. Obviously with this build being so small none of the parts are going to be all that large, so shipping isn’t going to be that expensive.
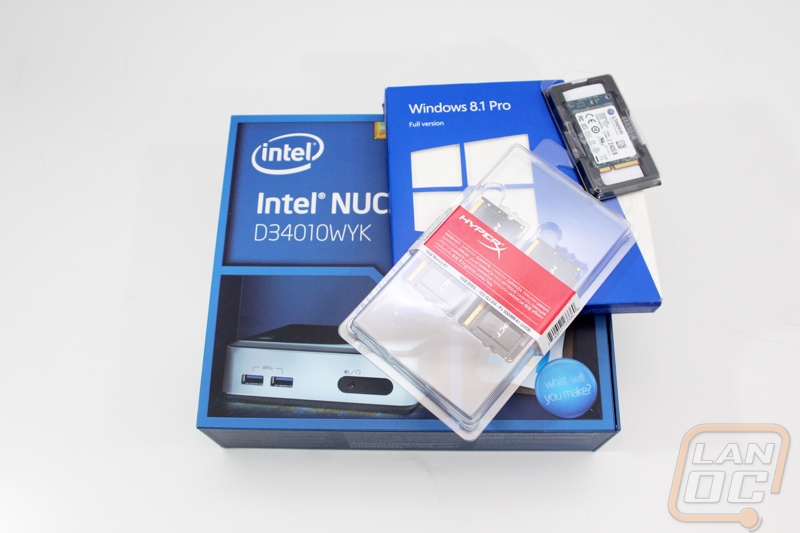
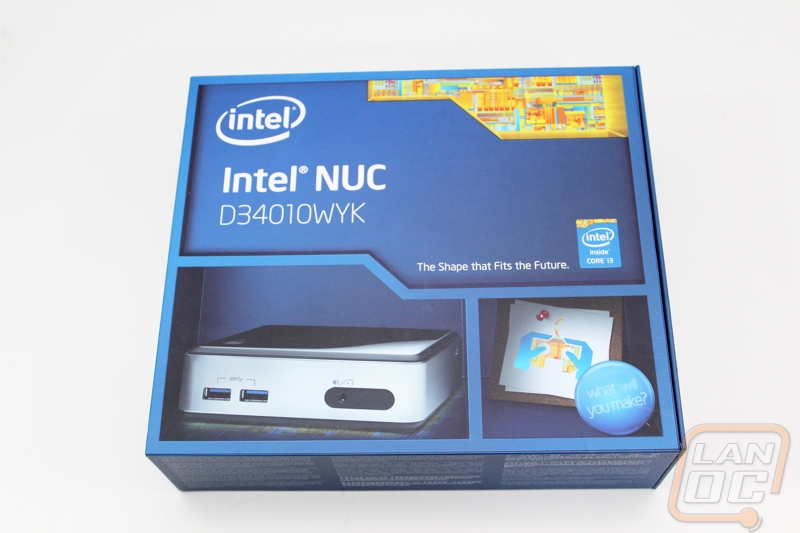
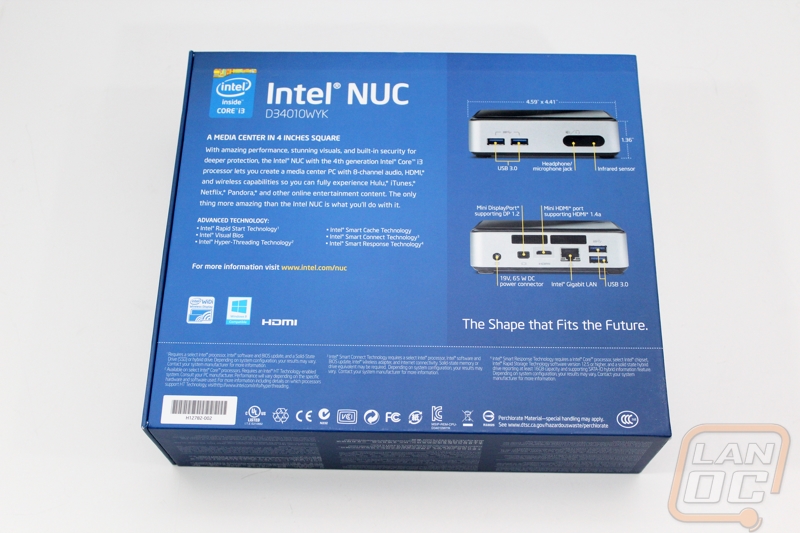
The NUC has that signature Intel blue all over the box. On the front you have a photo of the NUC along with the model number. Beyond that the box looks like a larger version of an Intel CPU box with the architecture up in the top right corner. On the back of the box we get a better view of the NUC with photos of the front and back as well as measurements showing just how small it is. Intel notes on the back that this is a media center in just 4 inches square, I think they know what we are going to do with it!
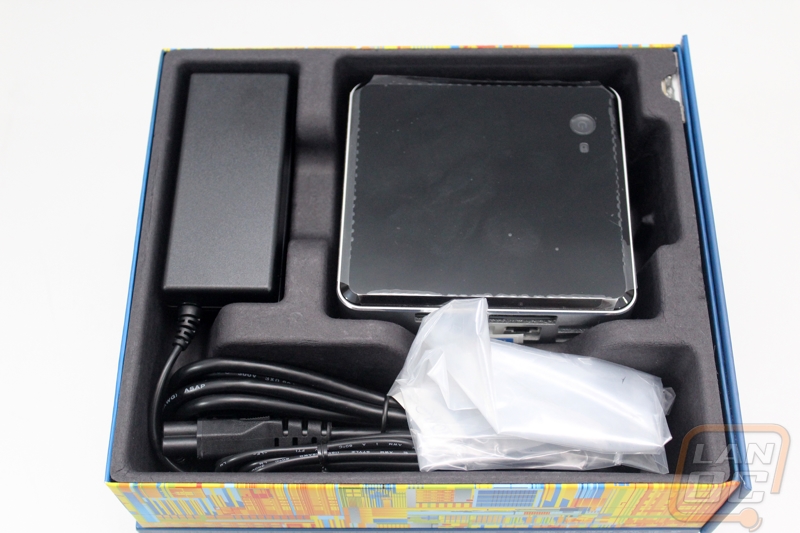
The first time I opened up the box I was surprised to hear that signature intel sound. As it turns out they slipped in a light sensor that plays the sound every time I see’s light. This made my office feel like an Intel commercial for nearly a week when I had the box open in the room. Every time I would turn on a light I would hear the noise. It doesn’t add to the performance of the NUC but I do think it adds to the experience of opening up your NUC for the first time. Speaking of that, inside the NUC is sitting in a formed tray with the power brick and power cord in their own spots. Up under the NUC you will find the VESA mount and documentation.
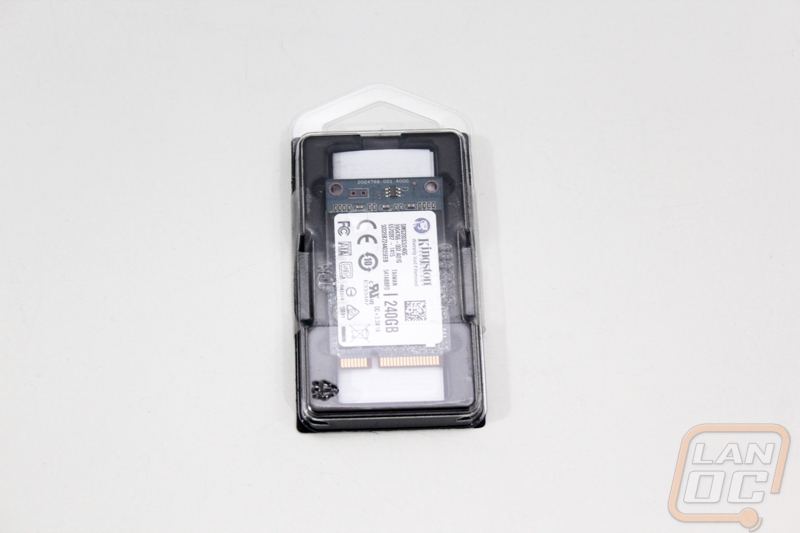
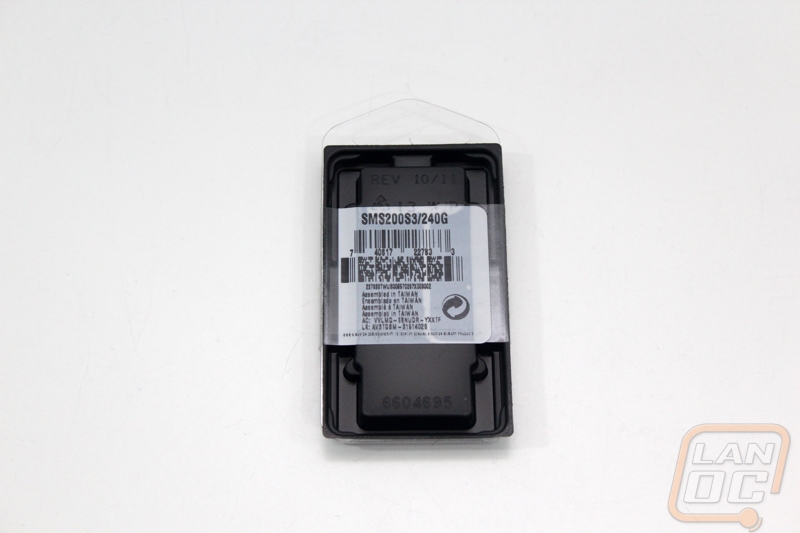
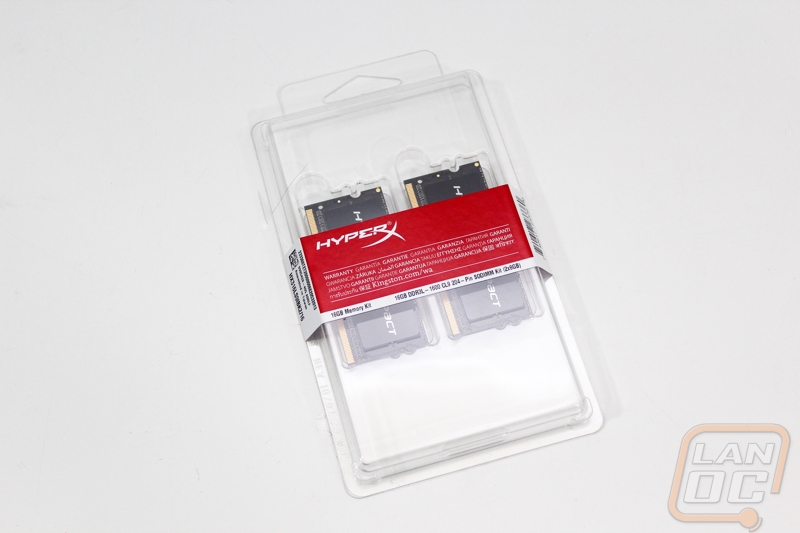
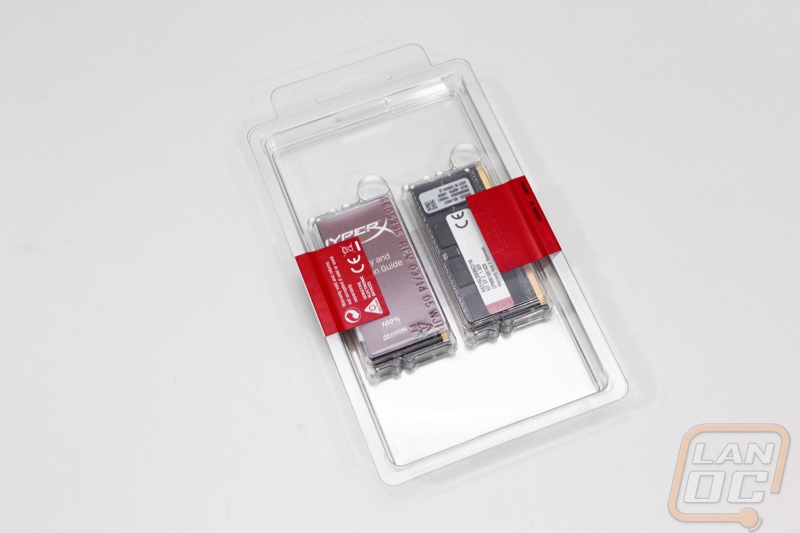
The RAM and SSD from Kingston are a little underwhelming for packaging. Both come in clear plastic trays with just a sticker on each showing what model each is. With the mSATA SSD and SO-DIMM being so small there just isn’t much they could do for packaging without really going crazy with it. I’m completely okay with this, it is right to the point and hopefully the performance of each of them will do the talking.
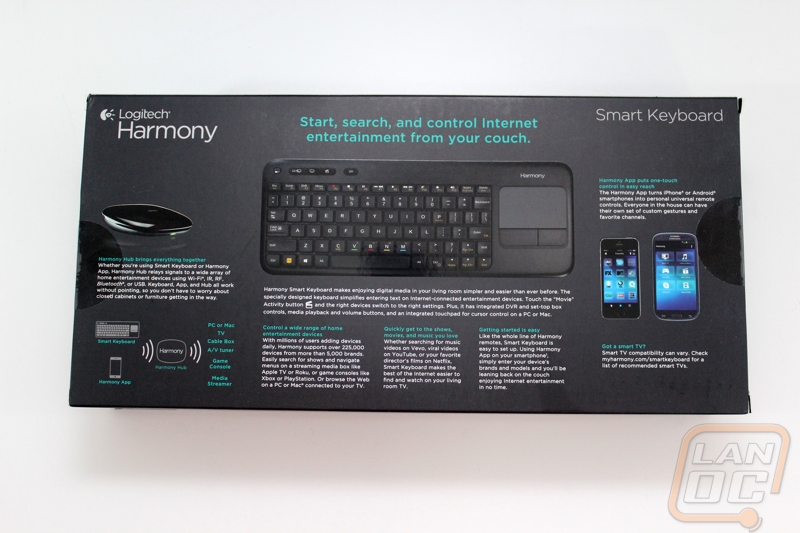
The Logitech Harmony Smart Keyboard packaging was obviously much larger than the NUC and all of its components put together. The box has a photo of the keyboard, harmony hub, and harmony app all together. Beyond that there isn’t much going on with the cover. Around on the back Logitech has photos of the hub, keyboard, and app again but this time with details on how all three work together to help answer any questions before you pick it up.

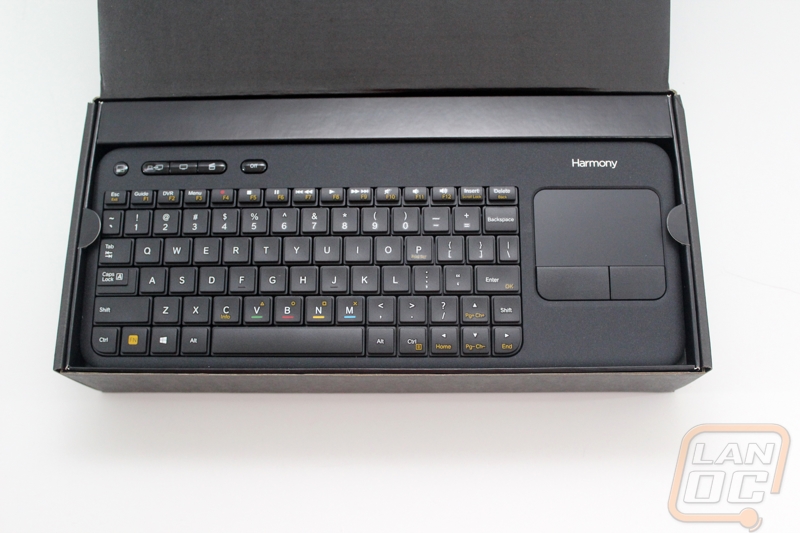
Inside the box right on top is the keyboard. There are small tabs on each side to help you pull the keyboard tray out of the box to get to the rest of the goodies. The Harmony Hub is sitting in its own cubby hole in the formed tray. Over on the other side are the instructions with the cords underneath. Then in the middle both USB dongles have their spots as well.
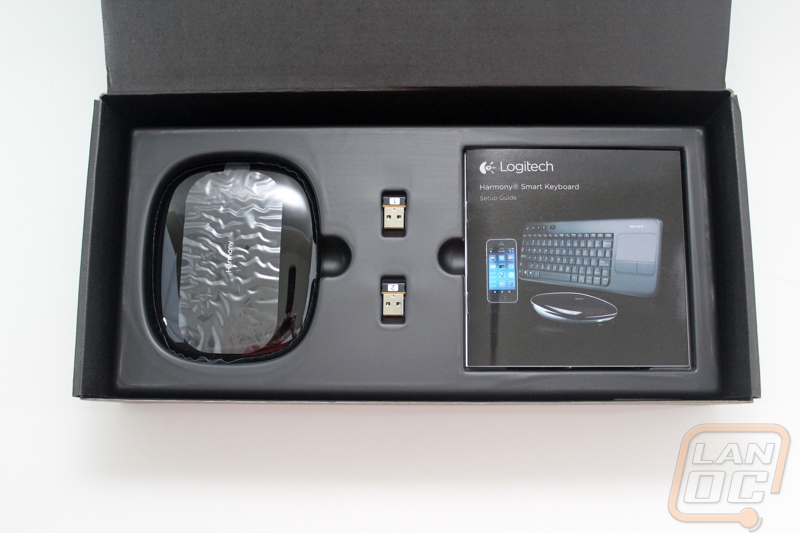
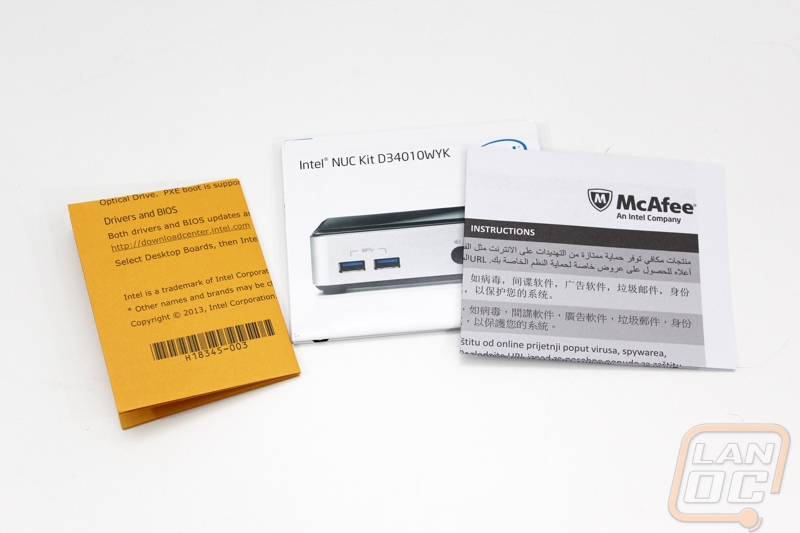
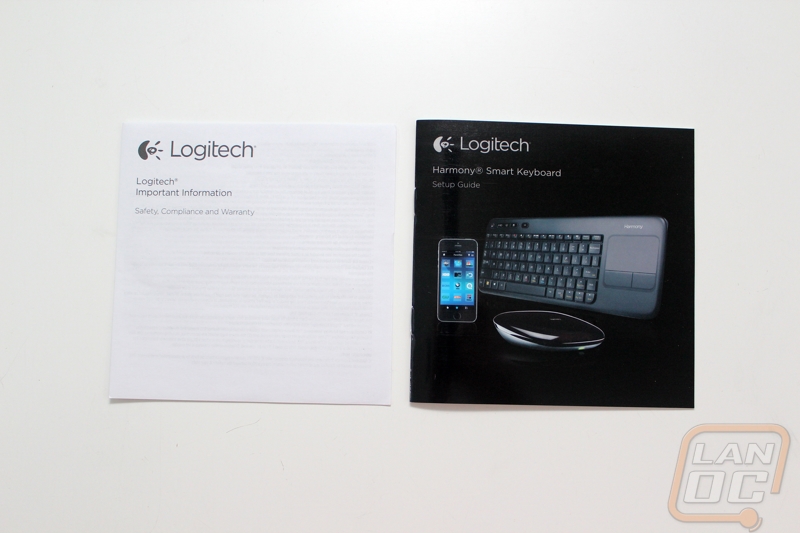
For documentation you get a setup guide and then a small pamphlet with safety, compliance, and warranty information inside.
Features and Photos
The most obvious thing about the NUCs design is its size, so let’s just put its dimensions out there. It is 1.32 inches tall, 4.59 inches wide, and 4.41 inches from front to back. That is around 26.7 cubic inches, to put that in perspective an average 3.5 inch hard drive is 23.6 cubic inches! Inside Intel has packed in an i3 CPU (it is also available in i5 and i7 configurations) not an Atom like we would have seen a few years ago in this form factor. On top of that you have room for your ram, SSD, WiFi and you have all of the standard connections including Ethernet. Heck my Ultrabook doesn’t even have Ethernet.
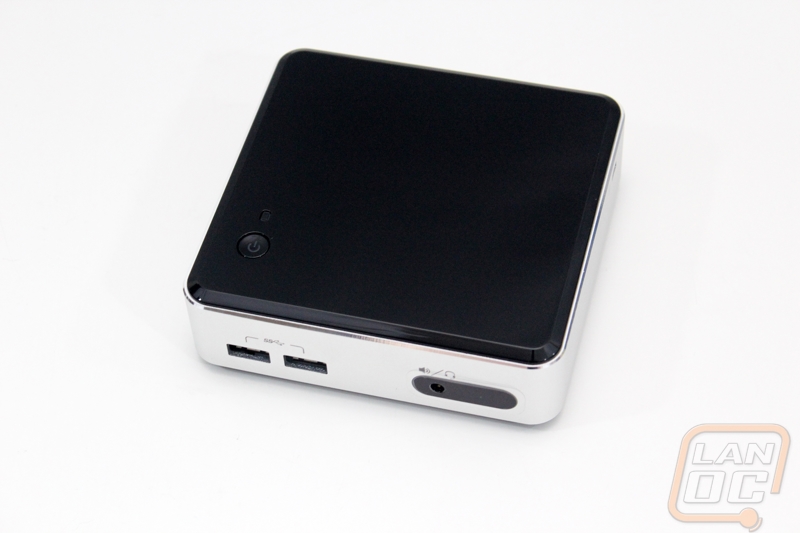
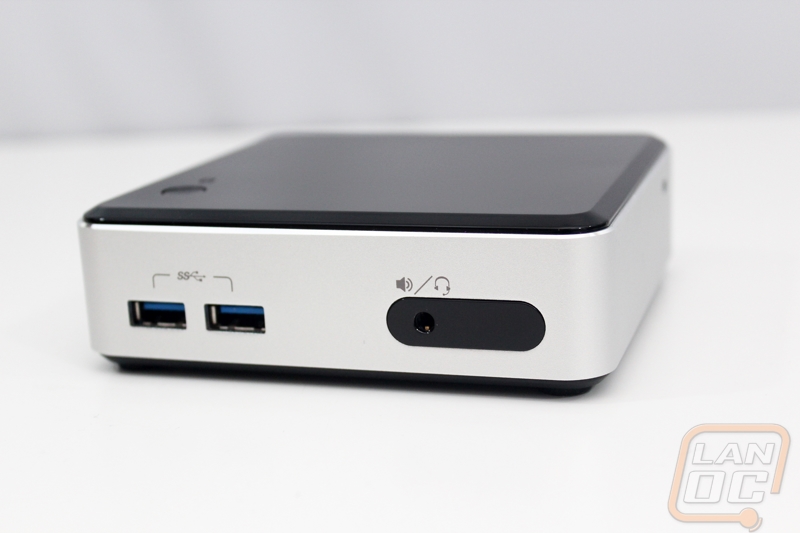
So starting at the front we have two USB 3.0 connections, a combination microphone/headphone plug and behind the black panel is also an IR Receiver.
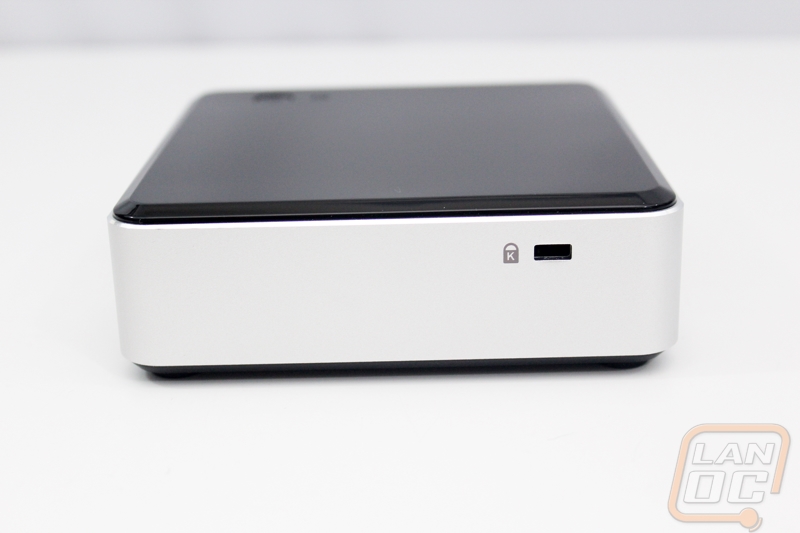
With the NUC being so tiny they did include a Kensington lock on the side of the aluminum frame to keep it from coming up missing. Then again the lock is going to take up as much room if not more than the NUC.
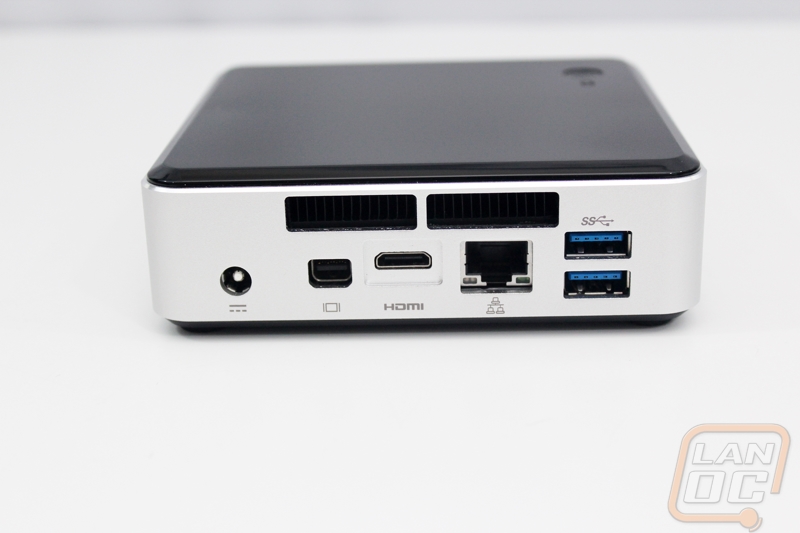
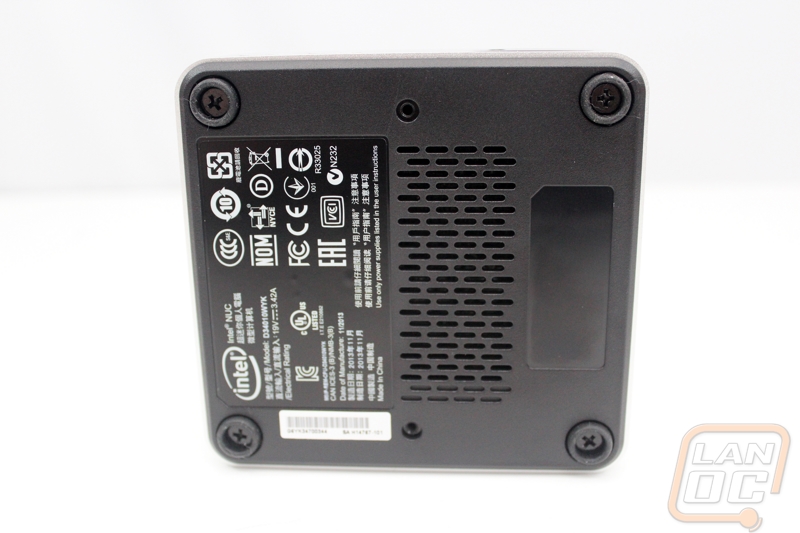
Around back is where most everything is going on. We have two more USB 3.0 ports for a total of four on the entire NUC. You have the Intel NIC and power plug. For display options you have a micro HDMI and a Micro DisplayPort. Last but not least are the two inch wide vents along the top to help keep things cool.
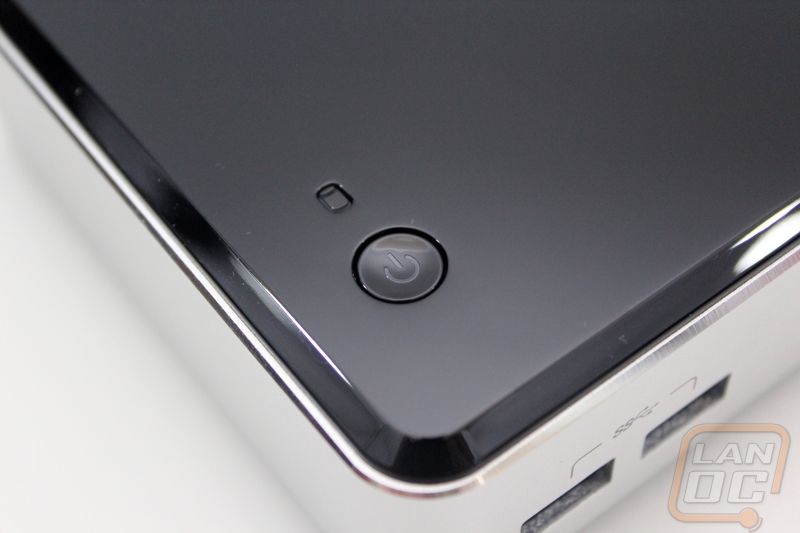
The entire top of the NUC is covered in a black plastic. In the corner you have the power button. The power indicator lights up blue when the NUC is powered on.
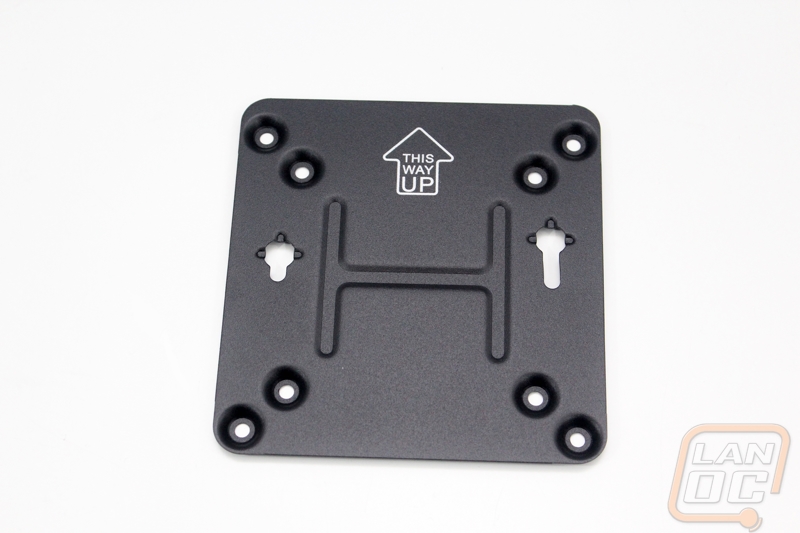
For accessories you really only get two things with the NUC and it is all you need. You get a power cord and then the VESA mount. I like that the power cord doesn’t have a large power brick on the end, the design is basically just like what you would get with your laptop. The VESA mount is really simple, there are two screw holes for you to hang the NUC and the other 8 are for two different VESA mount sizes. One set fits monitors and the other fits TV’s. Both would be extremely useful with the NUC as it is at home in your office as well as your living room.
Building the NUC
In order for you to install your SSD, SO-DIMM’s, and a WiFi card you have to gain access to the inside of the NUC. Lucky for us, they really couldn’t have made it easier. On the bottom there are four screws inside of the feat. Once you remove those the bottom comes right off. I originally thought that removing the screws would let the top come off, because I’m used to these things being on the top of the PCB. In a way I guess they are, but the CPU is actually mounted on the other side of the PCB. This makes working in the NUC simple though, because you don’t have to mess with removing the CPU cooler. The only cooling on the bottom side is a small thermal pad that pulls the heat off of your SSD.
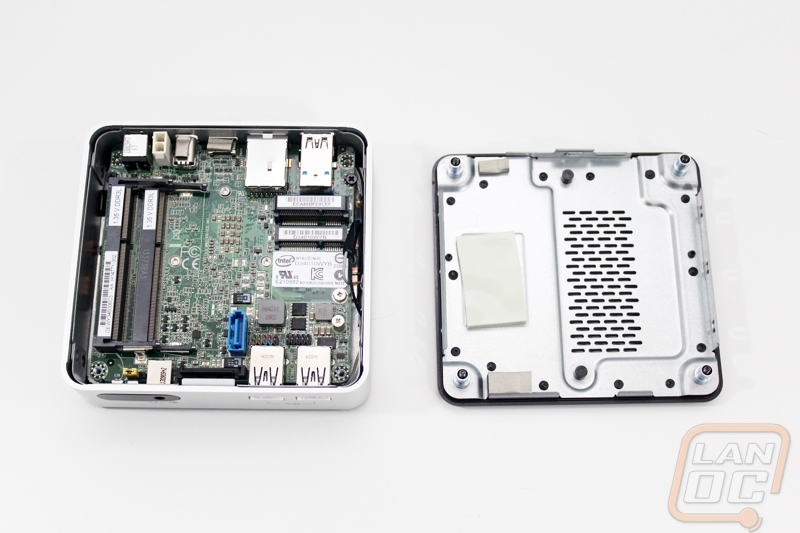
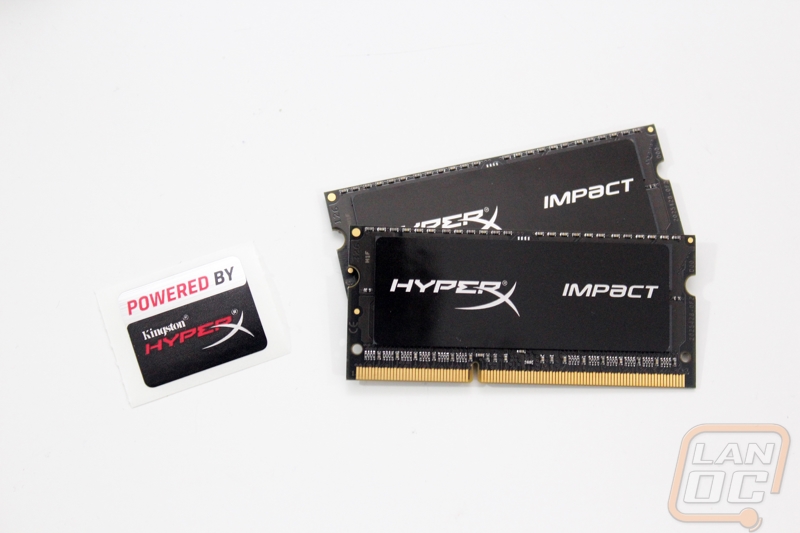
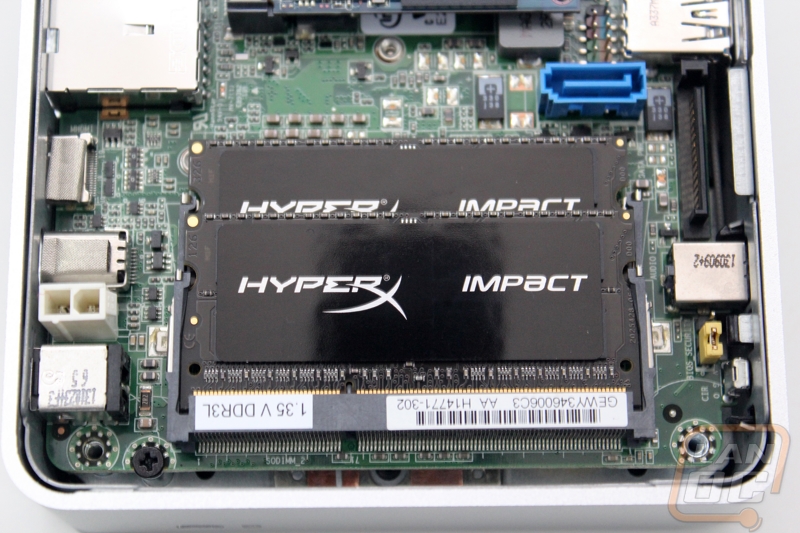
To start things off I installed our two 8 gig sticks of HyperX Fury SO-DIMM. For being so small, Kingston really packed enough RAM on them. They install just like ram on any other laptop. You have to install the bottom stick first, putting the connector in then pivoting it down until it snaps into place. The second stick installed the same as well. Being HyperX RAM they did put stickers on them to give them a little style. Sadly with SO-DIMMs there isn’t enough room for a heatspreader.
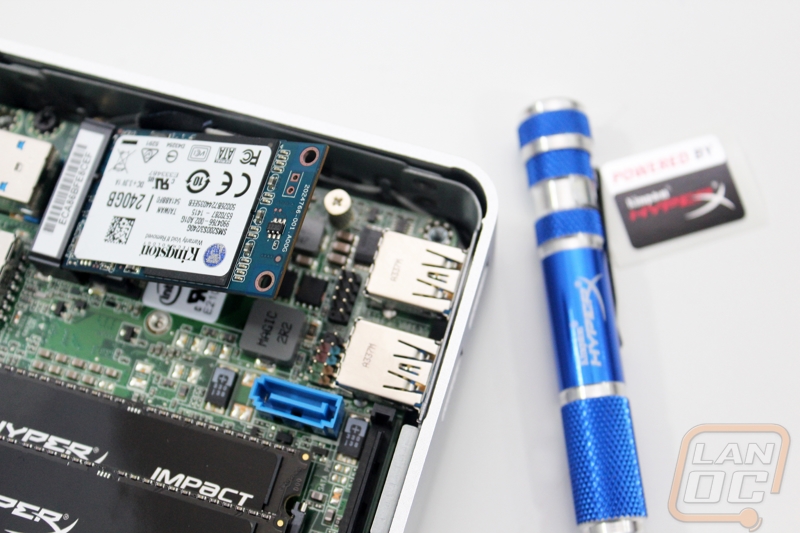
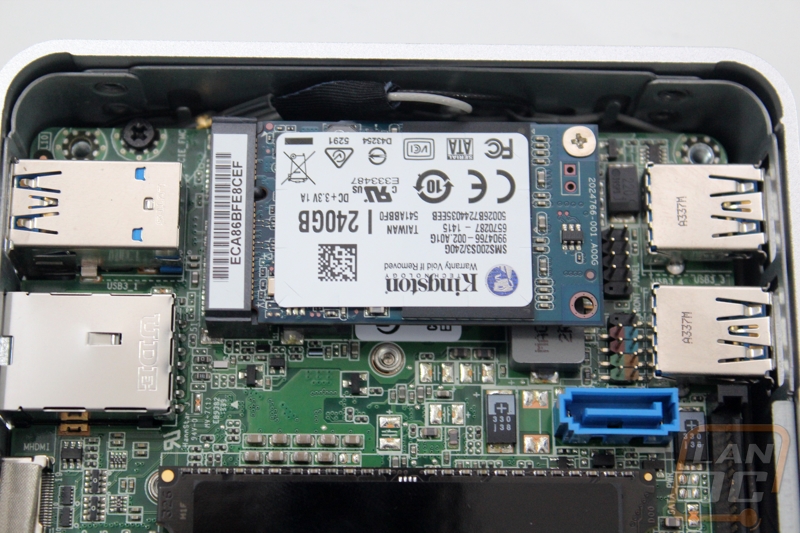
Your WiFi and SSD both install stacked on top of each other to save space. In our case we didn’t have a need for WiFi so we went directly to the SSD. The mSATA SSD installs like the RAM with the only difference being with the hold down. To keep the SSD in place you remove the small screw in the photo below and tighten the SSD down with it.
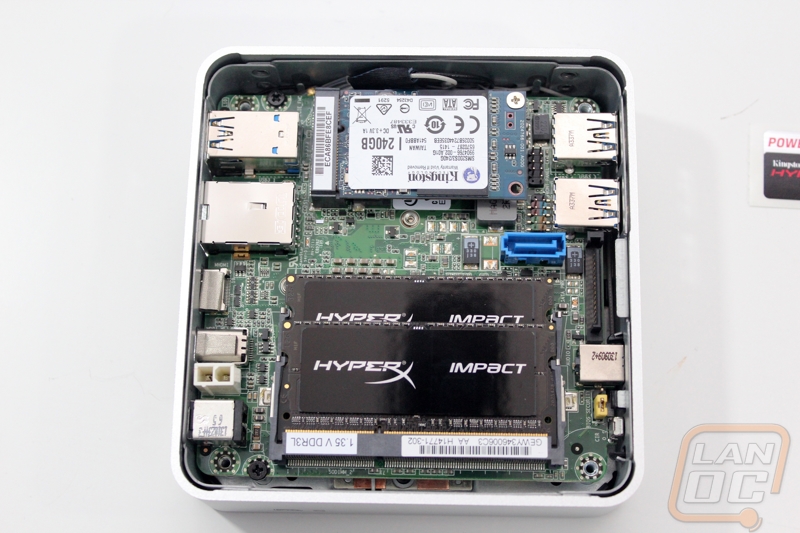
A notable mention while inside of the NUC is the inclusion of a SATA connection and SATA power connection. This is great for hooking up a DVD Drive if you don’t have a USB drive to install windows with. With everything installed I just had to reinstall the bottom panel with its four screws.
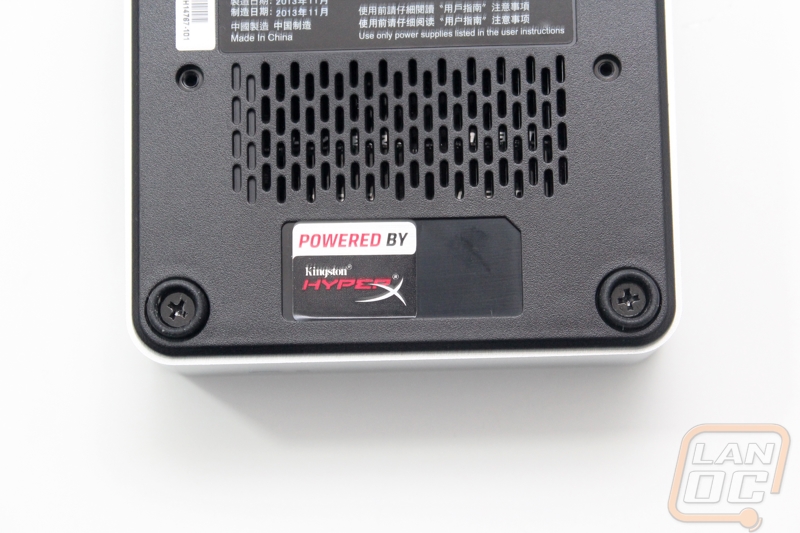
I typically avoid stickers unless it is something that goes with the build but considering the awesome RAM and SSD that Kingston provided I couldn’t help but slip the Powered by HyperX sticker up on the underside of our NUC.
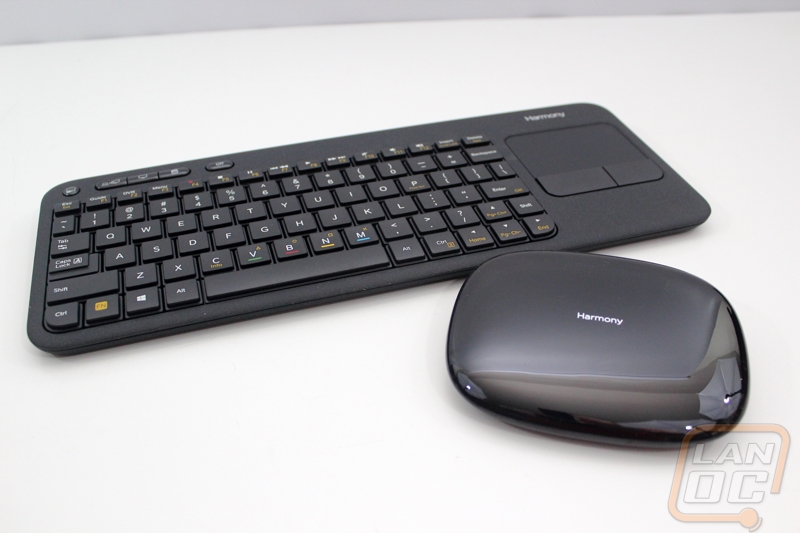
Logitech Harmony Smart Keyboard
To go along with the NUC and to help with HTPC use I contacted Logitech and they sent over a Harmony Smart Keyboard. The Smart Keyboard was only recently introduced and it combines Logitech’s Harmony Hub with one of their HTPC keyboards.
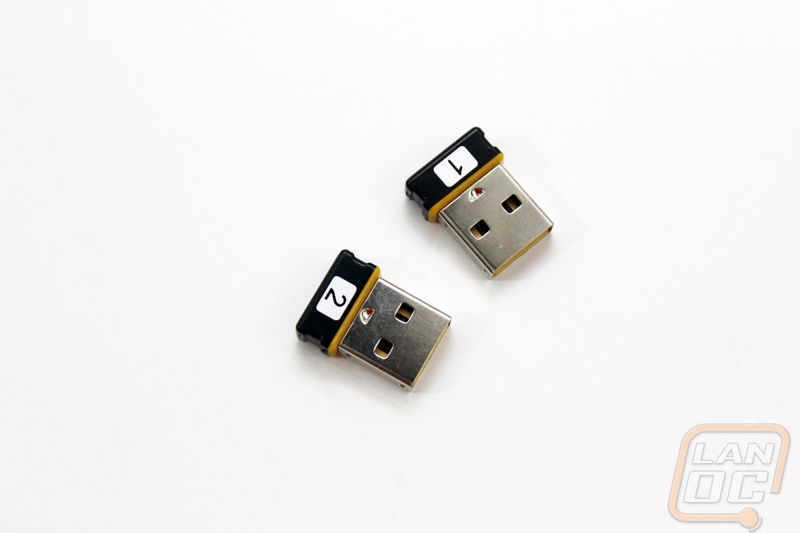
The Smart keyboard comes with a power cord for the Hub as well as a USB cord for hooking it up directly to your PC. You also get an IR blaster than you can hook up and run into or your of cabinets to make sure you can control all of your devices. The also include two USB dongles and a USB extender. The Extender is useful when trying to plug the dongle into an Xbox 360 for example, where the door closes and blocks the signal some.
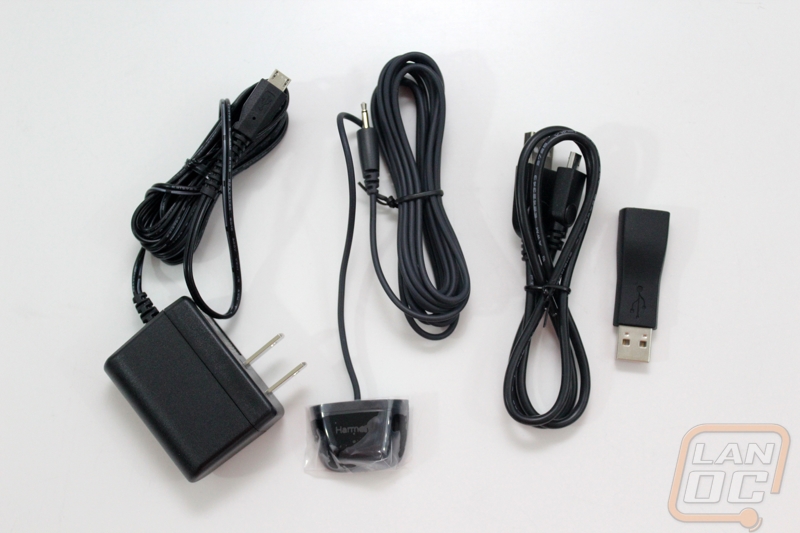
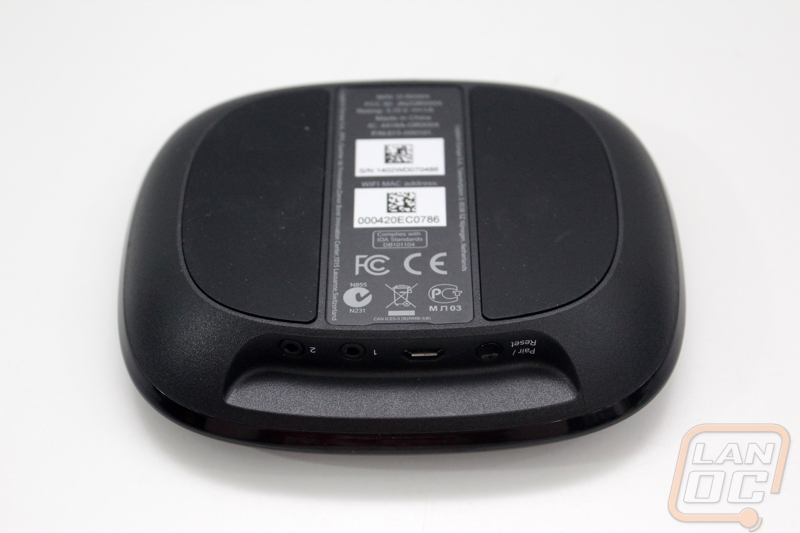
All of the cords above plug into the back of the Harmony Hub, a glossy black device. All of the connections are hidden from above, you have to flip it over like in the picture below to really get a good look at them. You have the USB power connection and two IR Blaster plugs. It only comes with one, but you can add another if you have a complicated setup. There is also a reset/pair button that you use to pair the device to your phone via Bluetooth log into the device and set it up. To keep it from sliding around most of the bottom is covered in rubber as well.
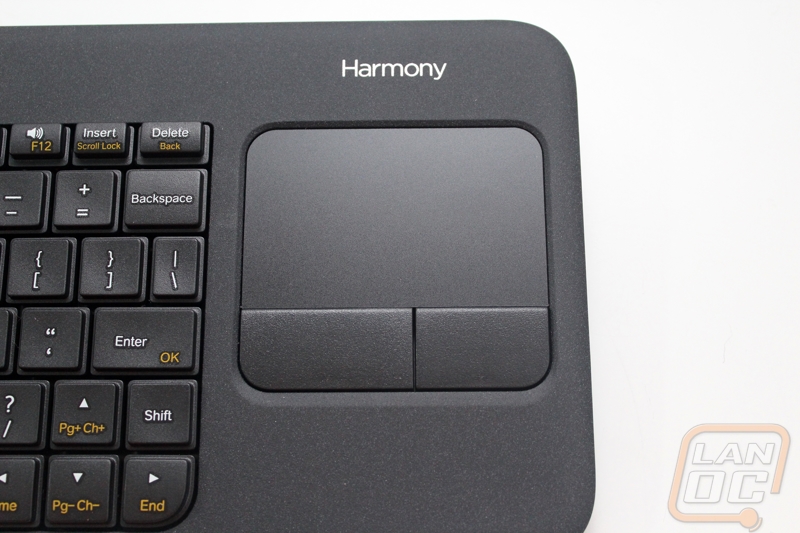
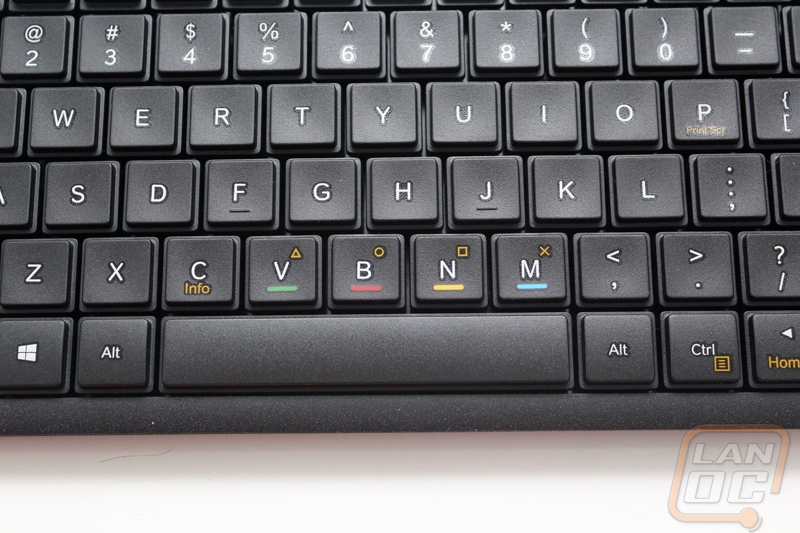
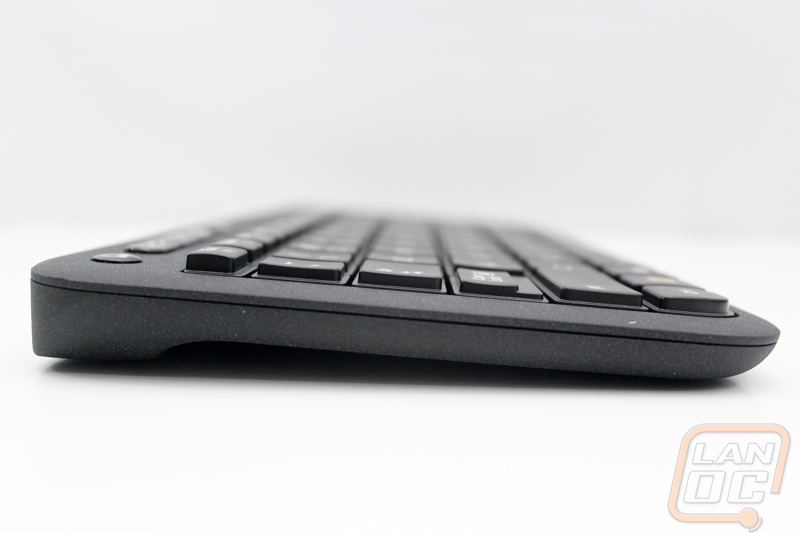
It wouldn’t be a Smart Keyboard without well, you know, a keyboard. The keyboard is a tenkeyless membrane design with a touchpad on the right side. There isn’t backlighting, or any lighting to let you know the keyboard is powered on. The rough finish that they went with is amazing, it is going to be very hard for anyone to drop the keyboard accidentally.
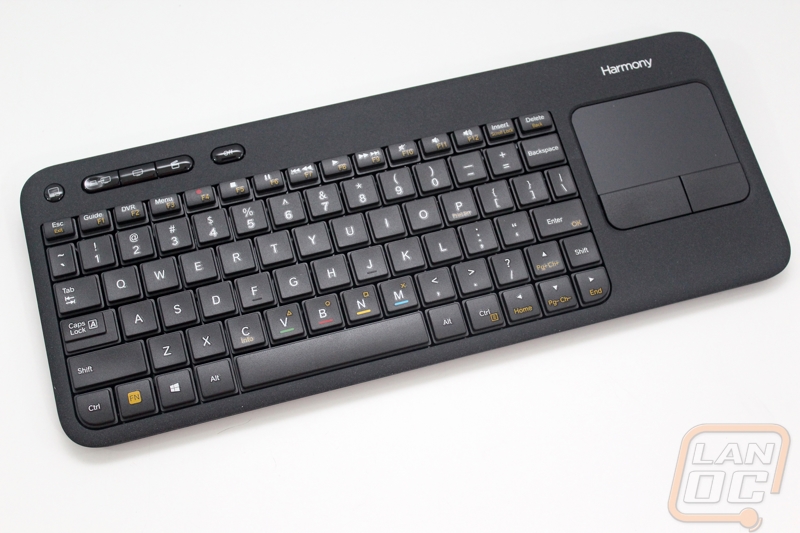
The Touchpad on the right side is simple, around 3 inches diagonal with two buttons for right and left click.
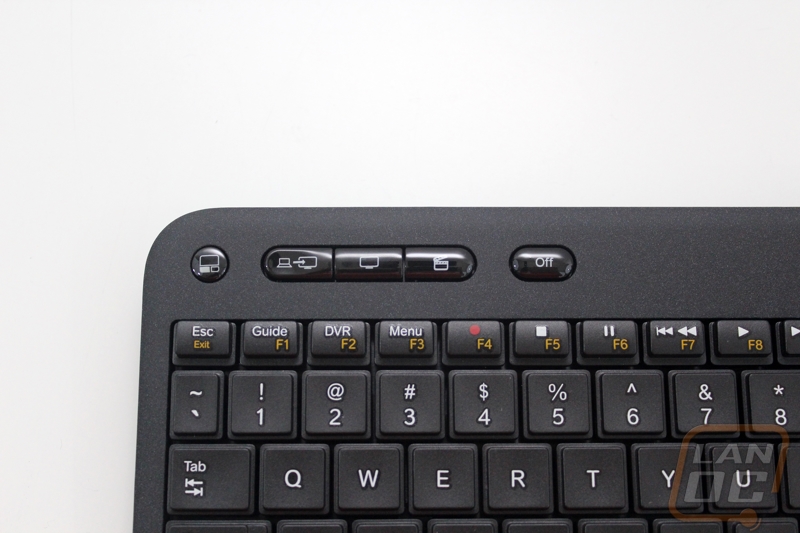
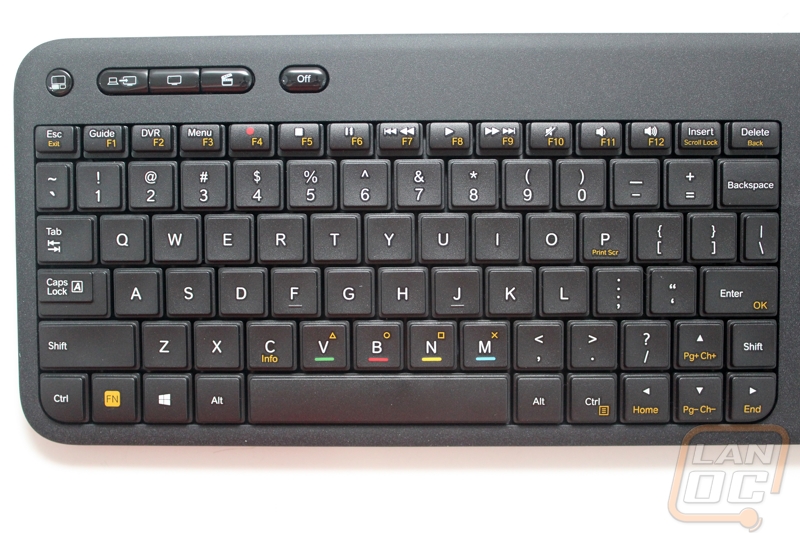
Up in the top left corner there are a few non standard buttons. There is a button that says Off, three next to each other with a PC, TV, and Movie on them, then a trackpad button. The trackpad buttons turns on the trackpad obviously. The three buttons together allow you to turn on everything you have configured for that device. For example if you had a projector, pushing the movie button might turn on your projector, lower the powered screen, turn on the Blu-Ray drive, and set the Projector to the proper input. You can even go farther by pairing up LED lighting, you can set the movie mood as well.
All over the keyboard the keys have additional functions. The four colored keys in the picture below are for use with your PS3.
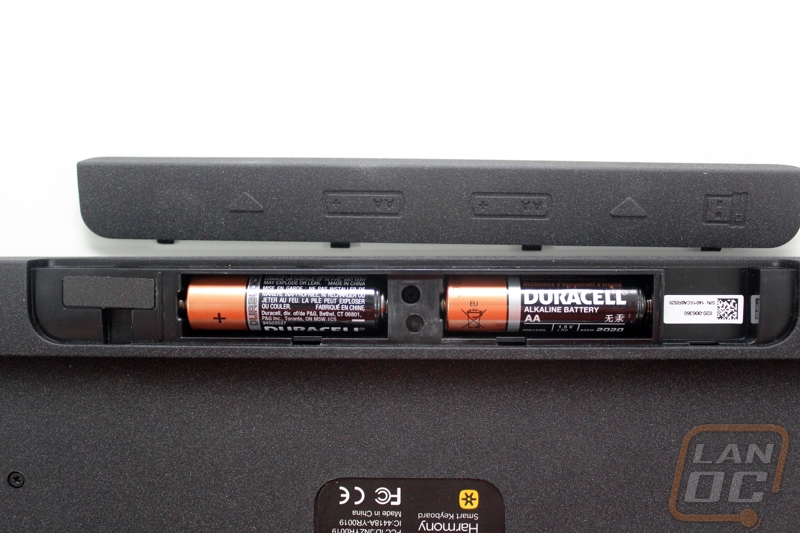
On the back side of the keyboard we can see the rough finish a little better. There are also four rubber feat to give you the best grip on your coffee table and to prevent the finish from scratching your new wooden tables. Along the back edge the keyboard is thicker where the batteries install. It takes two AA batteries to power. Also inside the battery compartment is a spot to store your second USB dongle should you not need it in your current configuration.
Slipped in along the top edge is a power switch to turn the whole keyboard off when you aren’t planning on using it for a while.

Here is a shot of the side profile with the battery compartment helping angle the keyboard slightly.
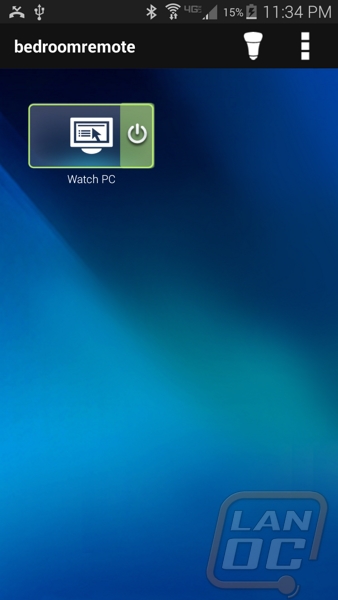
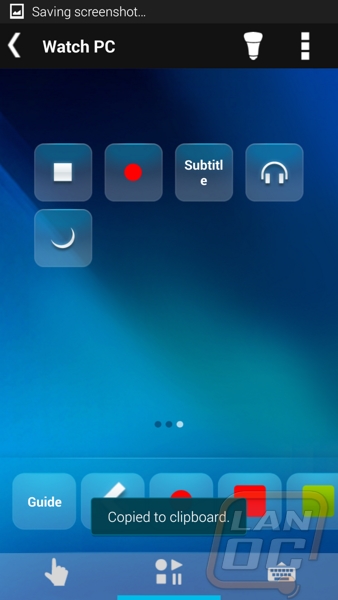
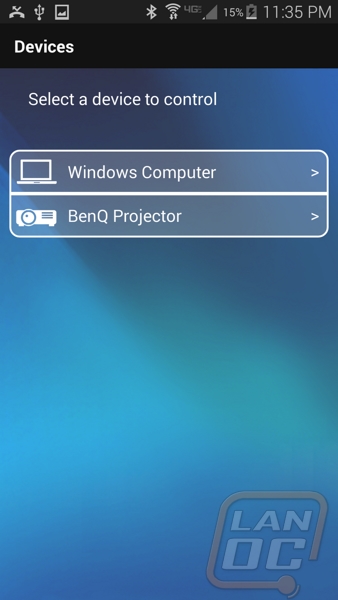
The Harmony Hub and Keyboard are only 2/3rd of the picture though. Without the Harmony mobile app it’s just a keyboard and a hub that does nothing. The app is what brings everything to life. The app is available on iOS and Android. Once installed you can link to the hub via Bluetooth and setup the Hub’s wireless settings as well as configure it to work with nearly any device. The Hub can control devices via IR, Blutooth, WiFi, and even using USB with the provided USB dongles. For our use we are just pairing it up with a TV and the NUC.
Once setup, the launch page lists all of your device configurations. In our case we are only working with the NUC, if you setup other devices you would see them all listed here. Pushing the green power button will turn everything on, if it is already on pushing on the left side takes you right to the controller for that device.
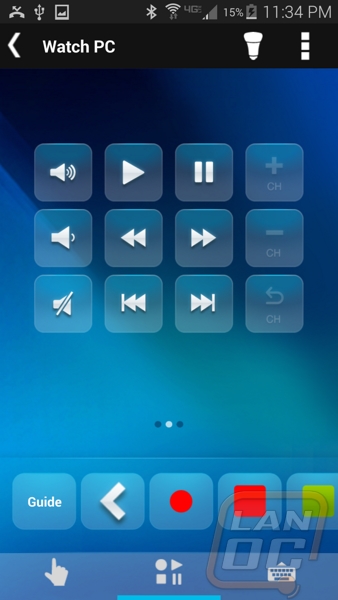
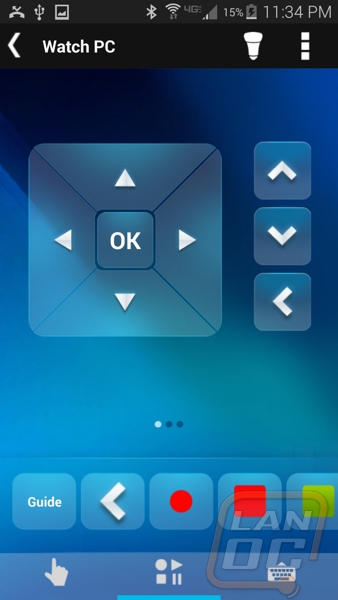
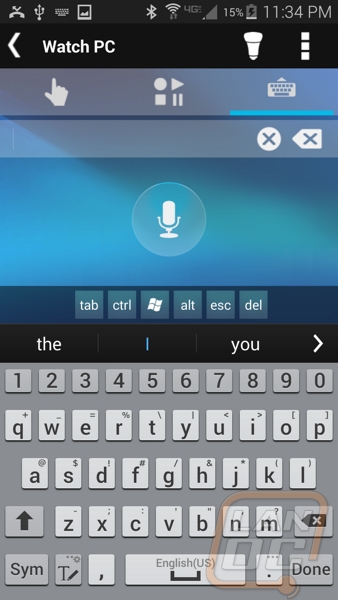
I took the screen shots using an S5. For mobile phones more of the controls are split up. On our tablets you have more buttons and at the same time you get access to the touchpad that lets you control the mouse curser. For the S5 I did have to flip through things to get to the touchpad. When you select the keyboard option the app launches your default keyboard making it easy to type without even using the smart keyboard. I still prefer the keyboard over using the app, but if you need to search for something or type in a web address really quick you don’t have to dig out the full keyboard. For those of you who keep your phone or tablet on your nightstand this is perfect. You can hide your remotes away keeping your bedroom clean.
Living room use is even more convenient as well, especially for larger familys. Everyone has a tablet or smartphone these days. Each family member has their own personal remote. I remember growing up my brothers would loose the remote in the strangest places, this should hopefully cut down on that. It does introduce the possibility of more fighting about volume and channels though now that anyone can change it at any point (even if they aren’t in the room at all!)
While the general controls just have the basics that you will need. If you open up the device listing you can find pages with all of the “other” buttons on your remote that you most likely rarely use. This is the benefit to this design over a universal remote, none of these options are going to be on a universal remote normally, but being an app they can include them here.
Performance
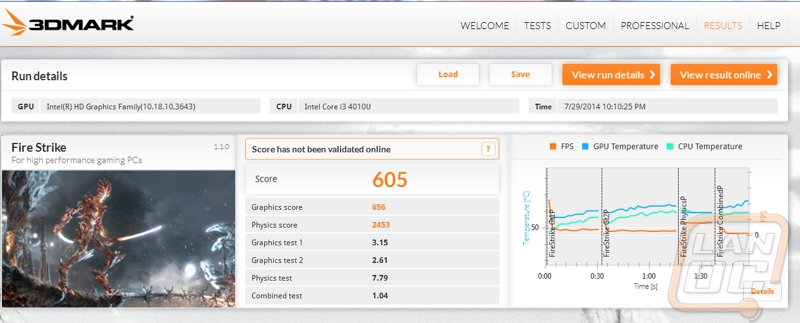
When it comes to performance there are a few aspects that I wanted to consider when testing the NUC. There is the overall experience you get as well as its performance numbers. To start things off I ran the NUC through a couple of our standard CPU benchmarks to see how it compares to the CPUs we have recently tested. For the onboard video I used the latest 3DMark. As you can see below we ended up with a graphics score of 656, to give this a little perspective the i7-4790K pulled an 817 when I tested it a little over a month ago.
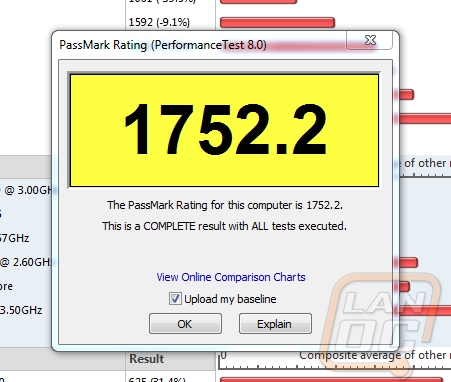
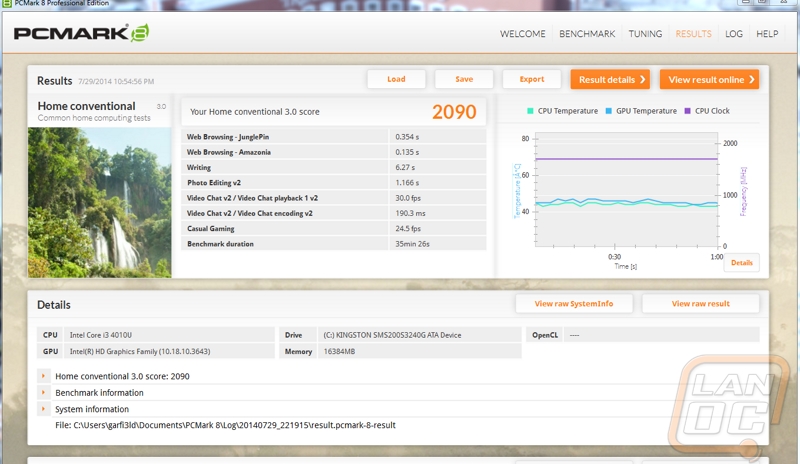
Passmark had a total score of 1752.2 and PCMark 8 came in with 2090, but I can’t compare them to our past benchmarks because I was using the onboard video where on our CPU reviews these tests are ran with a dedicated GPU. You are still welcome to see how it compares to your current configuration.
The biggest limitation of the i3 NUC is its onboard video performance. While I feel confident in using it for playing less demanding games and watching video I would never try to use it to play anything more demanding. If you are looking for better gaming performance in a similar form factor Gigabyte has a BRIX with an i7 and a dedicated GPU.
While the performance of the NUC is great, it is the NUCs size that really stands out the most. I talked a little about that in the previous sections, but I think that the only way to really understand how small it is would be to hold it in your hand. This is what makes the NUC a great HTPC and also why I think it is a much better option than a lot of the prebuilt PCs that you see in retailers. Sure you can’t add a large capacity hard drive, but for someone who plays a few online games, browses the internet, and does their taxes on their PC (aka the average person) you could save a lot of room on your desk without losing any power. This is especially true if you use the VESA mount that is included with the NUC. You can mount it directly to the back of your monitor or TV. When paired up with the Logitech Smart Keyboard I was able to mount it to the back of our bedroom television. The NUC replaced a Sapphire Edge-HD that has been running non-stop for the past three and a half years! While the Edge-HD did us well, the NUC is a major step up in performance.
Overall and Final Verdict
I set out today to see what the Intel NUC was all about and give a little peak inside of my personal HTPC build. Because of that I won’t be posting up pro’s and con’s on any of the products that went into the build. But I did want to address the title I gave this article. There has always been a group of people who have been looking to build the biggest and best PC in the smallest possible form factor. Over the past 5 years or so things have really started to gain traction and it has gone from just a few enthusiasts challenging themselves to everyday people getting the same experience. In my opinion the Intel NUC is the next big step forward. A few years ago if you wanted a small Barebones PC you went with a Shuttle. Now you can get the same thing in a package that is literally smaller than the disc drive you would put in that Shuttle.
Add to that just how well they perform, I have seriously considered building a NUC to take out to LANs. Sure I can’t play everything, but at the last few events I have played TF2, Unturned, LoL, and Minecraft, all are more than capable of being played on the NUC. With Gigabyte bringing out a BRIX (their version of the NUC) with a GTX 760M inside I think we might be getting a peak at what some of us might be using for LAN rigs in the next few years!
So what does it all cost? You could build the exact same configuration I put together right now for $639 on amazon. That is without an OS and you would need another $149 for the Logitech Smart Keyboard. If you dropped the SSD down to a 120 GB and to 8 Gigs of RAM you could put it together for $435. Personally I would go with the cheaper build unless you had a real need for the larger capacity.


