When it comes to EnGenius’s enterprise-focused lineup, especially when it comes to access points, they have a wide variety that covers most needs. I’ve taken a look at some of their indoor and outdoor options but one area where they have been missing something on their outdoor lineup that they have had on their indoor access points is having a 4x4 Wifi 6 Access Point. I previously took a look at the ECW260 which is a 2 x 2 Wifi 6 AP. Well, they now have the ECW270 to fill in that gap. Like with the ECW260, it connects with a 2.5 Gigabit PoE connection but the ECW270 doubles up on its antennas and radios to better utilize that bandwidth. They have also given it a 1 Gig PoE capable port to make it easy to run a PoE camera nearby. We have been using the ECW260 to get better coverage outside and I’m curious how the upgrade to the ECW270 might perform. So today I’m going to take a closer look at the ECW270 and also see how it performs.
Product Name: EnGenius ECW270 WiFi 6 4x4 Outdoor Access Point
Review Sample Provided by: EnGenius
Written by: Wes Compton
Amazon Affiliate Link: HERE
|
Specifications |
|
|
Technical Specifications |
|
|
Standards |
IEEE 802.11b/g/n/ax on 2.4GHz IEEE802.11a/n/ac/ax on 5GHz |
|
Processor |
Qualcomm® Quad-Core CPU ARM Cortex A53s @ 2.2GHz |
|
Antenna |
Four (4) External 7 dBi 5 GHz Detachable N-Type Antennas Four (4) External 5 dBi 2.4 GHz Detachable N-Type Antennas |
|
Physical Interface |
1 x 10/100/1000/2500 BASE-T, RJ-45 Ethernet Port 1 x 10/100/1000 BASE-T, RJ-45 Ethernet Port (PoE+ PSE out) |
|
LED Indicators |
1 x Power 1 x LAN 1 x LAN 2 1 x 2.4 GHz 1 x 5 GHz |
|
Power Source |
Power-over-Ethernet: 802.3at/bt Proprietary 48V – 54V IEEE 802.11e Compliant Source Active Ethernet (PoE) |
|
Maximum Power Consumption |
46W |
|
Surge Protection |
1KV |
|
ESD Protection |
Contact: 4KV Air: 8 KV |
|
Wireless & Radio Specifications |
|
|
Operating Frequency |
Dual-Radio Concurrent 2.4GHz & 5 GHz |
|
Operation Modes |
AP, Mesh, AP Mesh |
|
Frequency Radio |
2.4GHz: 2400 MHz ~ 2482 MHz 5GHz: 5150 MHz ~ 5250 MHz, 5250 MHz ~ 5350 MHz, 5470 MHz ~ 5725 MHz, 5725MHz ~ 5850MHz |
|
Transmit Power |
2.4GHz: 24 dBm 5GHz: 24 dBm Maximum power is limited by regulatory domain |
|
Tx Beamforming (TxBF) |
Increasing signal reliability and transmitting distance. |
|
Radio Chains/Spatial Stream |
4x4:4 |
|
SU-MIMO |
Four (4) spatial streams SU-MIMO for 2.4GHz and four (4) spatial streams SU-MIMO for 5GHz up to 3,600 Mbps wireless data rate to a single 11ax wireless client device under both 2.4G Hz and 5GHz radio. |
|
MU-MIMO |
Four (4) spatial streams multi-user (MU)-MIMO for up to 2,400 Mbps wireless data rate to transmit to one (1) four streams MU-MIMO 11ax capable wireless client devices under 5GHz simultaneously
Four (4) spatial streams multi-user (MU)-MIMO for up to 1,200 Mbps wireless data rate to transmit to one (1) four streams MU-MIMO 11ax capable wireless client devices under 2.4GHz simultaneously. |
|
Supported Data Rates (Mbps): |
802.11ax: 2.4 GHz: 9 to 1148 (MCS0 to MCS11, NSS = 1 to 2) 5 GHz: 18 to 2400 (MCS0 to MSC11, NSS = 1 to 2) 802.11b: 1, 2, 5.5, 11 802.11a/g: 6, 9, 12, 18, 36, 48, 54 802.11n: 6.5 to 600 Mbps (MCS0 to MCS15) 802.11ac: 6.5 to 1733 Mbps (MCS0 to MCS9, NSS = 1 to 2) |
|
Supported Radio Technologies |
802.11ax: Orthogonal Frequency Division Multiple Access (OFDMA) 802.11b: Direct-sequence spread-spectrum (DSSS) 802.11ac/a/g/n: Orthogonal Frequency Division Multiple (OFDM) |
|
Channelization |
802.11ax supports high efficiency (HE) —HE 20/40/80 MHz 802.11ac supports very high throughput (VHT) —VHT 20/40/80 MHz 802.11n supports high throughput (HT) —HT 20/40 MHz 802.11n supports very high throughput under the 2.4GHz radio –VHT40 MHz (256-QAM) 802.11n/ac/ax packet aggregation: A-MPDU, A-SPDU |
|
Supported Modulation |
802.11ax: BPSK, QPSK, 16-QAM, 64-QAM, 256-QAM, 1024-QAM 802.11ac: BPSK, QPSK, 16-QAM, 64-QAM, 256-QAM 802.11a/g/n: BPSK, QPSK, 16-QAM, 64-QAM 802.11b: BPSK, QPSK, CCK |
|
Management |
|
|
Multiple BSSID |
8 SSIDs for both 2.4GHz and 5GHz radios |
|
VLAN Tagging |
Supports 802.1q SSID-to-VLAN Tagging Cross-band VLAN Pass Through Management VLAN |
|
Spanning Tree |
Supports 802.1d Spanning Tree Protocol |
|
QoS (Quality of Service) |
Complaint With IEEE 802.11e Standard WMM |
|
SNMP |
v1, v2c, v3 |
|
MIB |
I/II, Private MIB |
|
Wireless Security |
WPA3-PSK (SAE) WPA3 Enterprise WPA2 Enterprise (AES) WPA2 AES-PSK OWE Hide SSID in Beacons MAC Address Filtering, up to 32 MACs per SSID Wireless STA (Client) Connected List SSH Tunnel Client Isolation |
|
Environmental & Physical |
|
|
Temperature Range |
Operating: -4º~149ºF/-20ºC~65ºC Storage: -22Fº~176ºF/-30ºC~80ºC |
|
Humidity (non-condensing) |
Operating: 90% or less Storage: 90% or less |
|
Waterproof & Dustproof |
IP68-Rated Enclosure |
|
Device Dimensions & Weights |
|
|
ECW270 Device |
Weight: 4.12lbs. (1.87kg) Width: 8.58” (218 mm) Length: 11.22” (285 mm) Height” 2.18” (55.5 mm) |
|
Packaging |
Weight: 3.33 lbs. (1.51kg) Width: 9.21" (234 mm) Length: 11.18" (284 mm) Height: 5.67" (144 mm) |
|
Package Contents |
1 – ECW270 Cloud Managed Outdoor Access Point 1 - Pole-Mounting Brackets 1 - Wall-Mount Screw Set 4 - 2.4 GHz 5dBi N-Type Antennas 4 – 5 GHz 7dBi N-Type Antennas 1 - Quick Installation Guide |
|
Certifications |
FCC CE IC |
|
Warranty |
2 Year |
Photos and Features
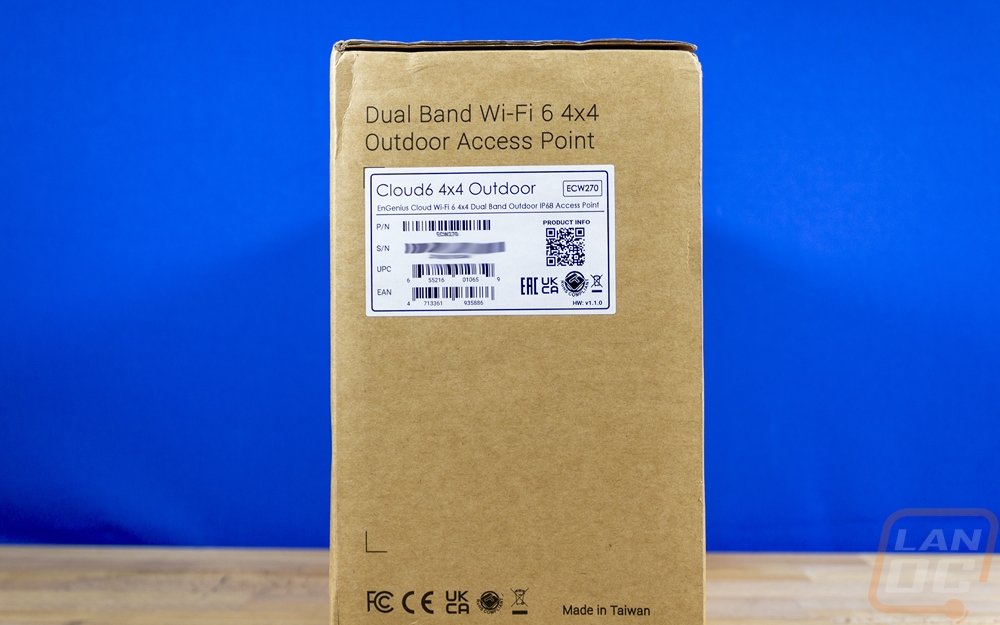
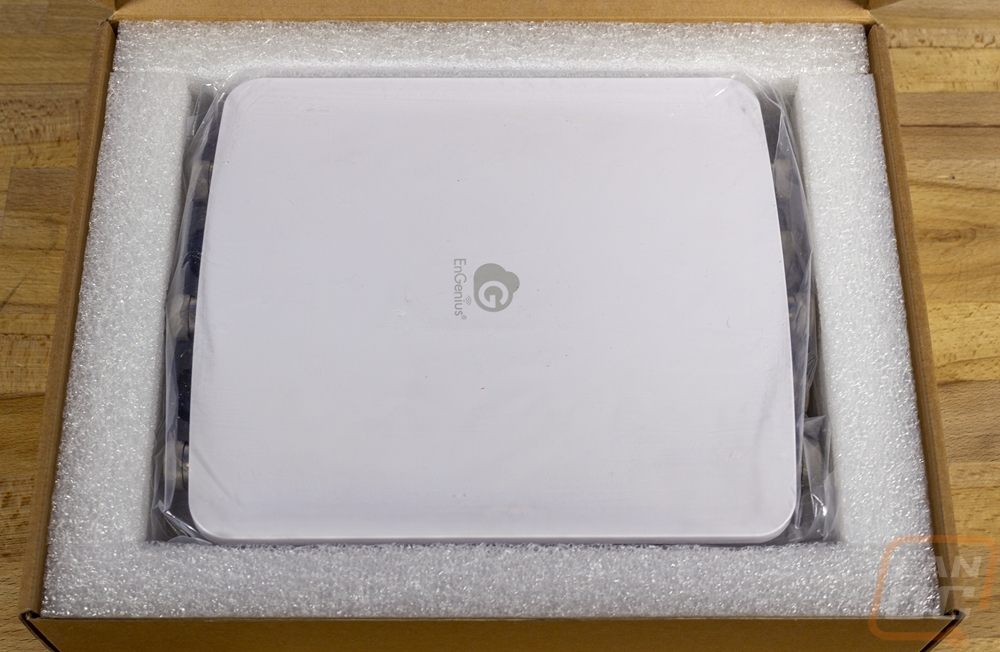
No surprise that the packaging for the EnGenius ECW270 comes in a brown box, this is what EnGenius has done for all of their enterprise products as well as their newer Fit lineup as well. The box for the ECW270 is big, a lot bigger than I expected. Both the front and back have the EnGenius Cloud branding on them. They also have “Facebook Wi-Fi Enabled” and in the bottom right corner, they do have the model name on them as well which some of the boxes don’t get because they can be reused. I guess because of the unique size there isn’t any worry that another product will also use the same box. Then on the side, they have a longer description that lets you know this is a dual-band WiFi 6 4x4 outdoor access point. They also have a white sticker on the side. This has the UPC and part number as well as your serial number. It also has a QR code that will take you to the product info as well.
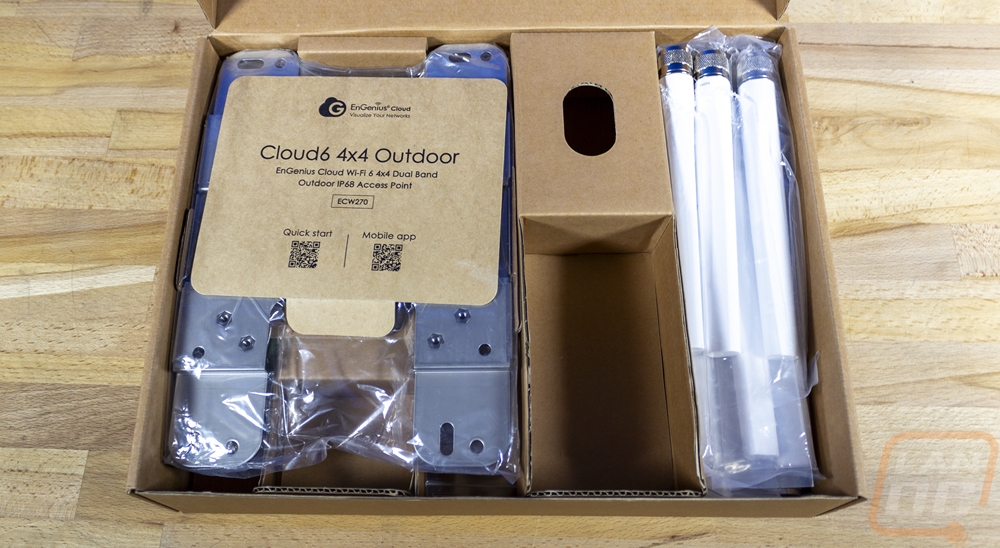
Once inside I was surprised to see two more boxes, EnGenius has one box with the ECW270 inside which is lined with foam for protection. Then the second box is packed full of all of the mounting hardware and the external antennas. I did notice that our sample has been opened up and tested which isn’t a big deal but should be noted as it does lower the chance that we run into any hardware issues out of the box. The accessory box has all of the antennas on the right side, each wrapped in plastic. There is an insert which has a quick start and mobile app QR codes on it and the model information. They also have a paper with the EU conformity paperwork. Then from there, the main mount covers up the screws, ground wire, and there is a second mount up under the cardboard as well.

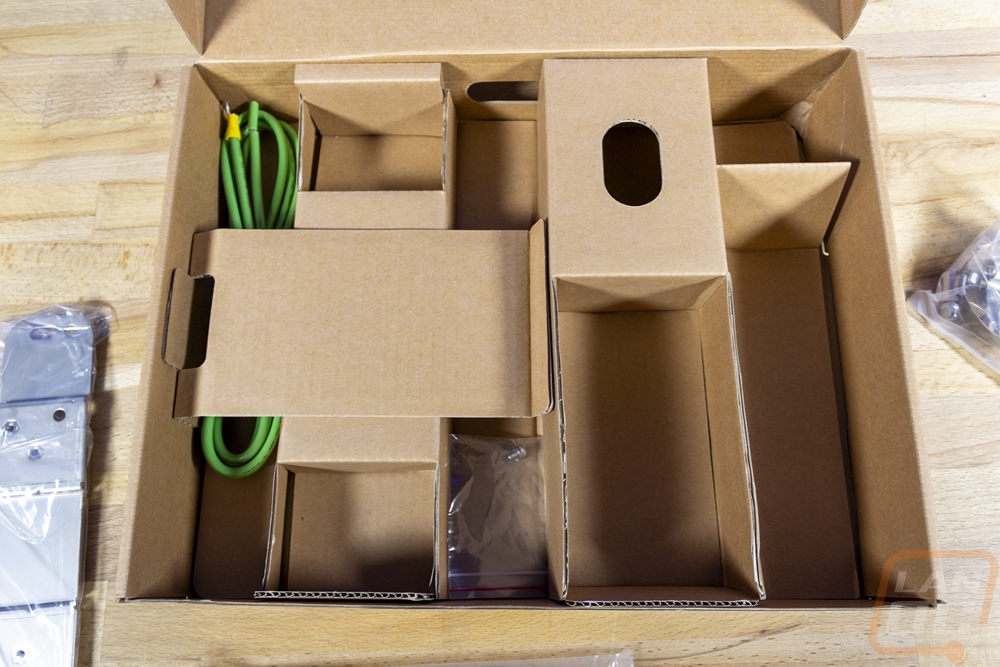
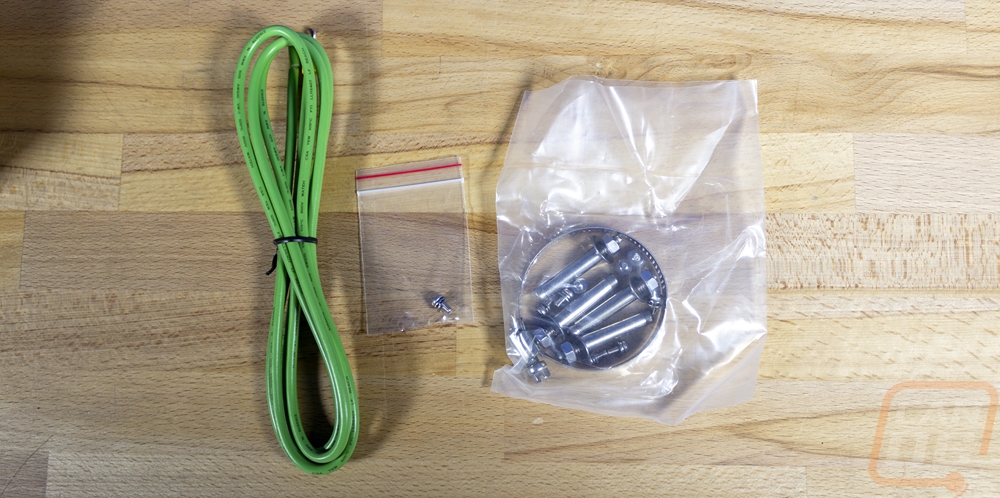
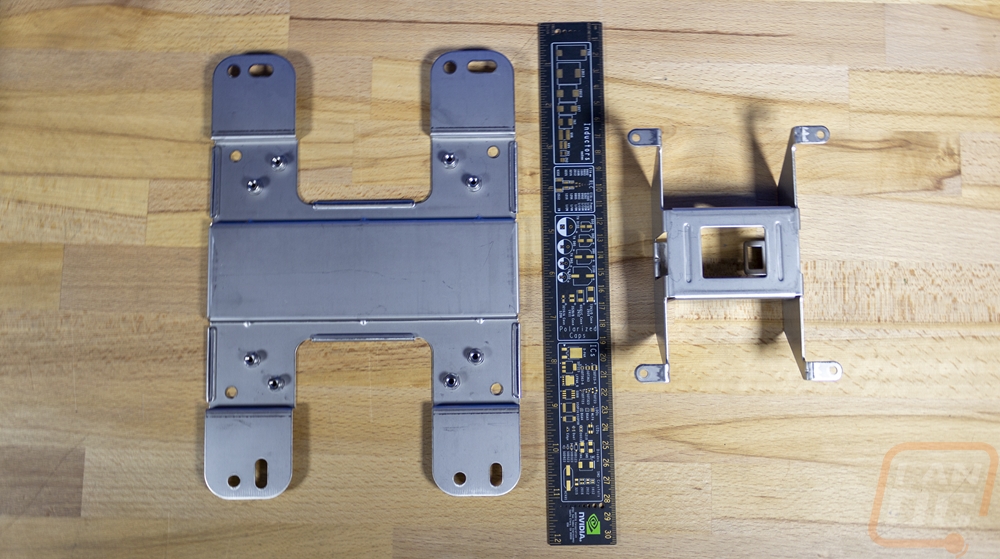
Like our previous look at the ECW260 2x2 Outdoor Access Point, the ECW270 comes with a thick green wire as a ground wire and a small mounting screw to attach it to the access point. Then there is another bag with a few mounting options. There are 8 screws with lock washers and standard washers already installed, those are for mounting the ECW270 to the mount and for mounting the secondary pole mount to the main mount. There are four wedge anchors which have a bolt on the end, the ECW270 is heavier than the ECW260 and you can see that with the much larger mount that are typically used in concrete. When you tighten the bolt they lock in place. There is also a metal hose clamp for pole mounting. For the mounts the mount for the ECW270 is huge, a big change from the one-piece design that they used on the ECW260. This looks a lot more like a TV wall mount and is 10 inches long on the long side with four slot mounting holes or four round holes that you can use for mounting it. Then on the inside, there are 8 mounting holes for mounting the pole mount giving you the option to install it in both directions. Then four holes where you install the ECW270 directly to the mount. The ECW260 had a mount with pegs where you could install the mount and then slide and lock the AP to the mount after, this design doesn’t allow for that at all. It also means that the mounting points will all be visible where the old design hid the mount completely.

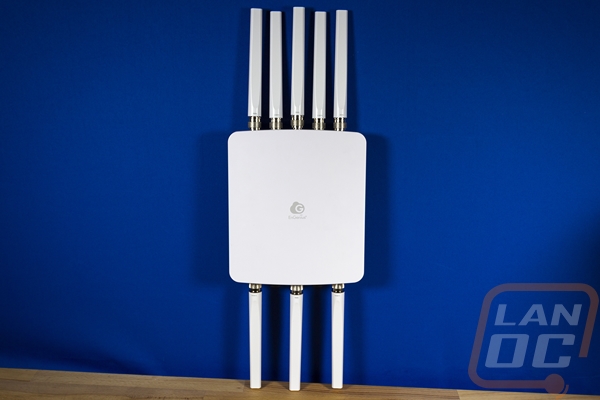
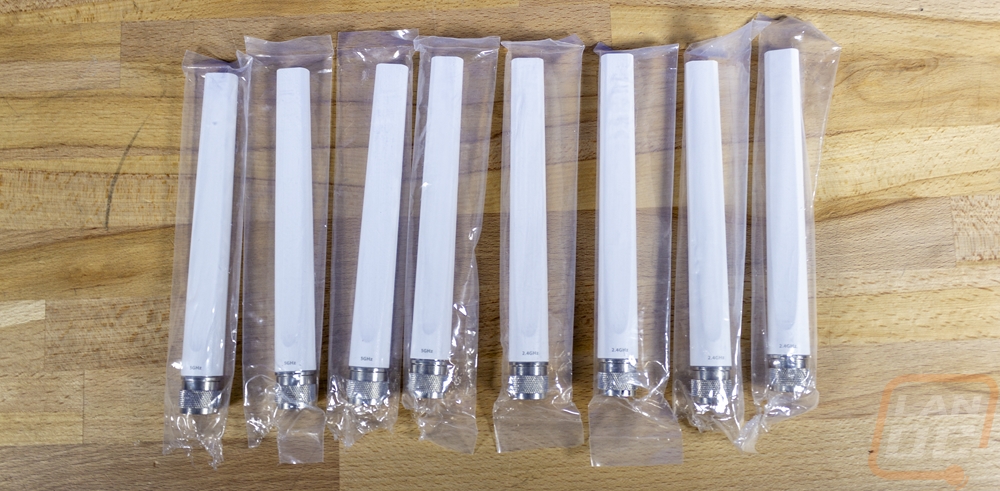
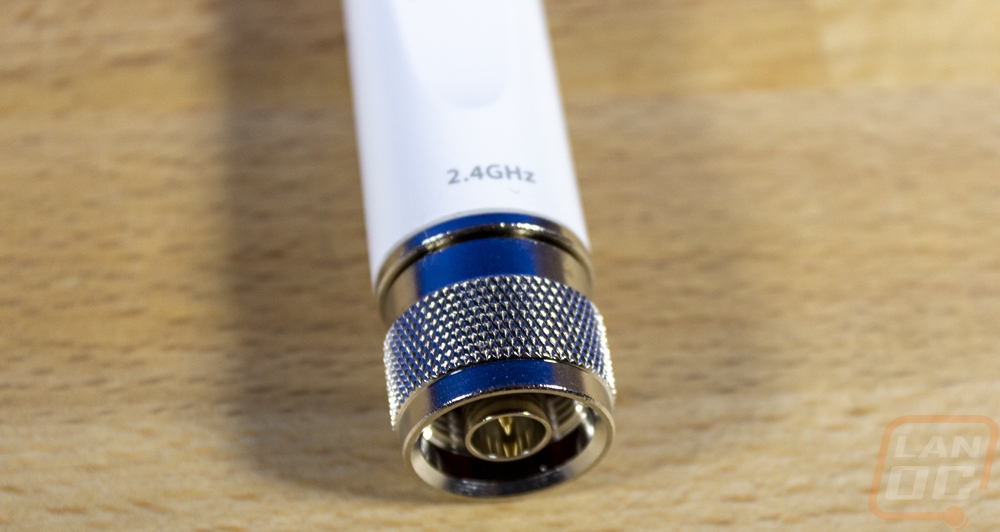
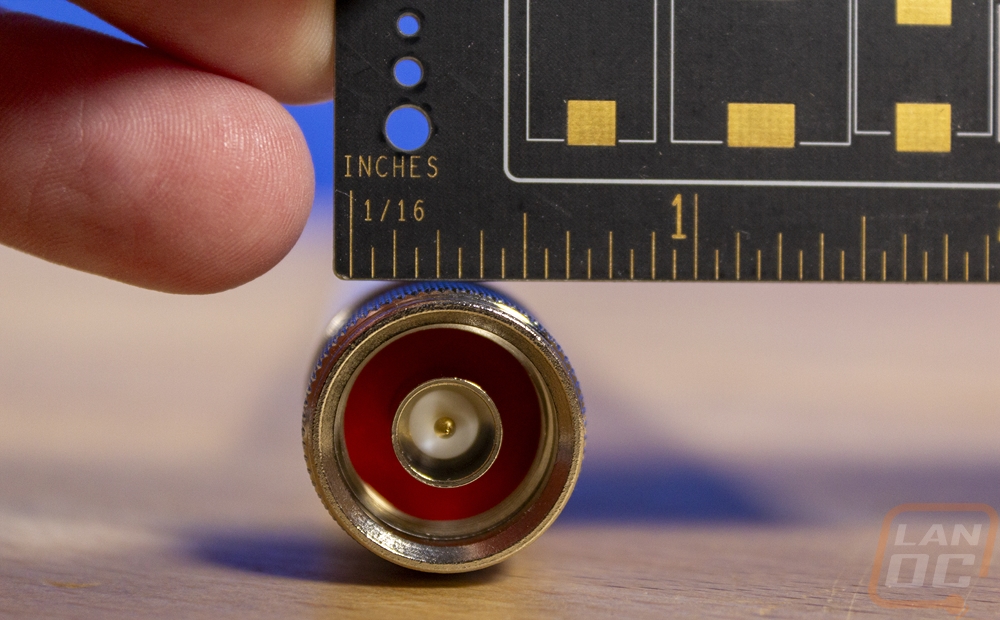
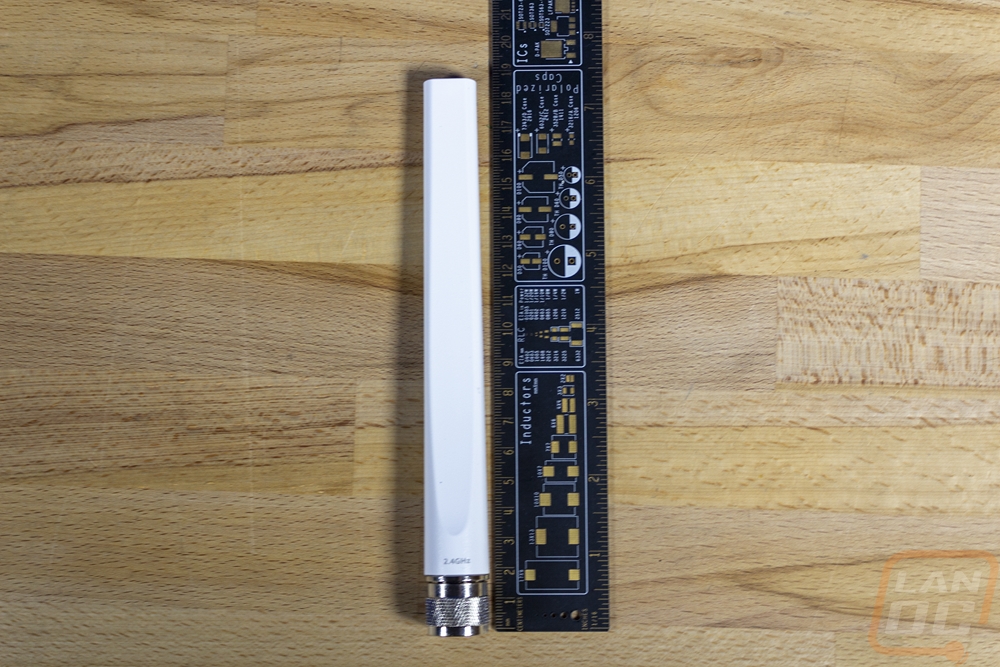
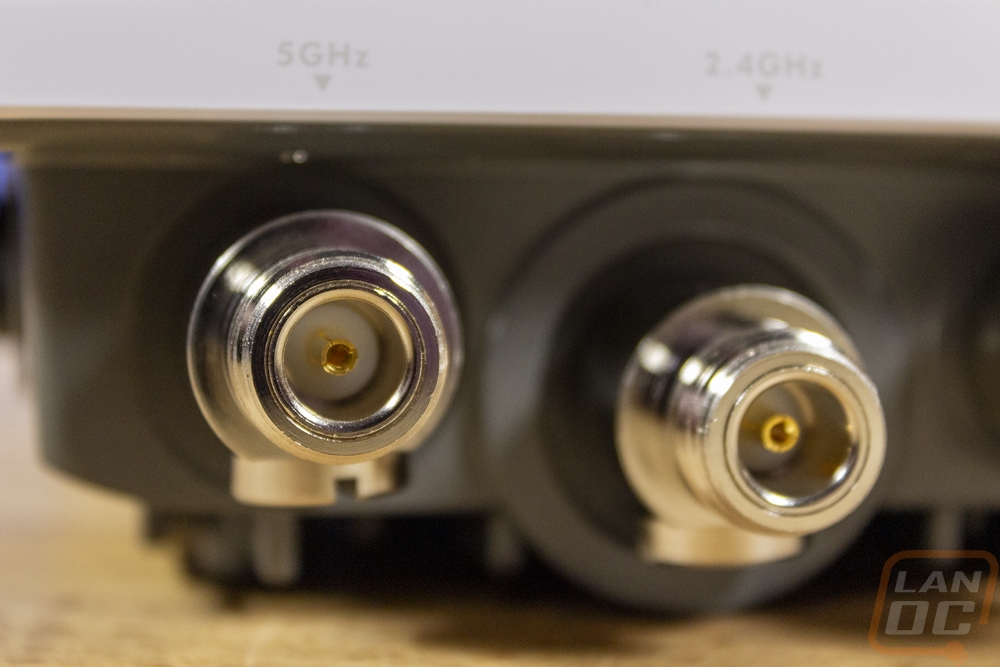
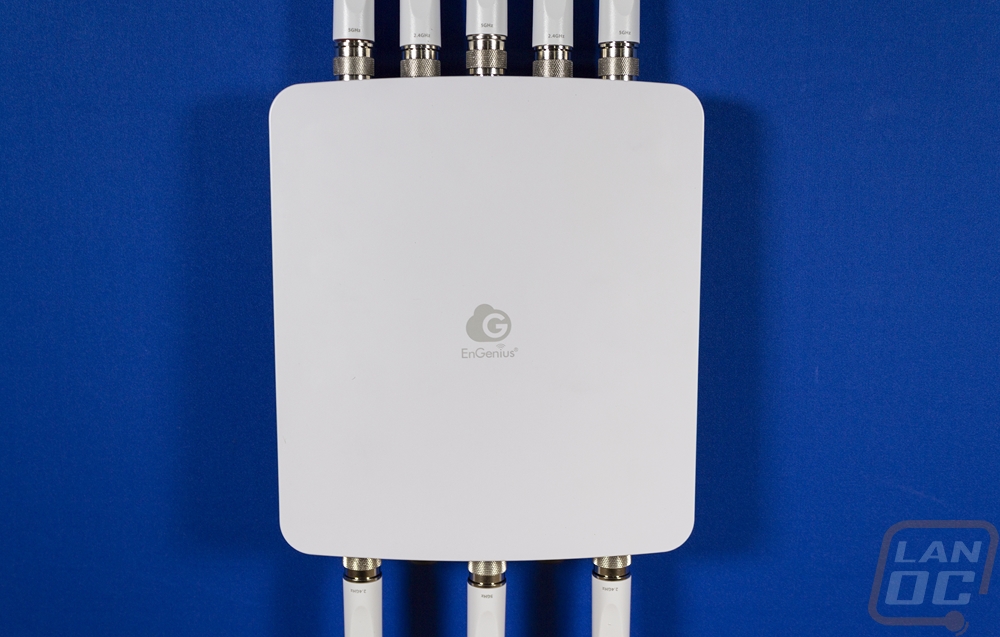
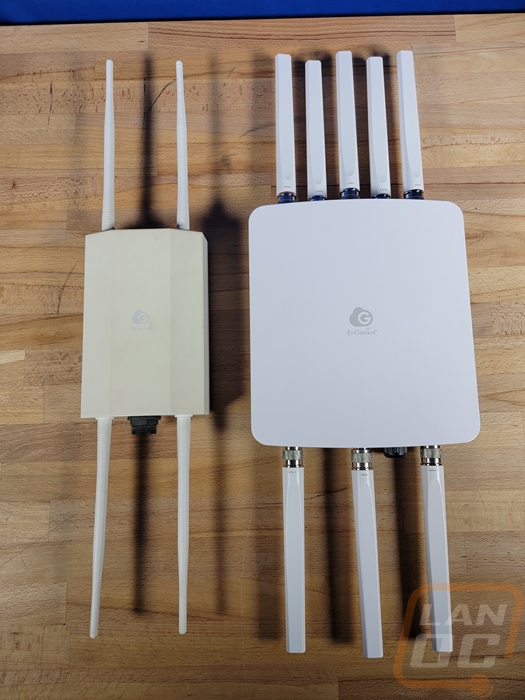
By doubling up on radios it also means there has to be twice as many antennas as well but what surprised me was that these are significantly larger than the design on the ECW260. These are 7 and a half inches long and almost ¾ of an inch thick as well. They are frequency specific and EnGenius has labeled them for 5Ghz and 2.4Ghz use and the larger design also has full metal connections on the ends with knurled texture on them. Inside the connection is in the center then there is a thick red ring insulator to keep things dry.
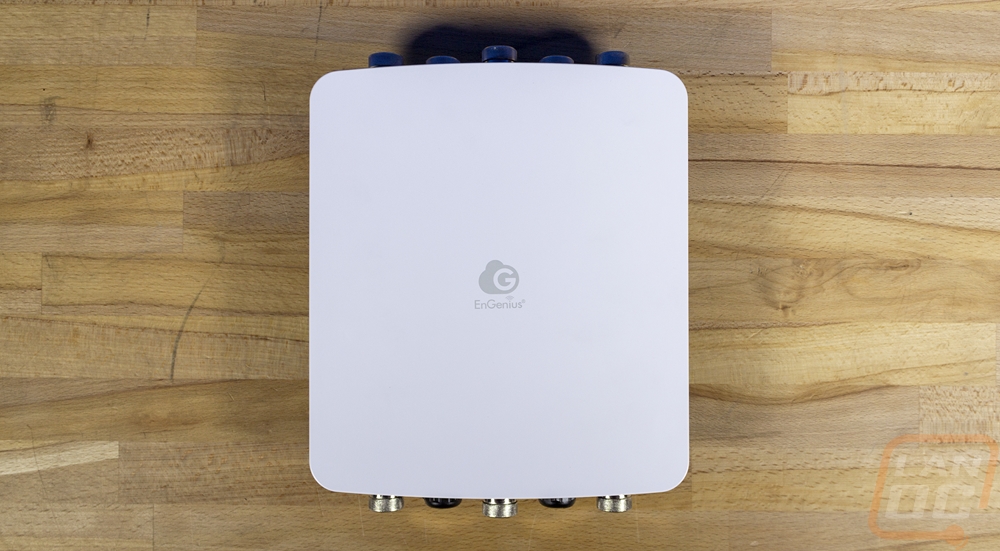
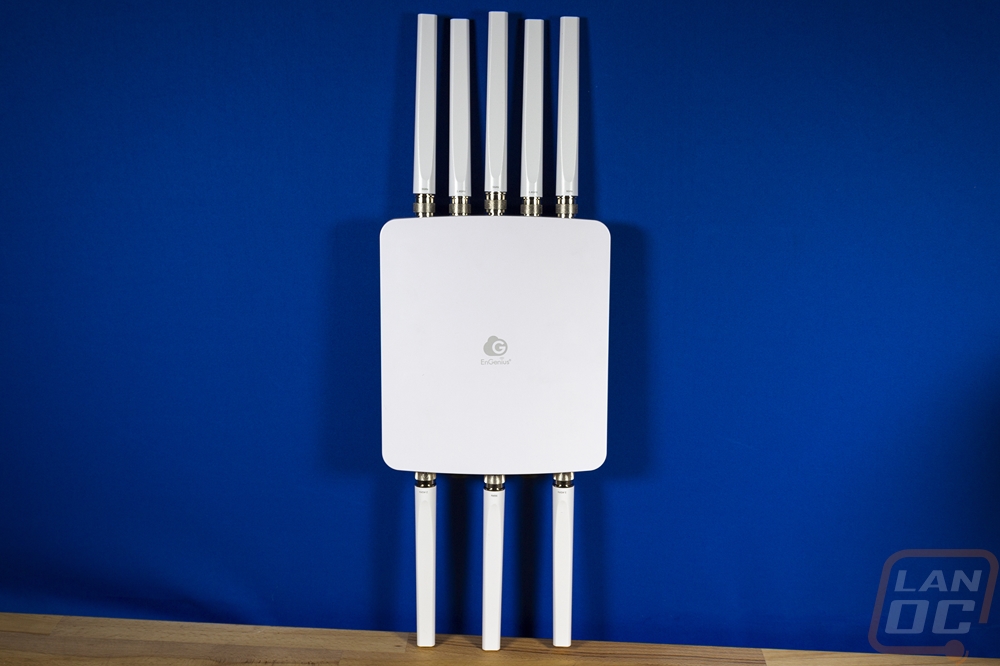
The access point itself is 4.12 pounds which is more than twice that of the ECW260 which was 1.54 pounds. It is 8.58 inches wide and 11.22 inches tall. For comparison with the ECW260, it was 7.48 inches tall and 4.07 inches wide. The ECW260 was 2.07 inches thick and the ECW270 isn’t too far off there at 2.18 inches. The base portion of the ECW270 before you install the antennas has a bright white finish with the EnGenius logo in a grey in the center and while larger than their inside access points does have a similar shape with the rounded corners.
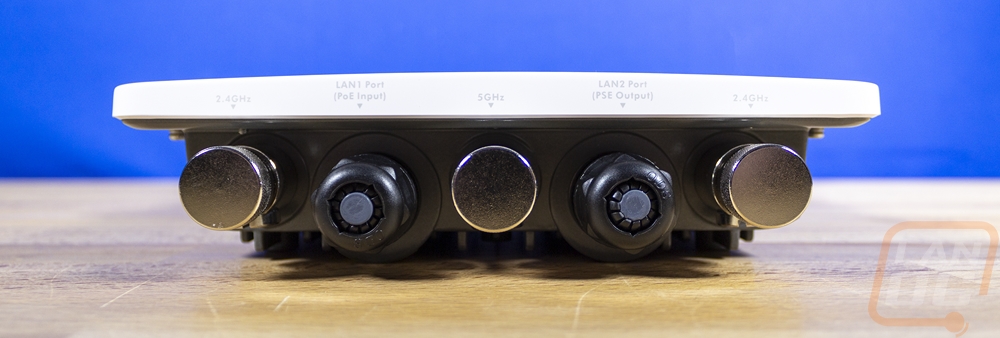
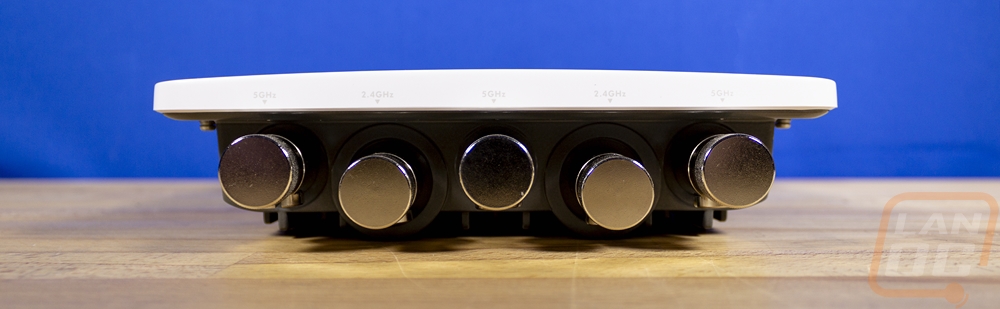
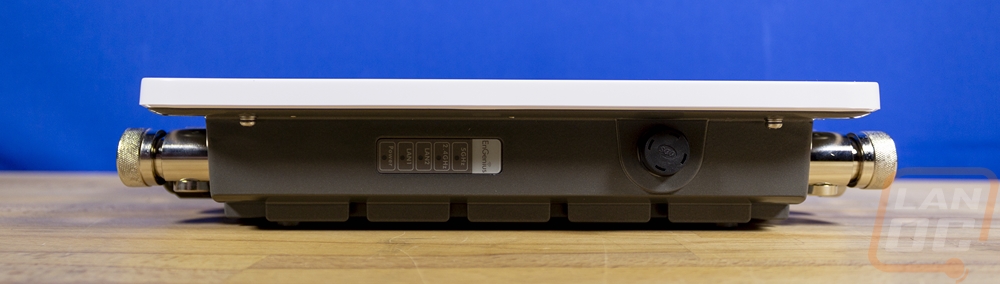
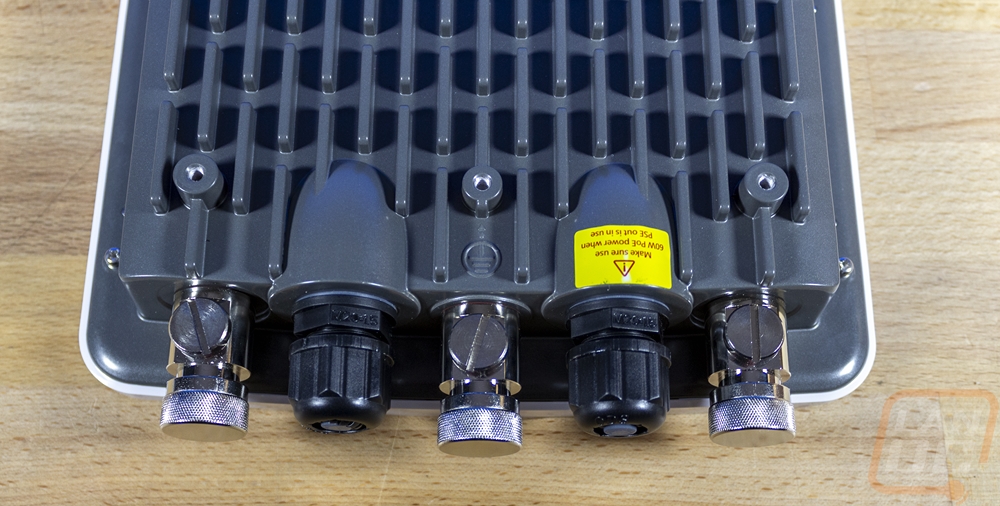
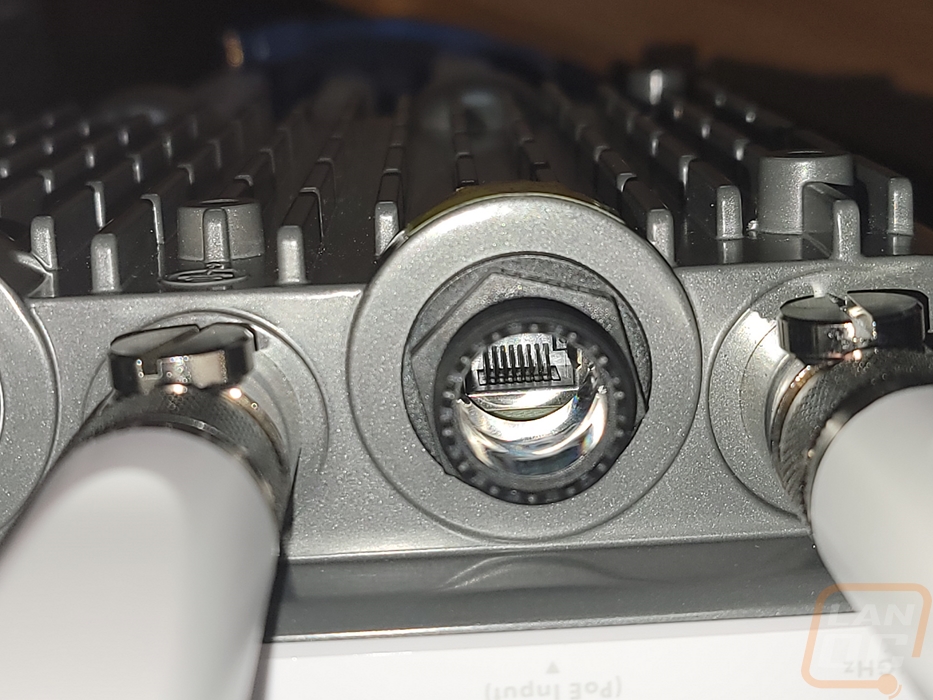
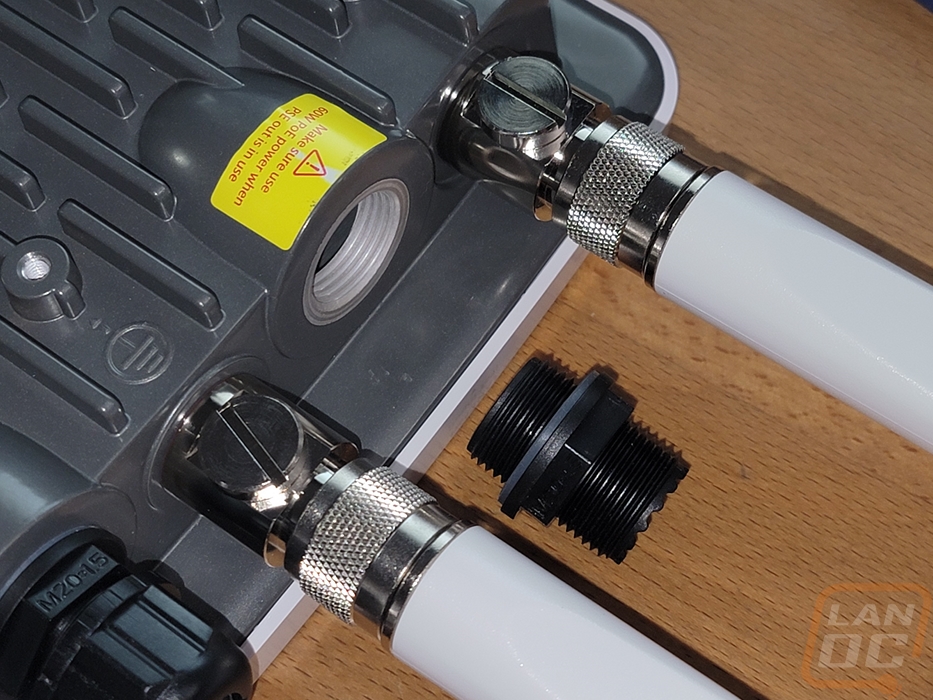
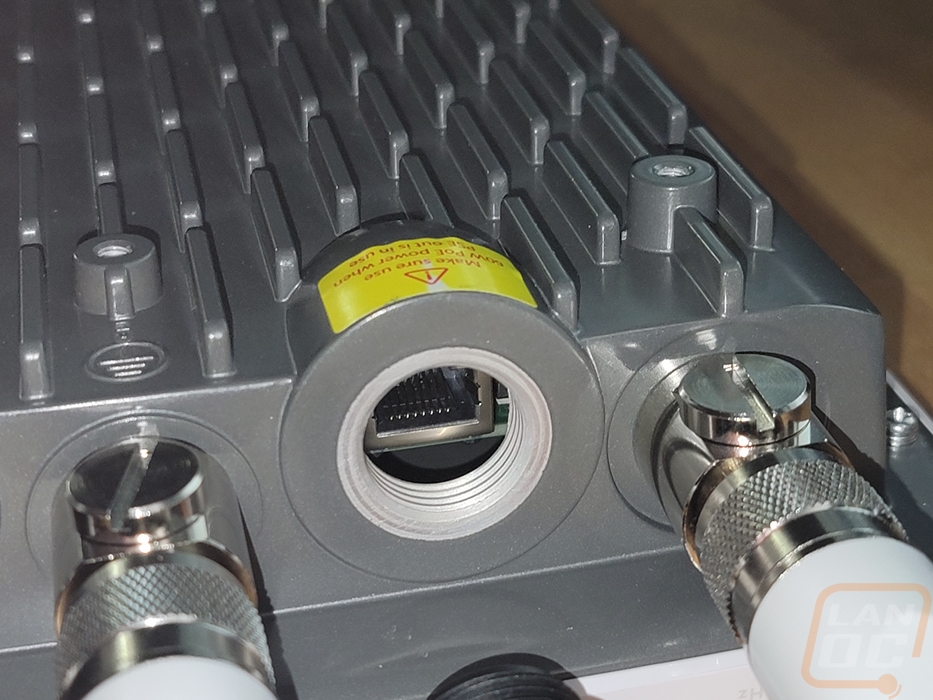
Once we start looking at the sides we can see that the white plastic cover wraps around a little less than a half inch and there is a slight curve to the front shape so it is thicker in the center than the outside edges. The top and bottom have all of the antenna connections. There are five in total on top and then three on the bottom, which makes room for the two waterproof ethernet connections on the bottom. The new larger antenna connections also come with metal caps installed on each one, the ECW260 with its smaller connections did come with plastic caps but the metal here seems a little excessive. Each of the antennas and LAN jacks is labeled on the plastic housing with an arrow. This helps make sure you get the 5Hz and 2.4 GHz antennas in the correct spots. Then for the LAN connections, this is important now that there are two. This lets you know that the left one is for the input connection whereas the right one is an output. The input is a 2.5 Gigabit connection and the output is 1 Gig but it does also pass through PoE making it a great way to also mount a PoE camera nearby without having to run an extra run for it.
The left side has a white sticker on it, this has all of your model information, serial, and Mac address as well. It also has a QR code for quickly adding the ECW270 to your EnGenius Cloud account for a quick setup. For security though I do wish that this was on the back of the ECW270 like they did with the ECW260. Obviously, if you are close enough to be able to read this you could have physical access to the wired connection, but giving quick access to the Mac address still isn’t ideal as it makes it even easier for someone to clone and bypass security measures. The right side then has a stack of small LEDs with labels for each. You have power down at the bottom, status indicators for each of the LAN ports, and the same for both wireless frequencies.
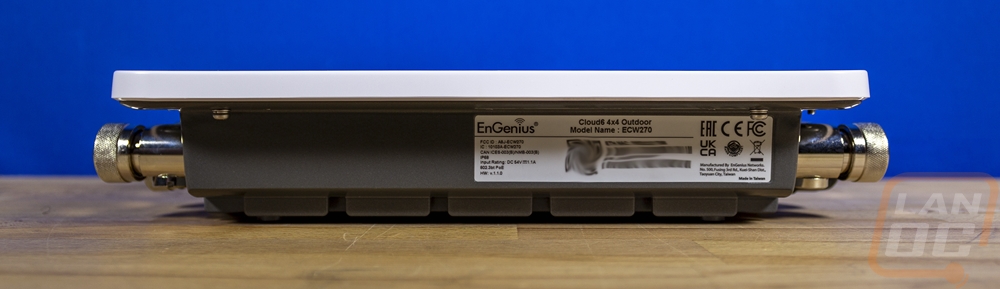

The back of the ECW270 has a thick aluminum housing and this along with the all-metal antenna connections are where a lot of the extra weight is found. The aluminum back housing has a thick heatsink designed into the entire back. Its weather resistance has been upgraded from IP67 on the ECW260 up to IP68. The 6 means complete dust protection. The upgrade from 7 to 8 is on the water intrusion rating. IP67 is protection from immersion between 15 centimeters and 1 meter in depth whereas IP68 meets the same rating but is rated for a larger depth but EnGenius doesn’t specify the depth in the specifications. With the heatsink, the temperature rating does from -4º~149ºF which is a little higher than on the ECW260, and has a humidity of up to 90%. Being in northern Ohio we do see lower the -4 degrees most winters, so that is something to keep an eye out on. The back has four mounting holes for attaching the included mount and the fifth threaded hole is for the included ground strap.

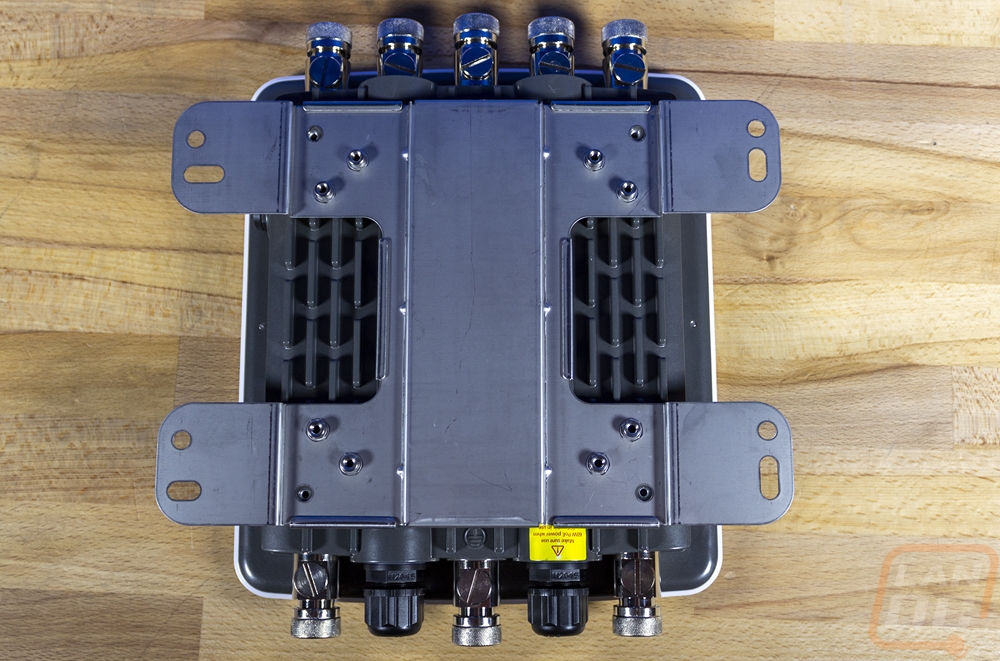
Here is a look at the ECW270 with all of the eight antennas installed and it isn’t much taller than the ECW260 which can be seen in the comparison shot between the two. That look does show just how much our ECW260 has yellowed in the two years that we have been running it.
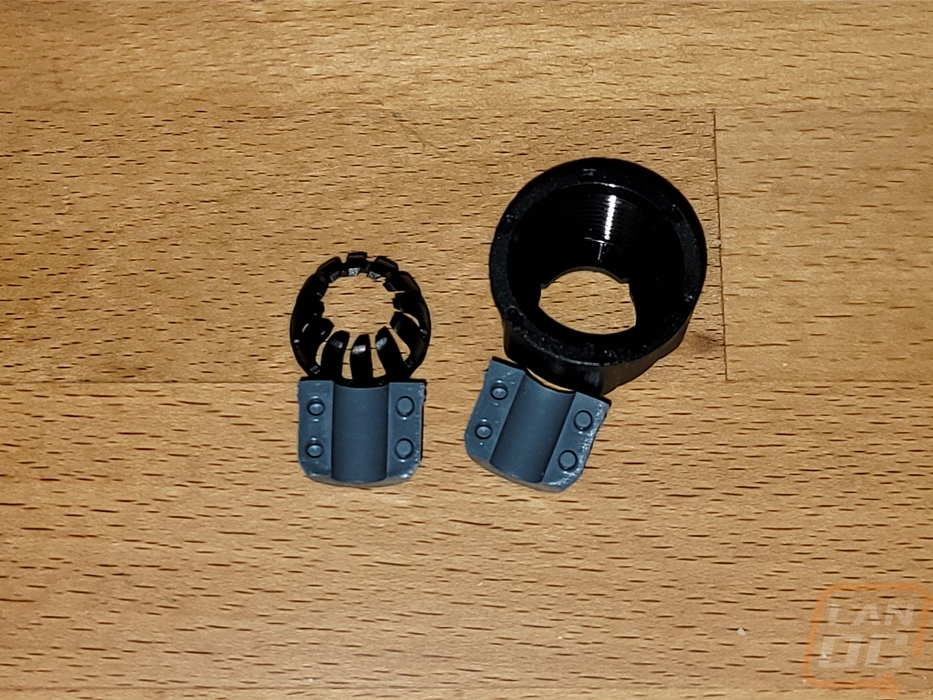
The LAN ports on the bottom have a relatively standard waterproof design which has a rubber insert that goes around your ethernet, a plastic insert to help it keep shape, then the cap that tightens things down, which will shrink the insert down around the cable. But like on the ECW260, I do have to point out that the ethernet connection itself is way up inside of the ECW270. Because of that unhooking, the connection is a huge pain and also means you can't run any strain relief on the end of your cable which might help make it easier to unplug. The design does work with already terminated cables which is good, the insert splits in half, and the cap is notched to fit the squared-off plug through it.
Software and Performance
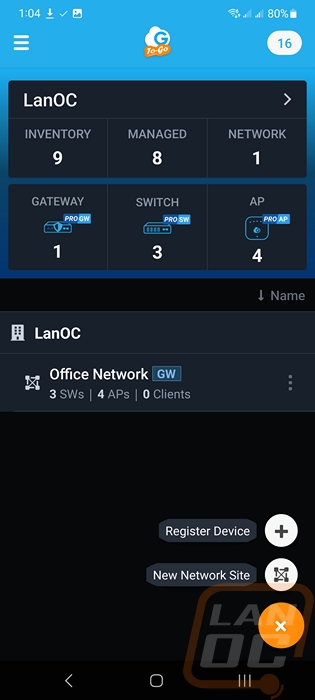
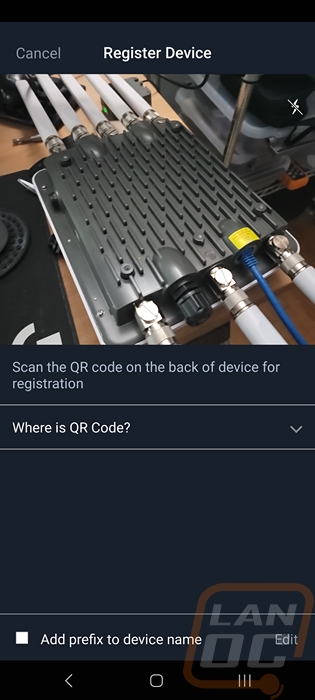
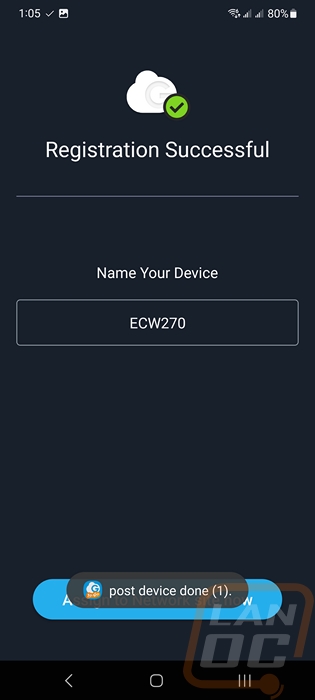
Before testing out the ECW270 there were a few things that needed to be done. For one we have to get the ECW270 attached to our EnGenius Cloud account and setup. I need to get the access point installed outside, replacing the ECW260 that we previously had mounted out there and I also need to go through the software because that is where you are going to find a majority of the features. The EnGenius Cloud software has both a web interface as well as an app. I utilize both so I will check both of those out and the ECW270 does have its own web interface so I will check that out at the end as well. The easiest way to add devices to your EnGenius Cloud setup is by using the app so we will start there. The homepage will list all of your locations in one place and at the top gives you a count of how many devices are attached. The three lines at the top left open up a menu and on the top right, you can click and see all of your alerts, in this case, I had 16 which were mostly letting me know that devices had rebooted for weekly updates. Then down at the bottom, you have a plus sign button, with that you can start a new network site or register a new device, I need to register a new device. This will open up your camera and you can scan the QR code on the ECW270, once scanned it is added right away. You also have the option to rename the device and pick which network you are adding it to.
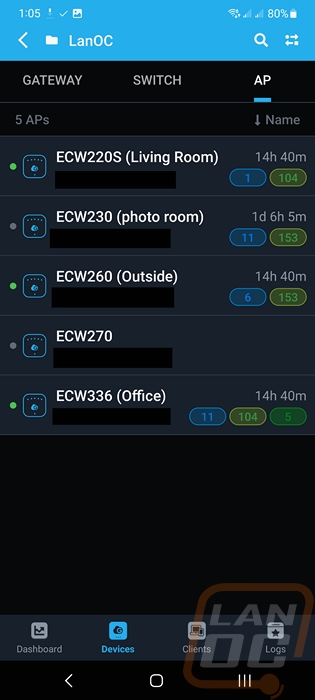
Digging around the rest of the EnGenius Cloud on the Go app, on the homepage you can touch the gateway, switch, or ap pictures and it will open up a listing of those devices. So for the ECW270, we can confirm that our newly added device is on the network. You do have to have it plugged in and running, of course, adding the QR code just tells the EnGenius Cloud to know to attach your device once it is online. The AP listing page will have all of your access points on that network, their name, and MAC addresses for each as well. Then on the right you can see their total uptime and what channels they are connected to. The blue is 2.4 Ghz, the green is 5 Ghz, and the dark green is for 6 Ghz if it is supported. Clicking on the device will open up the device detail page. This will have the full model and firmware information then as you scroll down it will list all of the SSIDs setup on the device, the radio settings, and also if wireless mesh networking is turned on or not. You also have the IP address settings as well which by default will be DHCP. I’ve IPs and Mac addresses blocked out just for safety on our network.
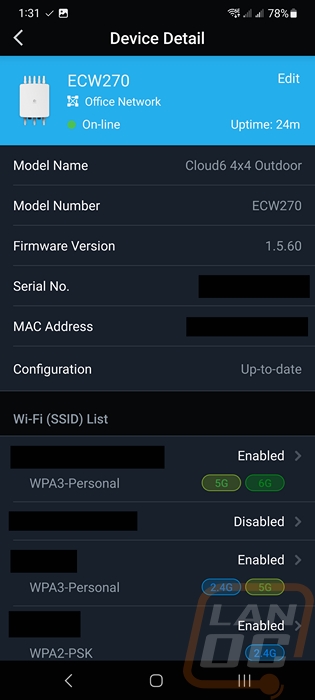
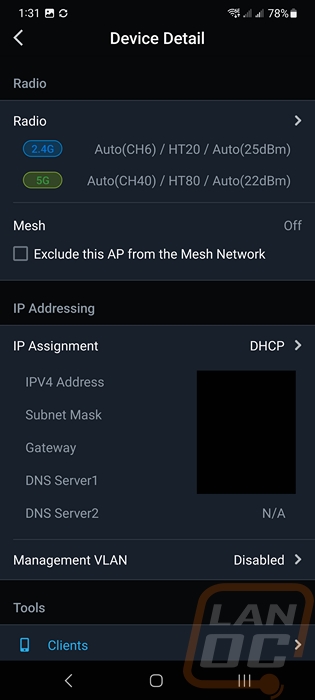
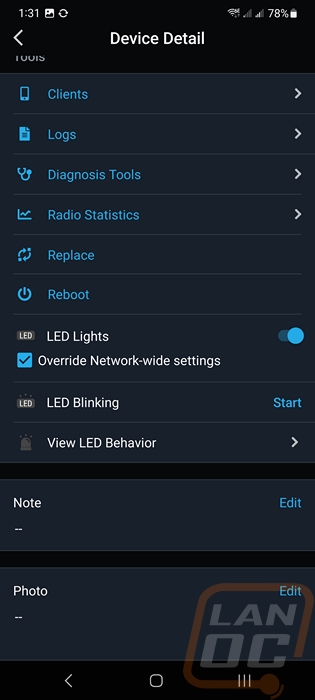
The bottom of the device page also has a lot of menus that you can open up. This starts with the client listing which will list all of the devices connected to the ECW270. The logs page will show bootup information, updates, and reboots. You can reboot the access point here and use the replace option if you want to swap it out. You can set up manual light settings which I have AP lights turned off by default so I have them on for our testing here. You can also set the LEDs to blink to help you confirm it is the device you are looking at if you have a lot of similar devices deployed. The diagnosis tools page opens up another page with tools to help pinpoint issues like traceroute and scanning radio frequencies (I will check this out more on the web interface). Radio settings can show you the 2.4 GHz and 5 GHz traffic graphed out and you can also manually change settings. These settings are device specific, you shouldn’t change these unless you only want this one device to do something. For example, turning the power down lower on a specific access point that maybe reaches well beyond your location or forcing one AP on a specific channel.
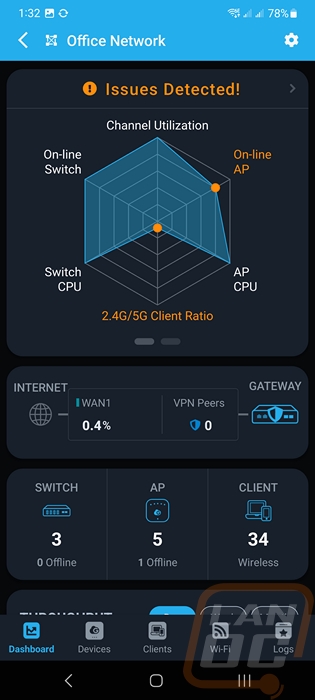
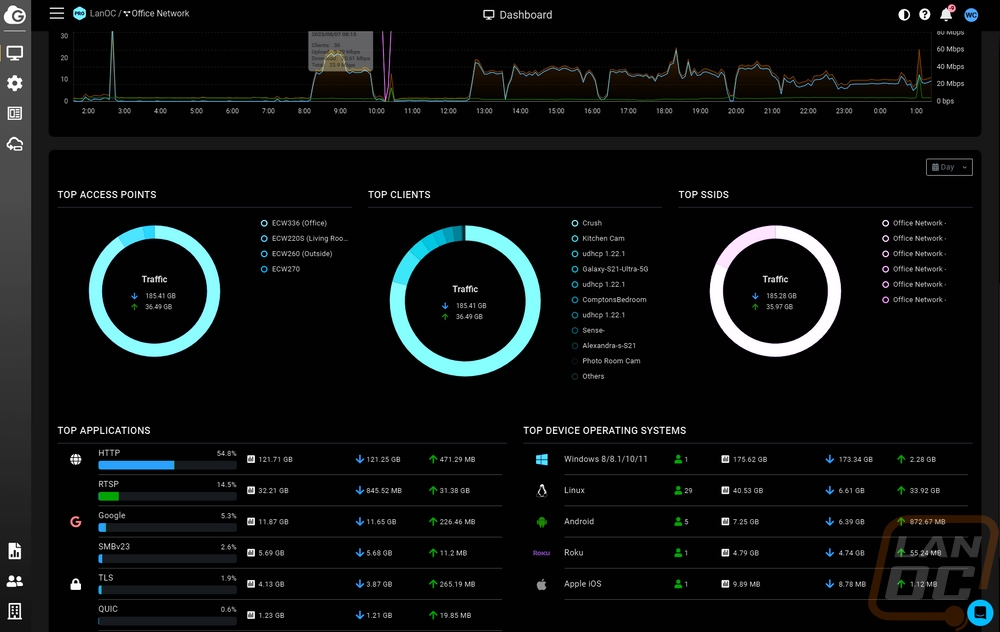
Opening up a specific network on the On-the-Go app will show you the current status of everything. For us, it shows that we have one access point offline and we have a big issue with 2.4 GHz and 5 GHz ratio because of IoT devices which lean heavily on 2.4 GHz only radios. Because we have a supported gateway it shows current WAN utilization and we have a count on the number of wireless devices. Scrolling down lower you will get graphs for AP traffic which can be set to show by day/week/month and you also get the top clients listed which is a quick way to be able to pinpoint heavy users.
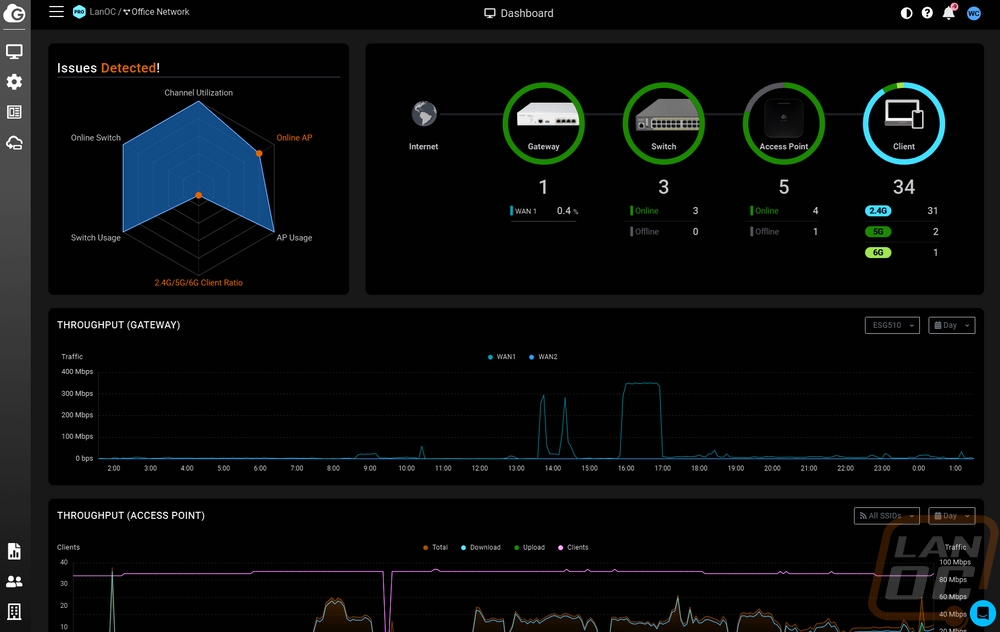
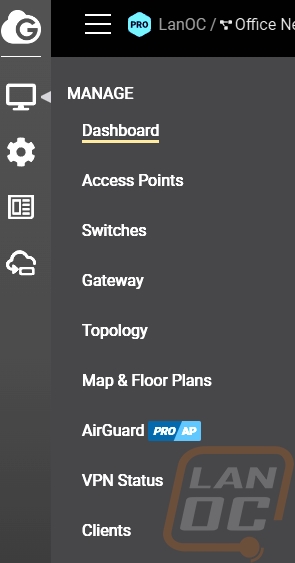
If you have seen any of our previous EnGenius Cloud coverage none of this is going to be different so you can skip ahead. But while the On-the-Go app is nice for when you are out of the office and makes adding devices easily. I use the main EnGenius Cloud web interface the most. They do share a lot of the same functionality though. When you sign in the main landing page has all of the status information including that status graph that lets you know if there are any immediate issues. Next to that each of the device types is shown with the number of devices online and offline and your client count for wireless devices. You have graphs for the gateway and access point that can be broken down by the day/week/month and by the SSID as well. Towards the bottom, there are pie graphs that show you the top access points, top clients, and top SSIDs to help pinpoint any issues. They also show application traffic and the operating system as well which is just for wireless clients. Then the grey bar on the left when you mouse over pops out with the menus. The main two are the manage and configure menus, today I will check out the options that apply to access points.
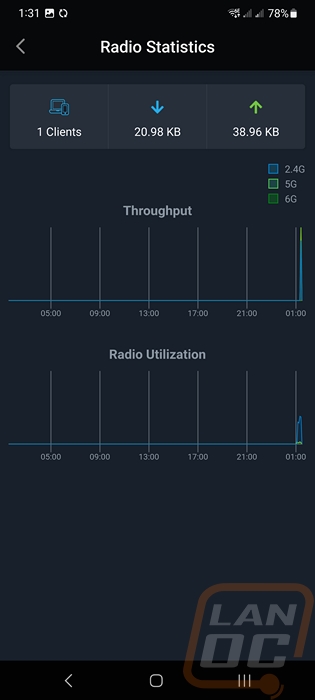
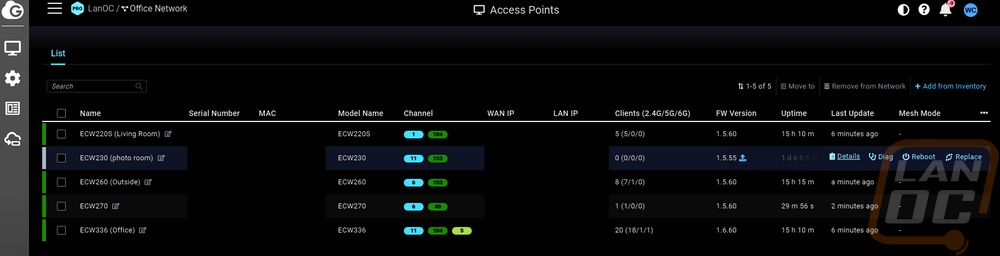
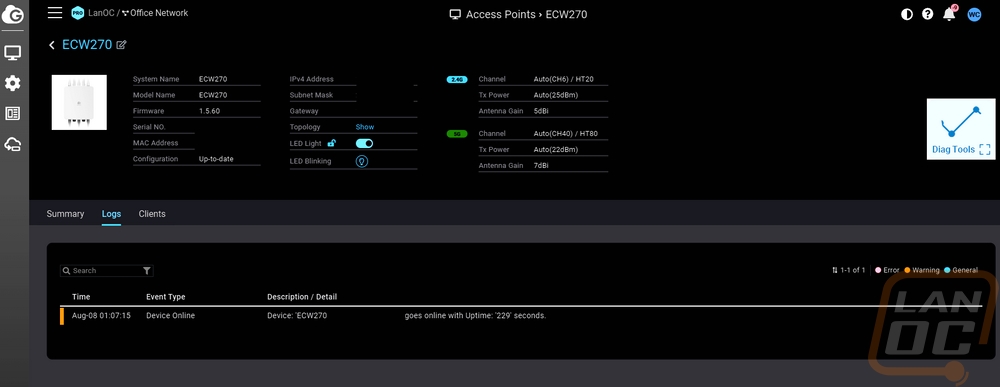
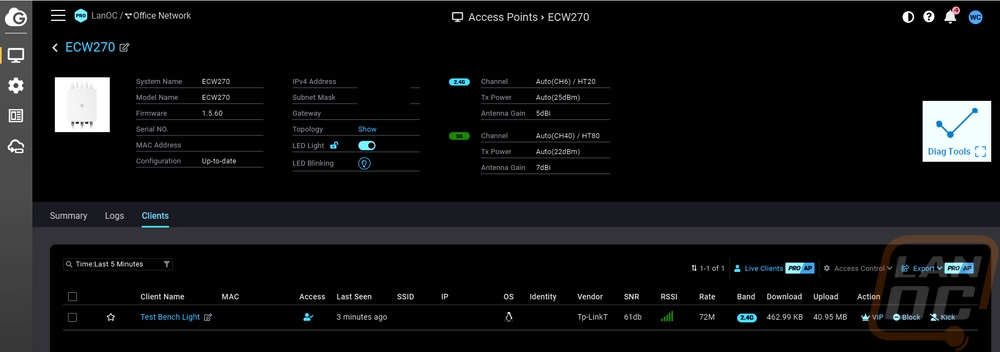
On the manage menu clicking on access points opens up a page that lists out all of the linked access points. This page has their names, serial numbers, Mac addresses, model names, and channels. You also have WAN and LAN IPs, client breakdowns by frequencies, firmware version, uptime, and last update. When a device has a pending firmware update the blue icon will show next to it. Then mousing over any AP on this listing shows a smaller menu where you can open up the details, diag page, reboot, or replace the device. The detail page has a picture of the device up top and repeats a lot of the same information you saw on the listing page up top. Here you can see all of the setup SSIDs and graphs for throughput for that specific access point like on the home page where you can sort by SSID and change the length of the graph. There is a tab for the log page which mostly just shows reboots and bootup times as well as errors if you run into any. Then you can see a list of clients attached to that access point. I had just one device this time on the ECW270 but you can see the device name and even rename it, Mac address, SSID, IP, and even device vendor. It shows upload and download bandwidth and the radio connection strength, rate, and frequency as well.
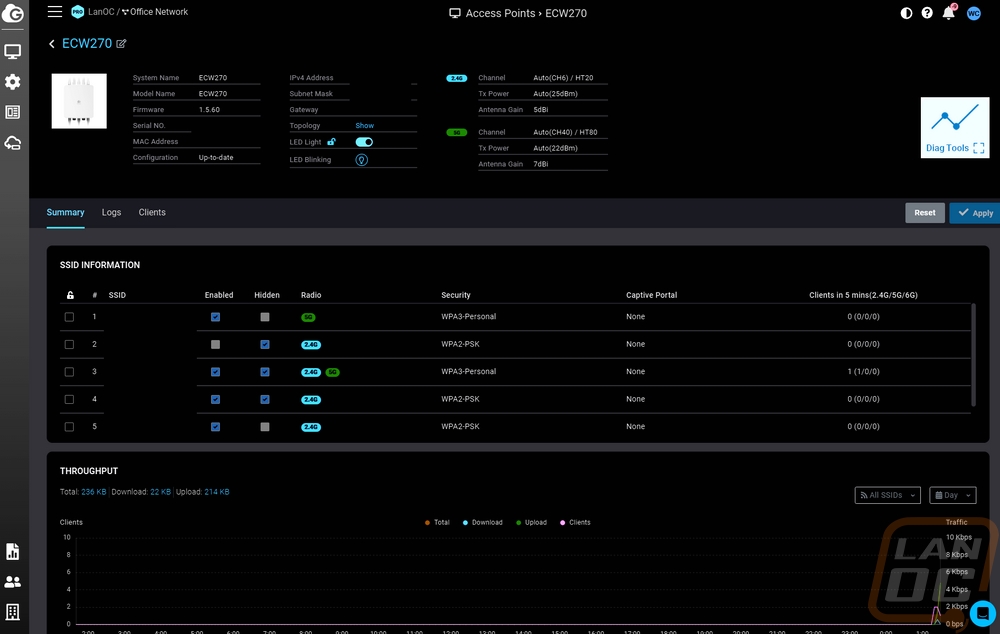
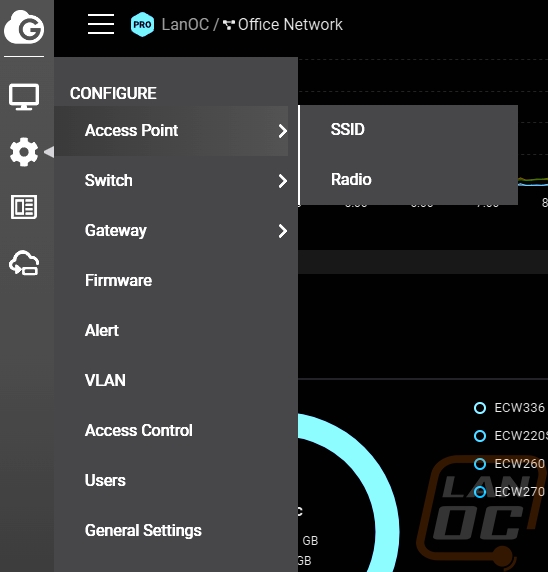
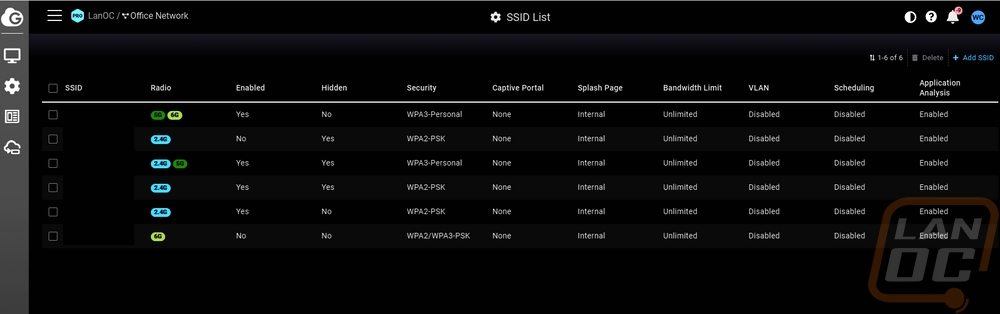
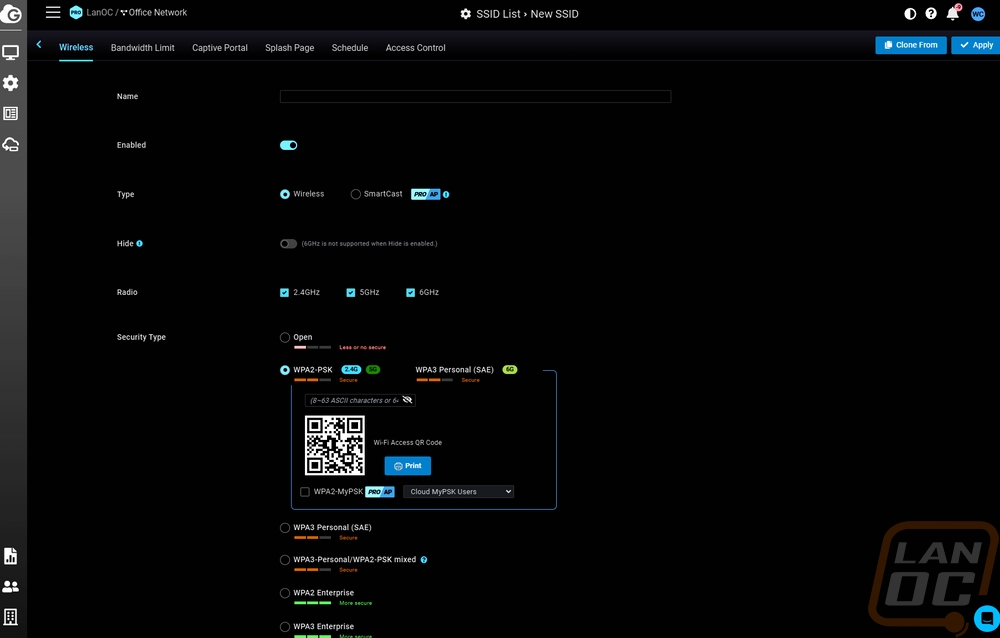
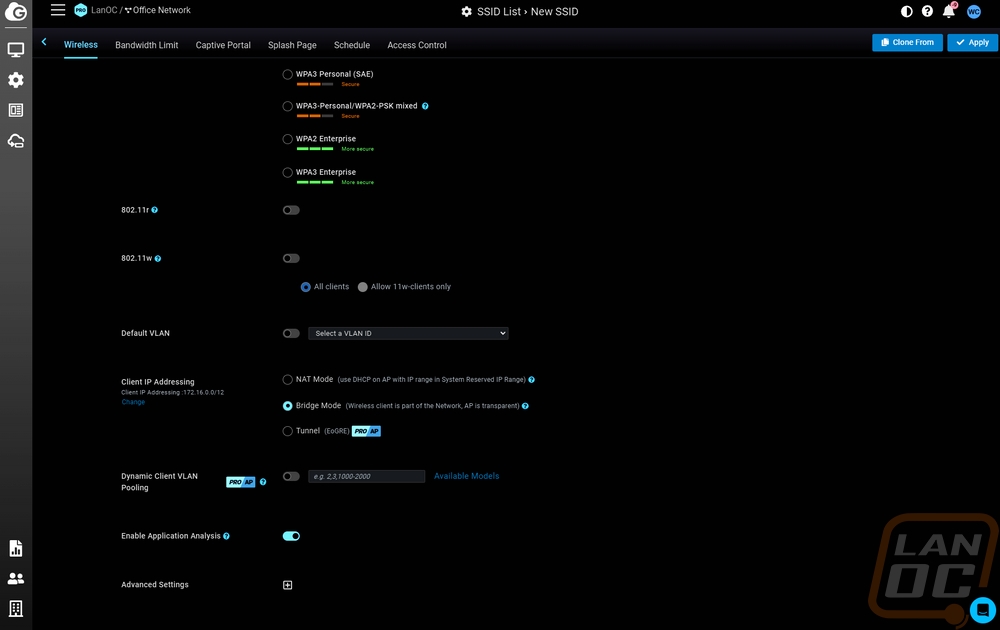
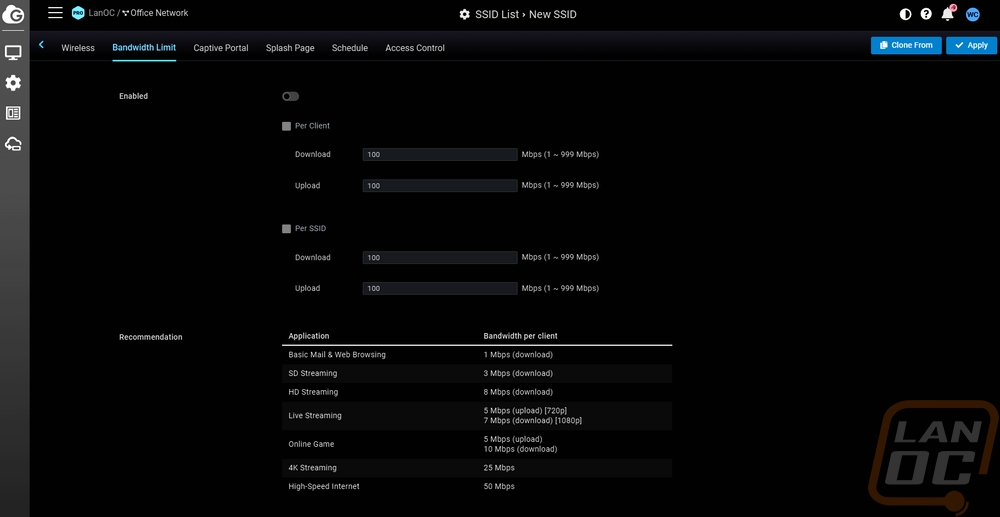
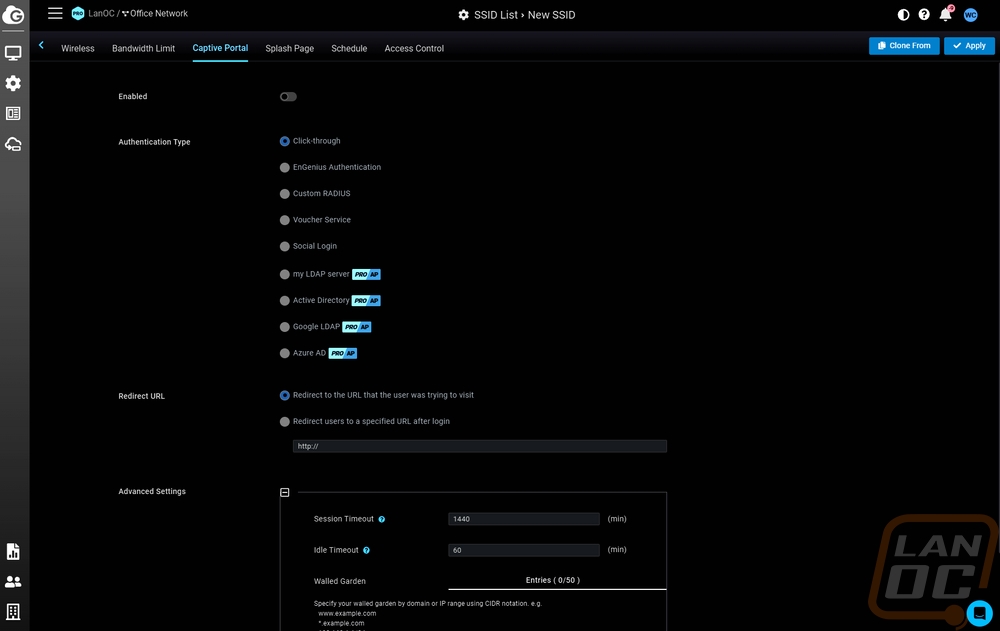
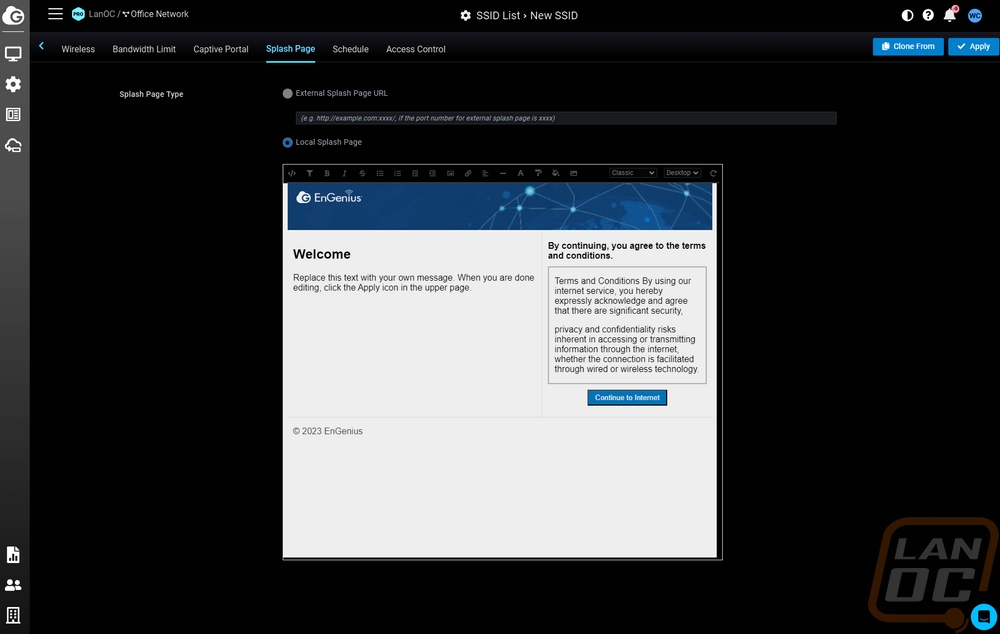
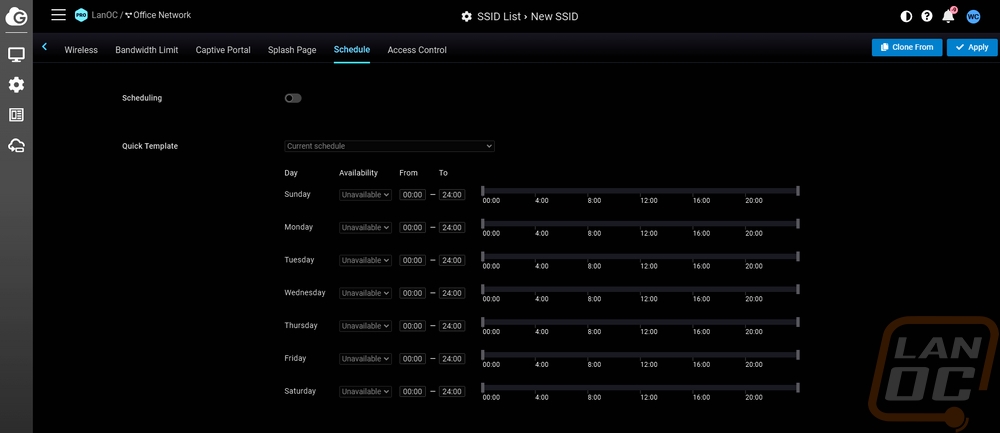
On the configure menu under access point, there are two options. The SSID option opens up a listing of all of the SSIDs you have configured across your network. Unless you change settings on a specific device all of these settings will propagate out to all access points that you add to your network. This is where you can set up a new SSID as well up in the top right the setup page has all of the same pages that you would find if you want to edit or change any of your current SSIDs. The first page of this has the SSID name option right up top and below that you can enable or disable. The option between wireless and smartcast is a pro feature but is an important one if you are using these devices in a hotel for example. By default, a hotel would set up their wireless as L2 devices to keep everything isolated from each other. But this option can let you still allow wireless connections from Chromecast for example, so for rooms with APs in each room you can let people cast to their TV but prevent them from doing it to other rooms. You can turn specific radio frequencies off by SSID then of course you have the security options which they have both personal and enterprise options with WPA2 and WPA3 as well as a mixed 2/3 option which will give you WPA3 security when it is supported but the availability of WPA2. They also make things easy with a QR code that you can print out in your business that will auto sign phones in. You can set up how you want the IP address to be handled including letting the AP handle DHCP if needed. There are then other pages up top with more settings. The first is a bandwidth limit page where you can cap bandwidth by the SSID or by client. With this being an enterprise AP the captive portal settings which has a long list of authentication types that keeps growing isn’t a surprise, you can also set up a splash page to take people to after they get signed in. The schedule and access control pages are both security settings and could be combined together. The schedule can turn an SSID on only during your business hours which is a great way to prevent someone from trying to access your network when no one is around. The access control page lets you block specific devices or give VIP access if needed.

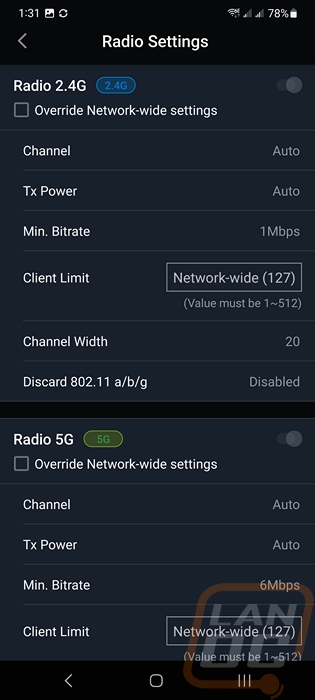
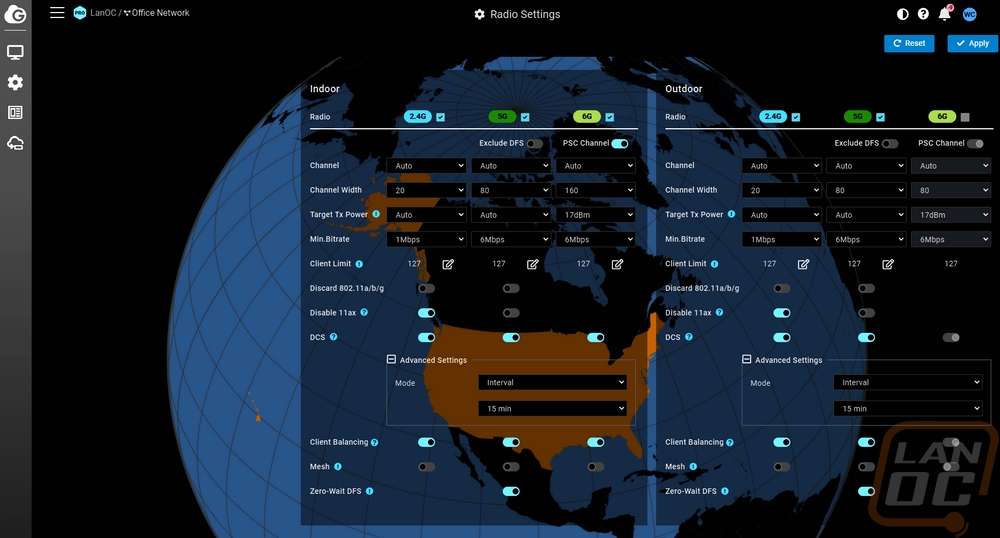
Also under the access point menu on the configure menu is the radio settings page. EnGenius has kept this simple with everything all on one page. Everything on the left is specific to indoor access points and then on the right you have outdoor access point radio settings. This lets you fine tune things inside and outside. From there, things are broken down by frequency with channel settings, channel width, target power, and minimum bitrate settings for each. You can also limit the number of clients here.
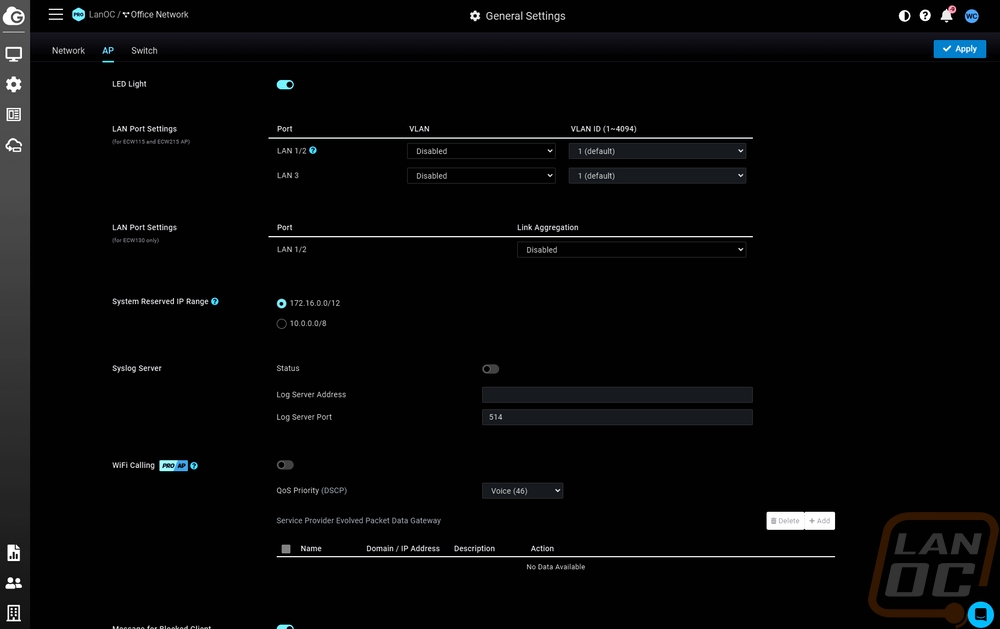
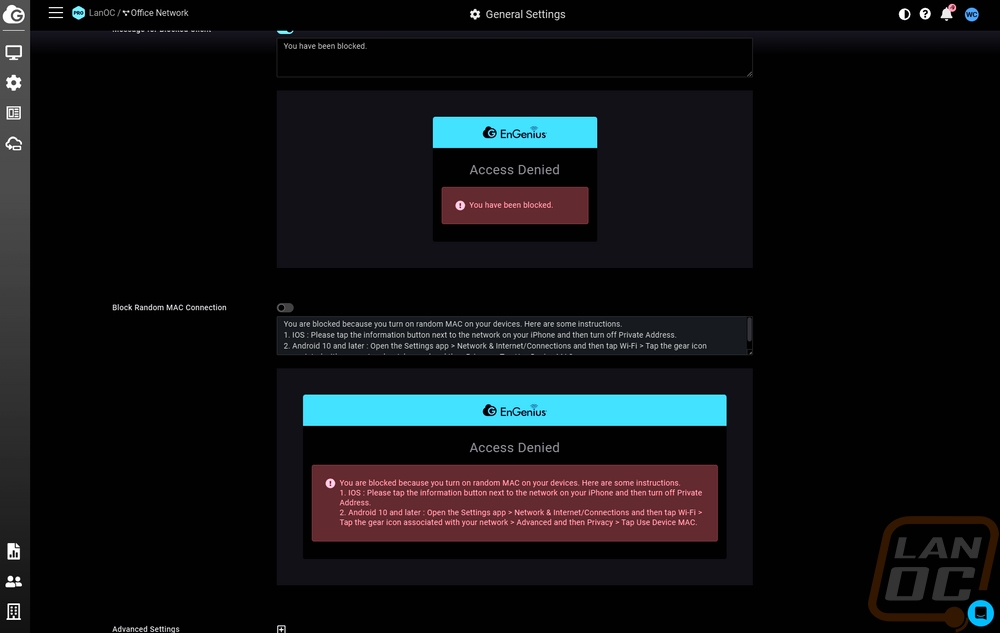
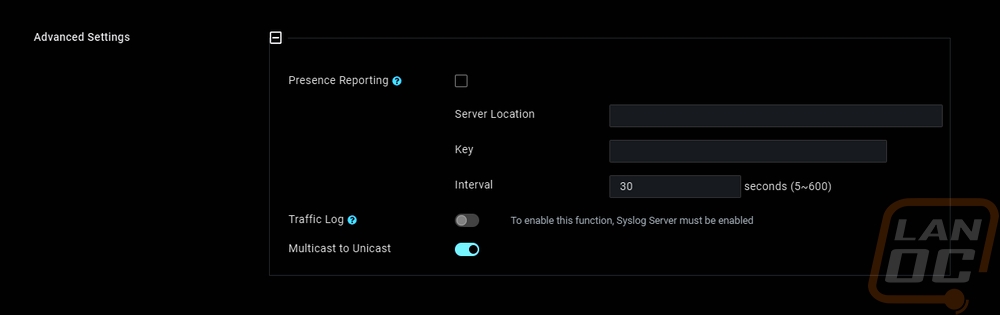
Under the configure menu there is also a general settings page. This has tabs up top for each device type but there are a few options for access points like the ECW270. These settings cover all access points on your network like the LED light option to turn lights off on all access points if you don’t want attention being drawn to them. You can set up LAN port VLAN settings and also set the reserved IP range. If you run a syslog server you can set that up here as well. WiFi calling support can be turned on here but it is also a pro-only feature. You can set up the message you want blocked devices to see and you can also set it up to block random Mac connections which you see on IOS and Android, this will even give the user a warning with instructions on how to fix it.
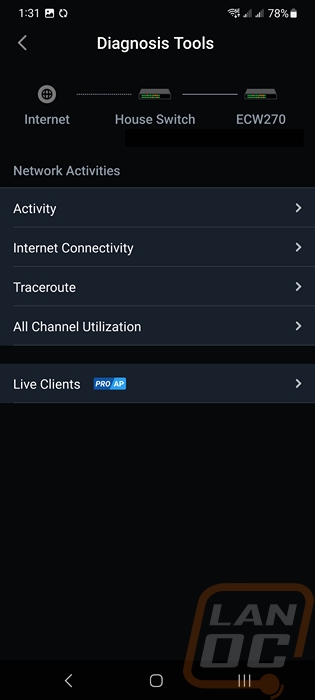
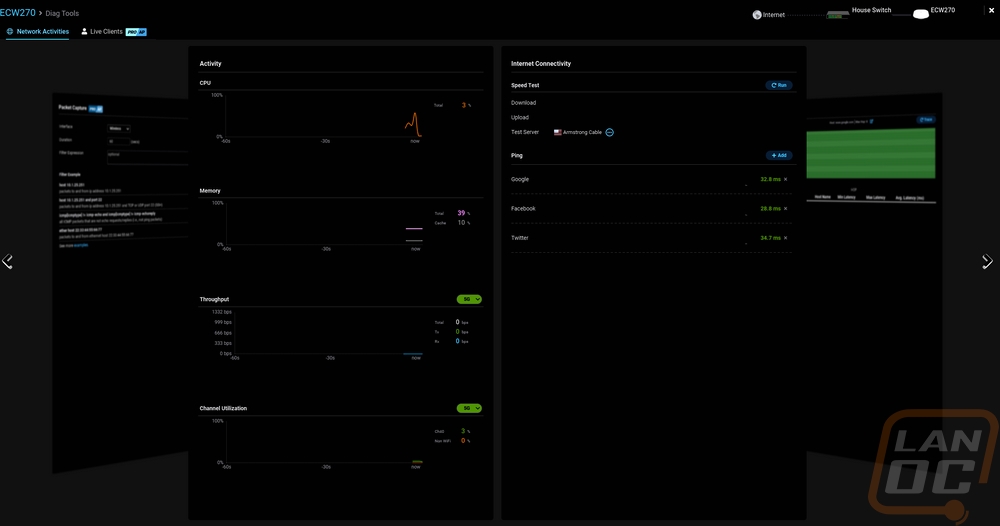
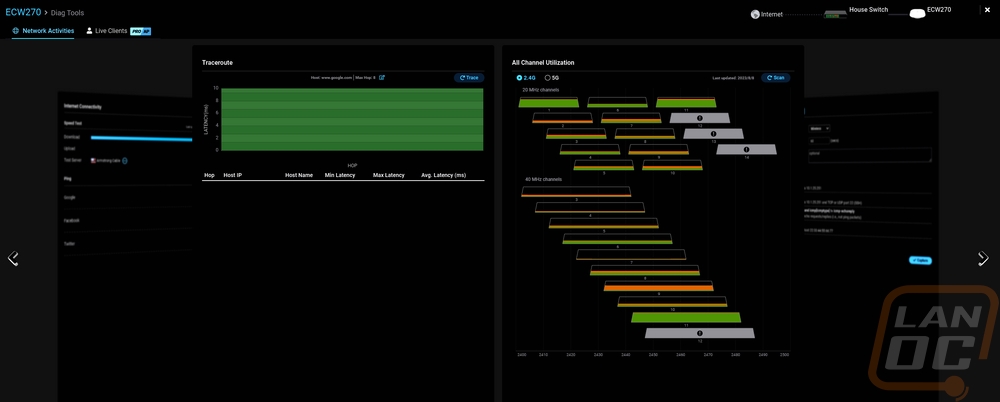
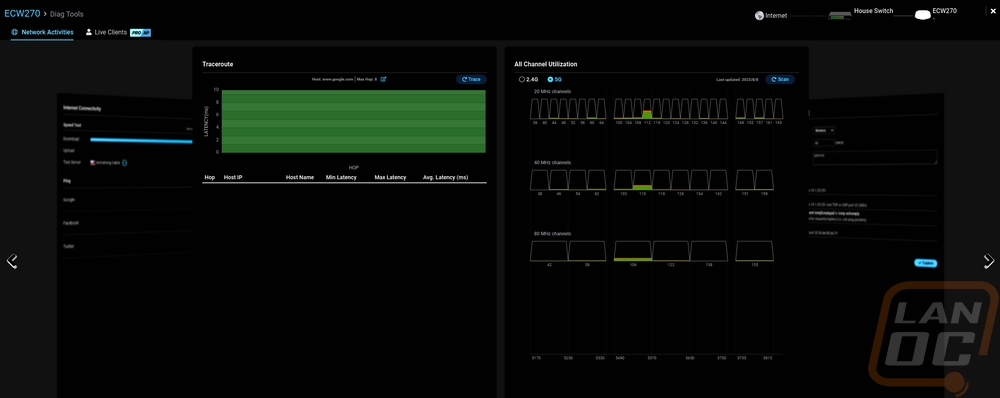
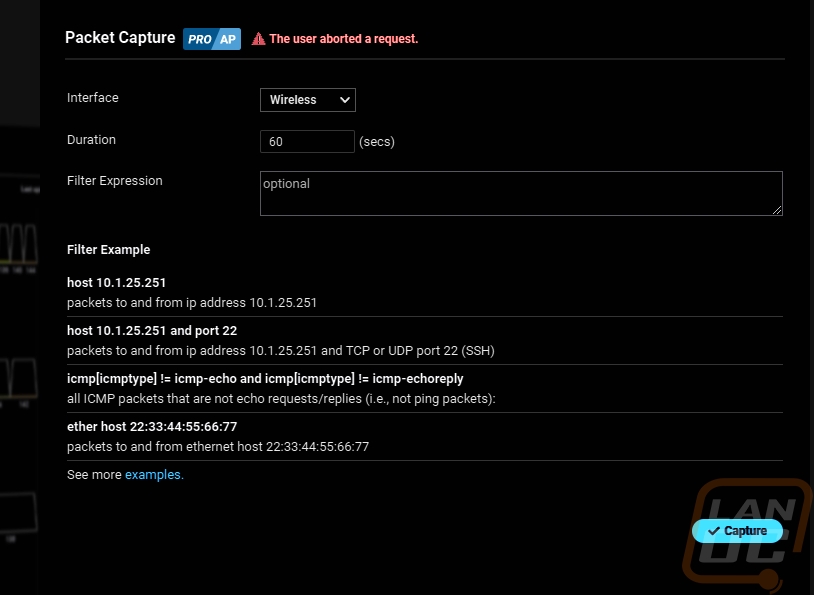
Opening up the diag page opens up a full-screen page which I have complained about in the past. It’s nice to have a full-screen option, but with this, if you have to check anything outside of the diag page it closes everything. There are two main tabs, the network activities page which has multiple pages of tools that you can flip through, and then a live clients listing which is only available to EnGenius Cloud Pro users. You have a page that just graphs out the activity including CPU, Memory, throughput, and channel utilization. You can also see the internet connectivity page which lets you run a speed test and see current pings to multiple websites and devices which you can add to. The traceroute page lists out a traceroute as you would expect but also graphs each hop up top to make it easier to see. Then the channel utilization page is two pages. You can set it up to see 2.4 GHz or 5 GHz and you have to run the scan before it will fill in the information, while doing that it turns off wireless activity unless you have a device like their S model security devices that have extra radios. This gives you a good look at all frequencies and shows wireless and non-wireless activity. You can see just how packed 2.4 Ghz is for me for example but 5 GHz is mostly clear. There is also a packet capture tool that lets you run a full packet capture to download and analyze.
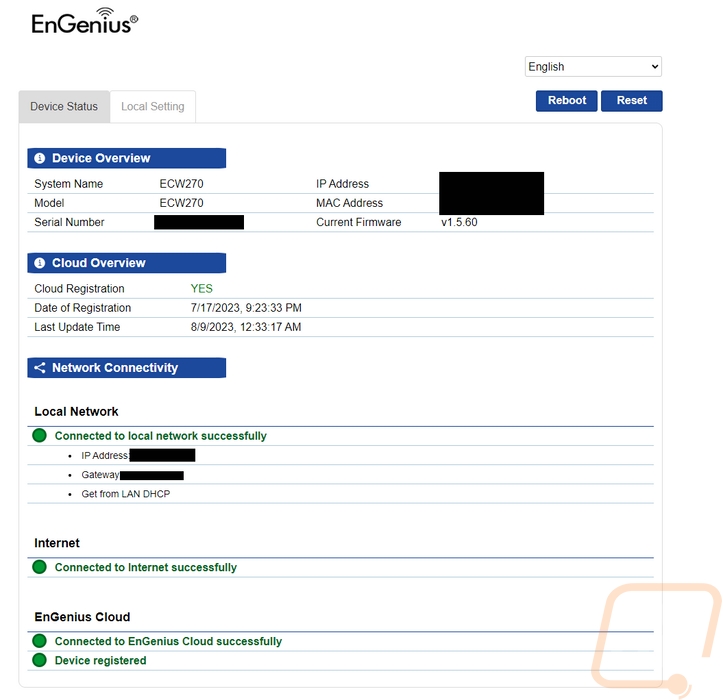
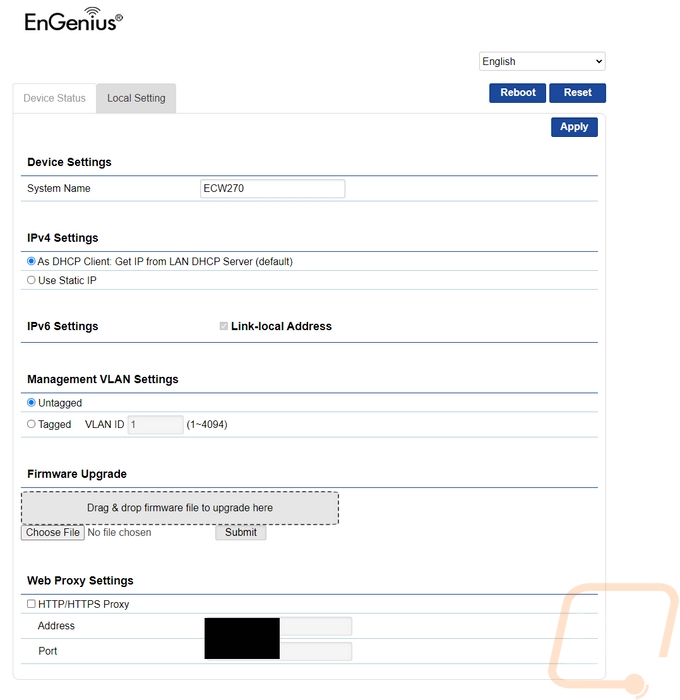
The EnGenius ECW270 does have its own web interface that you can log into outside of the cloud-based environment but it is extremely limited. Some of the EnGenius Cloud devices have a full web interface or you can even access features not available on the cloud but for their access points this is just a simple landing page where you can check the status of things, restart the device, reset the device, and update the firmware. The main page lists the device information including if it is registered to the cloud and the current status of its connection to the cloud, LAN, and internet. Up top, you can reboot or reset it. Then on the second page, you can change the device name and network settings. That includes static or DHCP and also setting it up on a VLAN as well as web proxy settings. There is also a manual firmware upgrade option here where the cloud software does it all for you, so this is a nice backup if anything goes wrong.
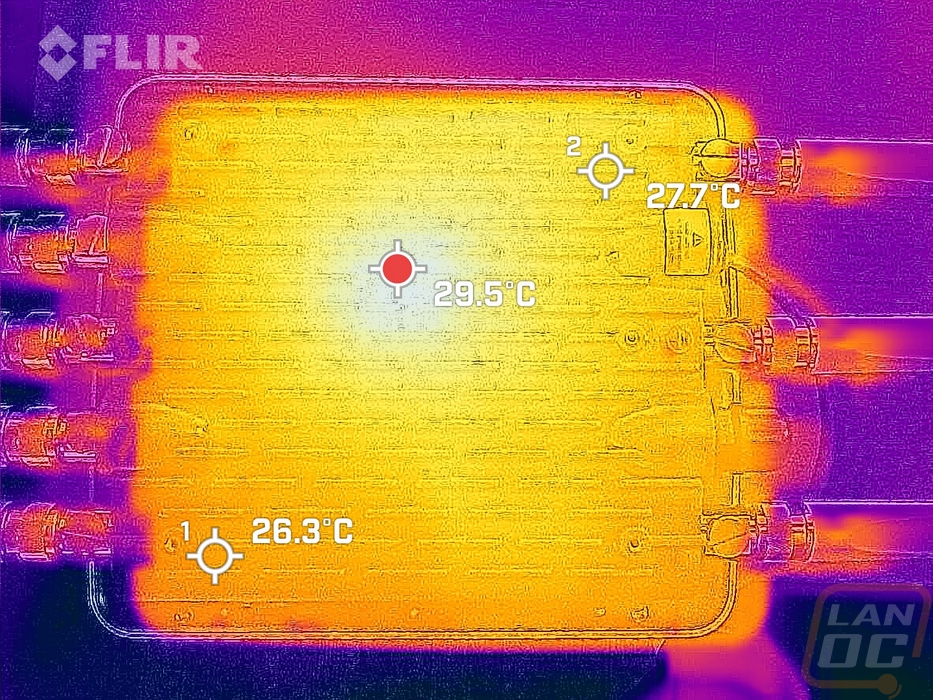
Before installing the ECW270 outside I did want to get a look at its thermals, especially with that large aluminum heatsink that covers the entire back of the device. For this, I was running it inside in a 74f room for a few days. With the thermal image, we can see there is one main hot spot but with it running 24/7 the heat did spread out across the entire back. That said the lowest temperature spot was just 26.3c or 79.34f which isn’t too far from our 74d room temperature and the hotspot was 29.5c or 85.1f. In other words, the ECW270 under normal use is hardly warming up enough to even notice it when touching it but the big heatsink is there to help keep things cool on hot days, especially with the ECW270 directly in the sun this could be very hot in some locations.
While testing I did also check out overall power usage and this is going to depend a LOT on how many devices you are running. But I compared the 4x4 ECW270 to the 2x2 ECW260 with a few basic devices connected to each. The ECW270 pulled 9.1 watts through PoE and the ECW260 pulled 7 watts. EnGenius does have the ECW270 rated at up to 46W and the ECW260 is rated at 15.9 watts. This is because of the LAN 2 port on the ECW270 which can pass PoE power onto a second device. The second device gets 802.3at or PoE+ but to support that you need to have the ECW270 connected at 802.3bt or PoE++. With that in mind, we can do some napkin math and remove the 25.5 watts for PoE+ from the 46-watt max rating to see that the ECW270 has a max power of 20.5 watts itself, 4.6 watts more than the ECW260 which is inline with the power usage difference I saw.
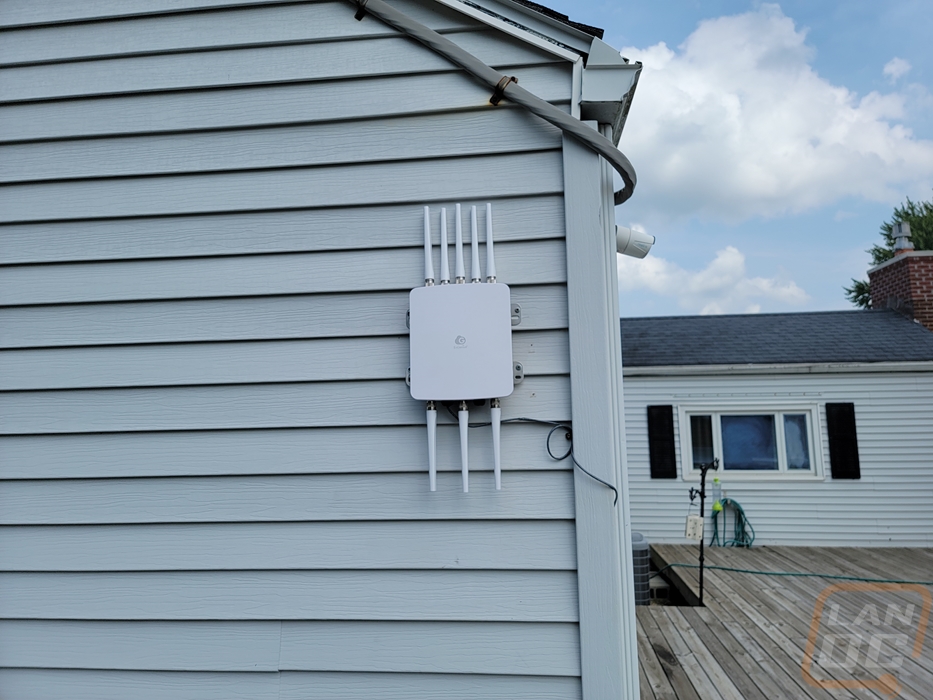
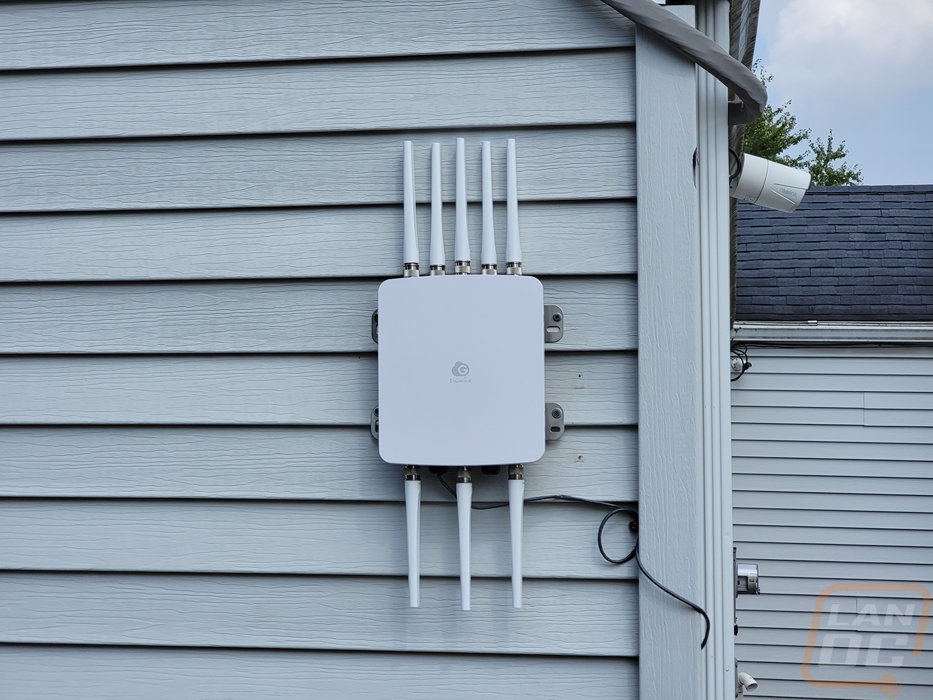
With that out of the way, I could finally install the ECW270 outside. I mentioned it in the photo section, but I do prefer the mounting design of the ECW260 which hides the mount completely behind the access point more than this new design which mounts to the ECW270 ahead of time and also means your screws/bolts are visible all of the time on the sides. For our situation I didn’t use the included bolts, going with large stainless screws. Either way however your best bet for any security is going to be mounting the AP in a location that isn’t reachable.
With everything set up, I did a few speed tests. For this I set up our own instance of OpenSpeedTest on the network and using a PC that supports WiFi 6 4x4 I ran a few tests. While doing this I also kept an eye on the Windows connection speed as well which isn’t a speed test but does give us another aspect to see how good the connection is. I tested the ECW260 as well as the ECW270 and while both performed well for my wireless environment there was a clear difference between the two. The ECW270 had upload speeds of up 1055.1 Mbps compared to the 643.5 Mbps on the ECW260 in the same situation. The download speed differences weren’t as big but it was still noticeable. Even on the Jitter and ping results the ECW270 outperformed the ECW260 and the Windows connection speeds showed that as well. The reason the performance is even close at all is because almost no client devices support 4x4 themselves so even our highest-end motherboards are 2x2 which caps out at 1200 Mbps. Because of that, it is very hard to test or even show the full capacity of the ECW270 but know that it is capable of doing the speeds below on two devices at once just as long as the wired connection and the server itself can handle it. That is where the ECW270 stands out, you can have multiple devices hitting your wireless network hard without slowdowns especially once you have devices spread out across 2.4 Ghz and 5 Ghz with all eight radios.
|
|
Down |
Up |
Jitter |
Ping |
Connection Speed |
|
ECW260 |
831.5 Mbps |
643.5 Mbps |
0.2 ms |
4 ms |
1020 Mbps |
|
ECW270 |
979.7 Mbps |
1055.1 Mbps |
0.1 ms |
2 ms |
1200 Mbps |
Overall and Final Verdict
My expectation for the EnGenius ECW270 was that it would be similar to the ECW260 that I took a look at previously, but doubled up in radios to go from 2x2 of the ECW260 to 4x4 but once I dug into things I found it to be a lot more. The ECW270 has stepped up the overall construction significantly with a big part of its construction being an aluminum main housing with a large heatsink that covers the entire back. With our ECW260 and being in northern Ohio I hadn’t ever really considered temperatures to be a concern but the reality is we get hot days as well and some intense sun which even has yellowed our ECW260 significantly over the past two years. With that increasing the cooling capacity is great to see, especially with the increased processing power and twice as many radios. Beyond that though the ECW270 has new larger antennas with large metal mounts. The build construction of the new access point is significantly better than EnGenius’s previous outdoor access point.
The ECW270 did give us a measurable performance improvement, but that only scratched the surface of what the 4x4 access point is capable of with most of that performance being limited by almost all wireless devices only supporting 2x2. The real performance will be seen when the ECW270 is handling lots of devices. In addition to the wireless performance, it also has a secondary LAN connection where you can pass PoE and data through to a second device, perfect for an IP cam to keep an eye on the same area.
Like with past EnGenius Cloud devices, setting the ECW270 up was quick and easy with the use of QR codes and the app. The Cloud software also makes managing your network easy as long as you keep everything in-house. It is cloud-based however which some people won’t be a fan of and unlike the EnGenius Fit lineup, they don’t have an on-premises controller option available to avoid that.
There were a few downsides with the new mounting design being one change that I wasn’t a big fan of. While the mount design on the ECW260 wasn’t perfect, the design was completely hidden behind the access point where the ECW270’s mount is wider and is visible on the sides giving full view and access to your mounting solution. In that same vein, the information sticker on the ECW270 is on the side and visible easily as well in that same situation. Obviously, the best security is going to be keeping the access point out of reach, but if you can’t do that it is more exposed than I would like. When installing the ECW270 the LAN connections are extremely recessed up into the housing. The ECW260 was similar and I wouldn’t mind this at all, but because of how tight things are it is extremely hard to unhook the connection. While performance was great, the ECW270 is still WiFi 6 not 6E which would add in the 6Ghz radios. This isn’t a fault of the ECW270 at all, but overall the outside access points are lagging behind the inside options. If you were looking to go all out right now with ECW336 indoor access points you wouldn’t have a comparable option to continue that outside and that doesn’t even factor in the upcoming ECW536 which is WiFi 7.
For pricing the big step up in construction and speed is reflected in the pricing on the EnGenius ECW270 as well. It has an MSRP of $999 which is double the MSRP of the EnGenius ECW260. Consumer or even prosumer buyers may be shocked at that pricing and it is a LOT for an access point. For comparison though, the Cisco Meraki MR86 which is also an enterprise WiFi 6 4x4 outside access point has an MSRP of $2,898.07. For a lot of situations for people already invested in EnGenius Cloud for their infrastructure the ECW260 is going to be more than capable. But if you have a deployment outside that is going to see a lot of users and also requires some of those users to have wired or better performance, the ECW270 is going to get the job done. The improved construction should hold up better and help things run cooler as well.

Live Pricing: HERE


