Software and Performance
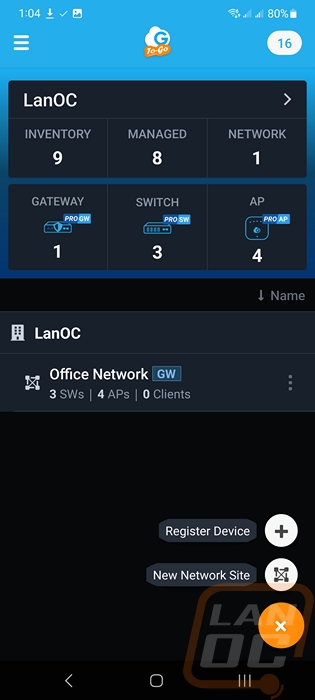
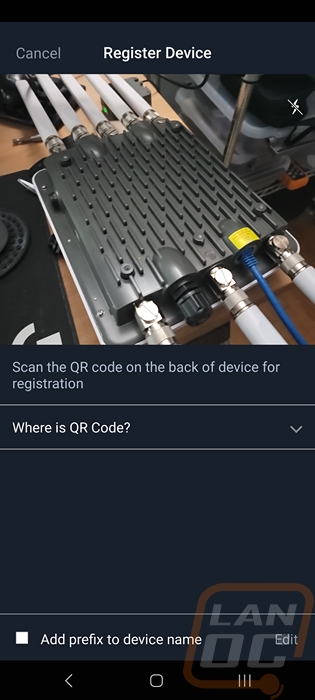
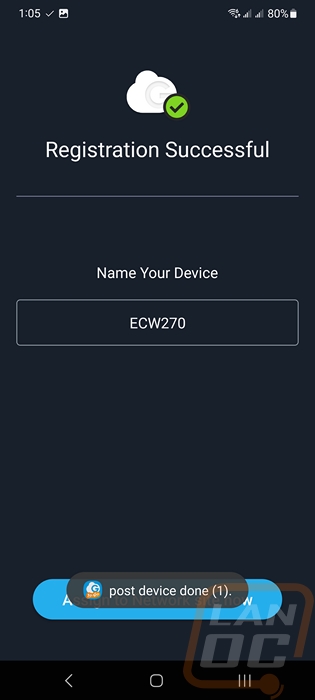
Before testing out the ECW270 there were a few things that needed to be done. For one we have to get the ECW270 attached to our EnGenius Cloud account and setup. I need to get the access point installed outside, replacing the ECW260 that we previously had mounted out there and I also need to go through the software because that is where you are going to find a majority of the features. The EnGenius Cloud software has both a web interface as well as an app. I utilize both so I will check both of those out and the ECW270 does have its own web interface so I will check that out at the end as well. The easiest way to add devices to your EnGenius Cloud setup is by using the app so we will start there. The homepage will list all of your locations in one place and at the top gives you a count of how many devices are attached. The three lines at the top left open up a menu and on the top right, you can click and see all of your alerts, in this case, I had 16 which were mostly letting me know that devices had rebooted for weekly updates. Then down at the bottom, you have a plus sign button, with that you can start a new network site or register a new device, I need to register a new device. This will open up your camera and you can scan the QR code on the ECW270, once scanned it is added right away. You also have the option to rename the device and pick which network you are adding it to.
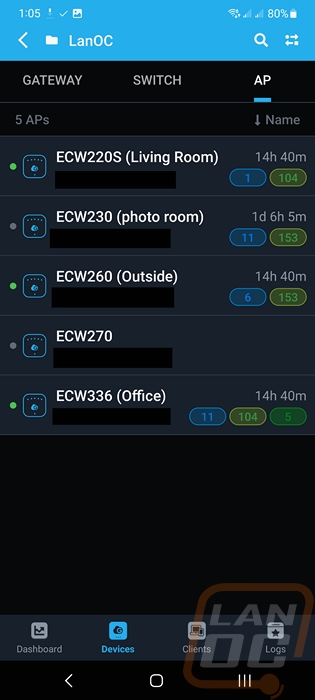
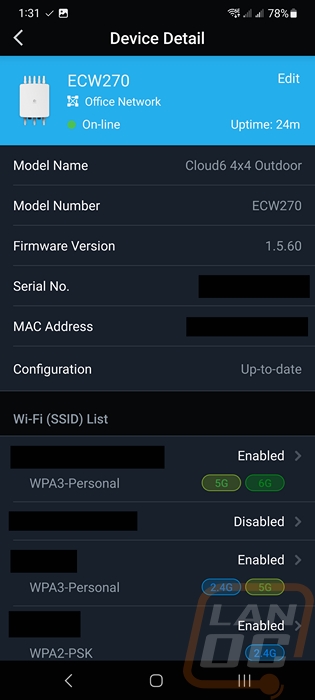
Digging around the rest of the EnGenius Cloud on the Go app, on the homepage you can touch the gateway, switch, or ap pictures and it will open up a listing of those devices. So for the ECW270, we can confirm that our newly added device is on the network. You do have to have it plugged in and running, of course, adding the QR code just tells the EnGenius Cloud to know to attach your device once it is online. The AP listing page will have all of your access points on that network, their name, and MAC addresses for each as well. Then on the right you can see their total uptime and what channels they are connected to. The blue is 2.4 Ghz, the green is 5 Ghz, and the dark green is for 6 Ghz if it is supported. Clicking on the device will open up the device detail page. This will have the full model and firmware information then as you scroll down it will list all of the SSIDs setup on the device, the radio settings, and also if wireless mesh networking is turned on or not. You also have the IP address settings as well which by default will be DHCP. I’ve IPs and Mac addresses blocked out just for safety on our network.
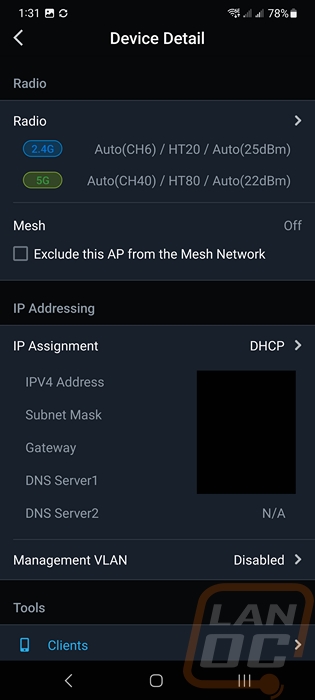
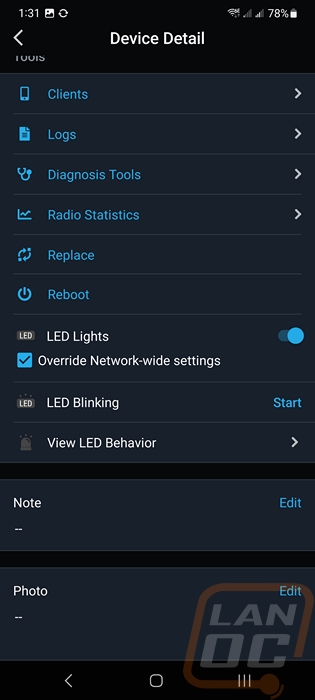
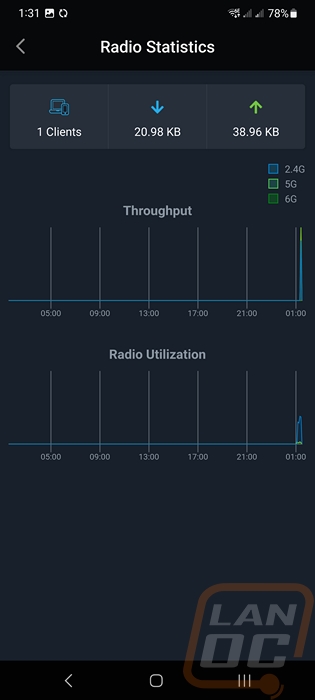
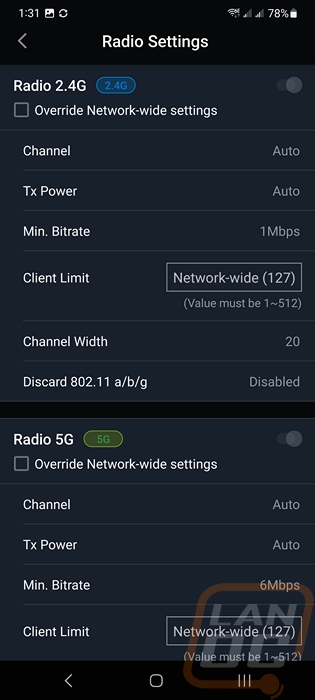
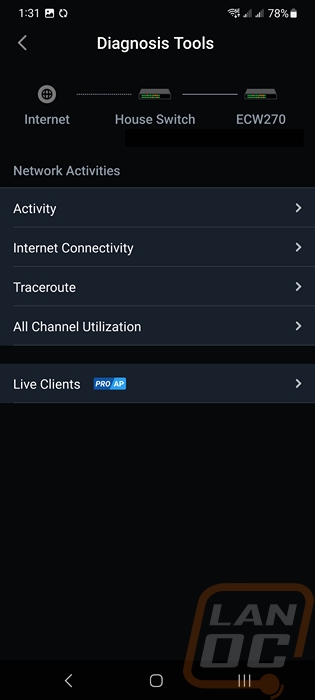
The bottom of the device page also has a lot of menus that you can open up. This starts with the client listing which will list all of the devices connected to the ECW270. The logs page will show bootup information, updates, and reboots. You can reboot the access point here and use the replace option if you want to swap it out. You can set up manual light settings which I have AP lights turned off by default so I have them on for our testing here. You can also set the LEDs to blink to help you confirm it is the device you are looking at if you have a lot of similar devices deployed. The diagnosis tools page opens up another page with tools to help pinpoint issues like traceroute and scanning radio frequencies (I will check this out more on the web interface). Radio settings can show you the 2.4 GHz and 5 GHz traffic graphed out and you can also manually change settings. These settings are device specific, you shouldn’t change these unless you only want this one device to do something. For example, turning the power down lower on a specific access point that maybe reaches well beyond your location or forcing one AP on a specific channel.
Opening up a specific network on the On-the-Go app will show you the current status of everything. For us, it shows that we have one access point offline and we have a big issue with 2.4 GHz and 5 GHz ratio because of IoT devices which lean heavily on 2.4 GHz only radios. Because we have a supported gateway it shows current WAN utilization and we have a count on the number of wireless devices. Scrolling down lower you will get graphs for AP traffic which can be set to show by day/week/month and you also get the top clients listed which is a quick way to be able to pinpoint heavy users.
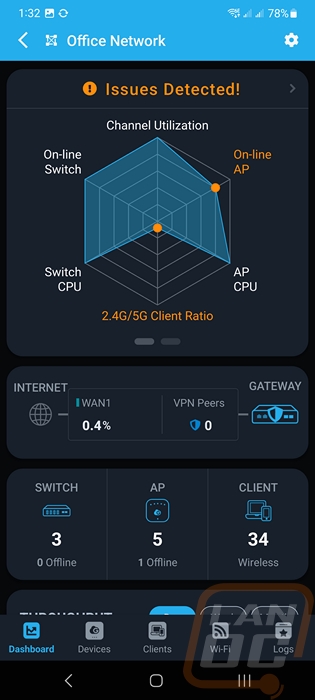
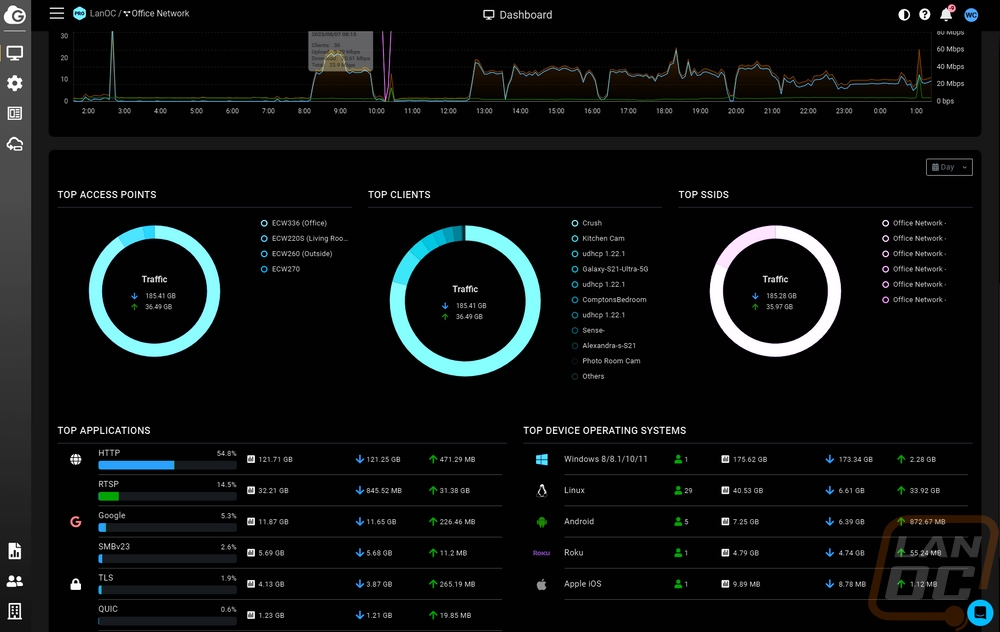
If you have seen any of our previous EnGenius Cloud coverage none of this is going to be different so you can skip ahead. But while the On-the-Go app is nice for when you are out of the office and makes adding devices easily. I use the main EnGenius Cloud web interface the most. They do share a lot of the same functionality though. When you sign in the main landing page has all of the status information including that status graph that lets you know if there are any immediate issues. Next to that each of the device types is shown with the number of devices online and offline and your client count for wireless devices. You have graphs for the gateway and access point that can be broken down by the day/week/month and by the SSID as well. Towards the bottom, there are pie graphs that show you the top access points, top clients, and top SSIDs to help pinpoint any issues. They also show application traffic and the operating system as well which is just for wireless clients. Then the grey bar on the left when you mouse over pops out with the menus. The main two are the manage and configure menus, today I will check out the options that apply to access points.
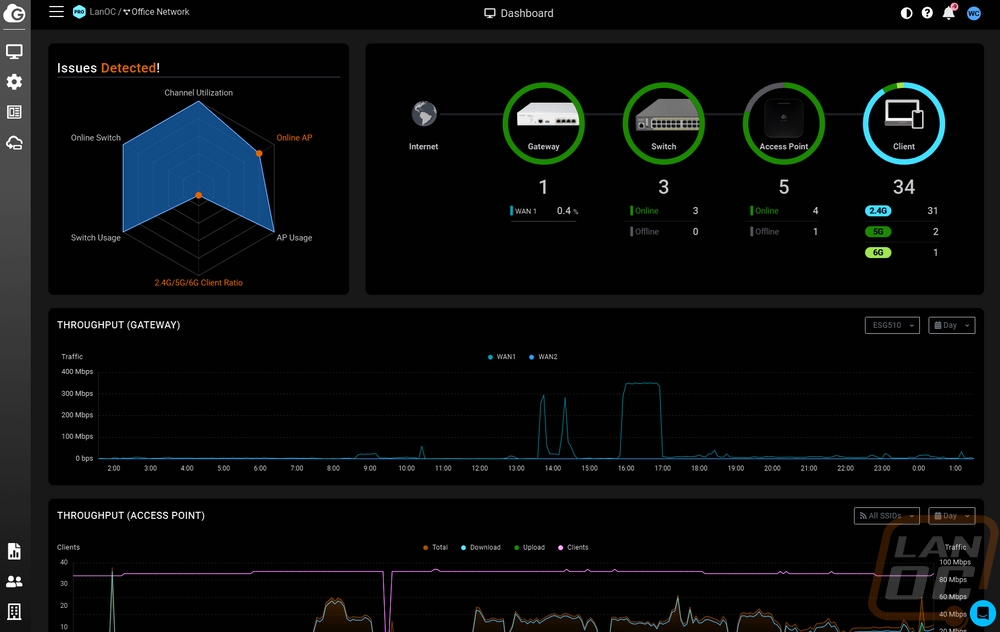
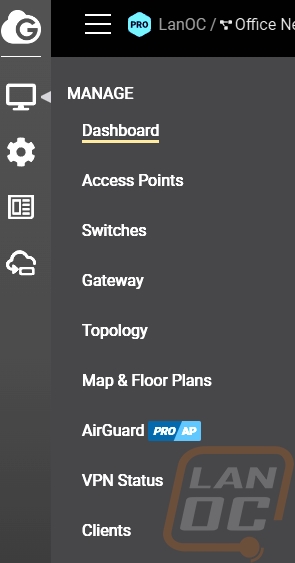
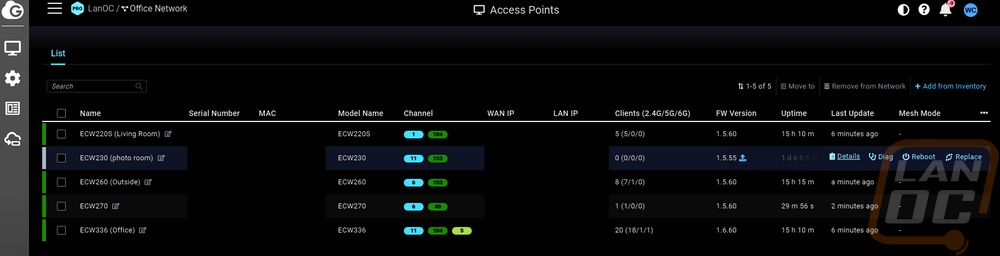
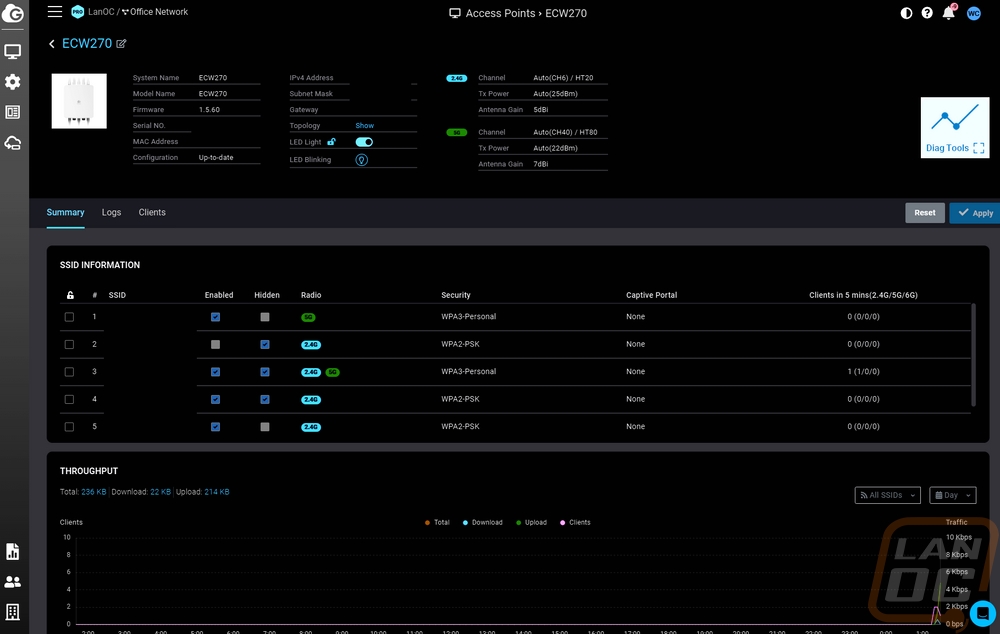
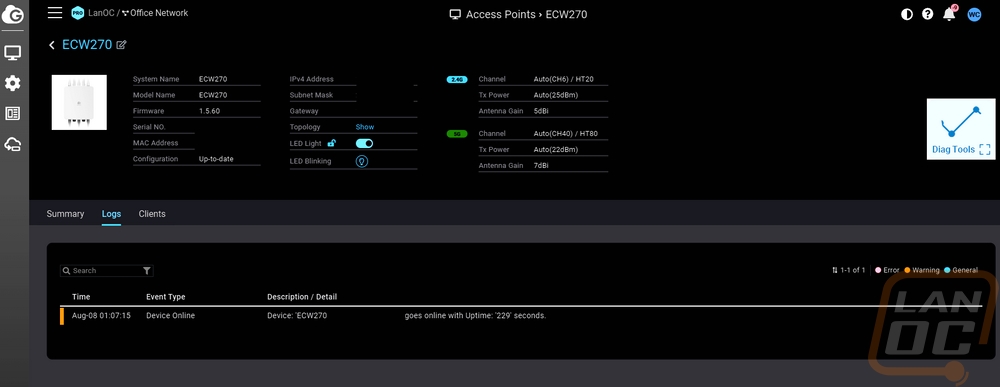
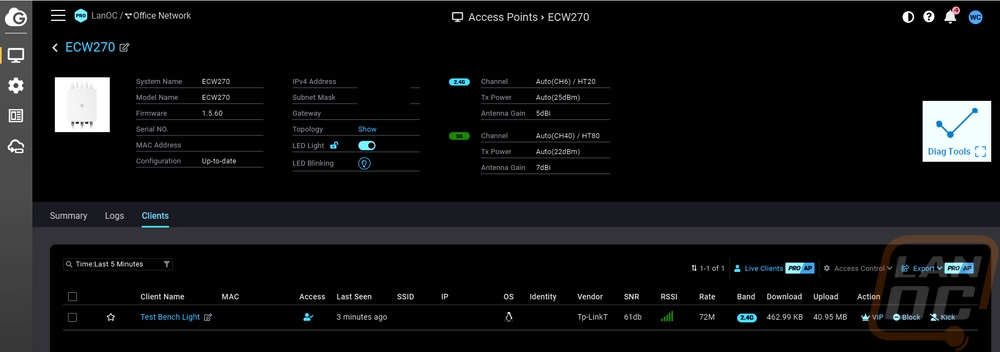
On the manage menu clicking on access points opens up a page that lists out all of the linked access points. This page has their names, serial numbers, Mac addresses, model names, and channels. You also have WAN and LAN IPs, client breakdowns by frequencies, firmware version, uptime, and last update. When a device has a pending firmware update the blue icon will show next to it. Then mousing over any AP on this listing shows a smaller menu where you can open up the details, diag page, reboot, or replace the device. The detail page has a picture of the device up top and repeats a lot of the same information you saw on the listing page up top. Here you can see all of the setup SSIDs and graphs for throughput for that specific access point like on the home page where you can sort by SSID and change the length of the graph. There is a tab for the log page which mostly just shows reboots and bootup times as well as errors if you run into any. Then you can see a list of clients attached to that access point. I had just one device this time on the ECW270 but you can see the device name and even rename it, Mac address, SSID, IP, and even device vendor. It shows upload and download bandwidth and the radio connection strength, rate, and frequency as well.
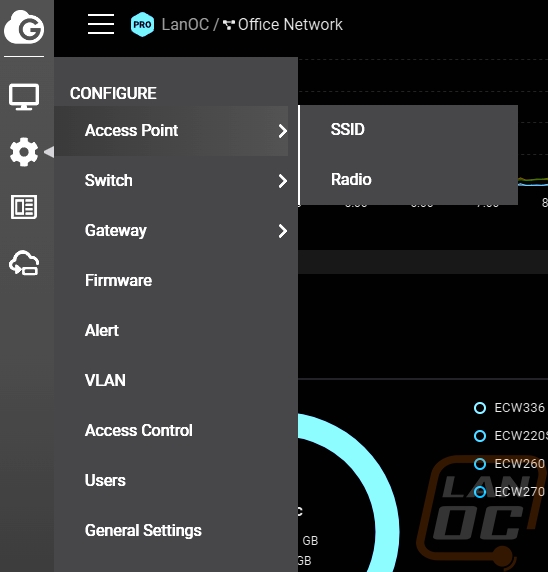
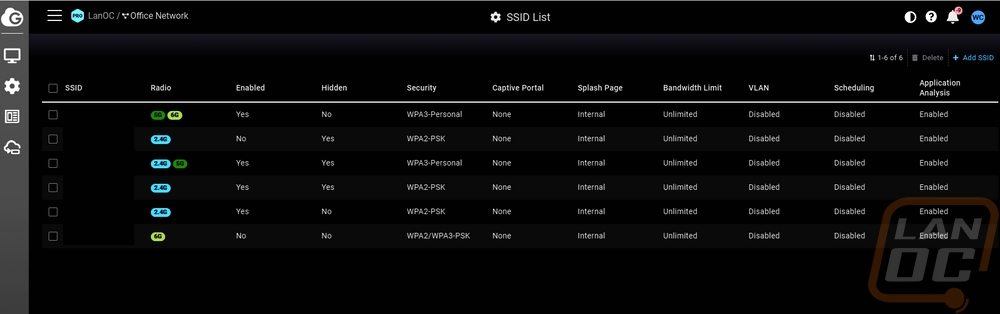
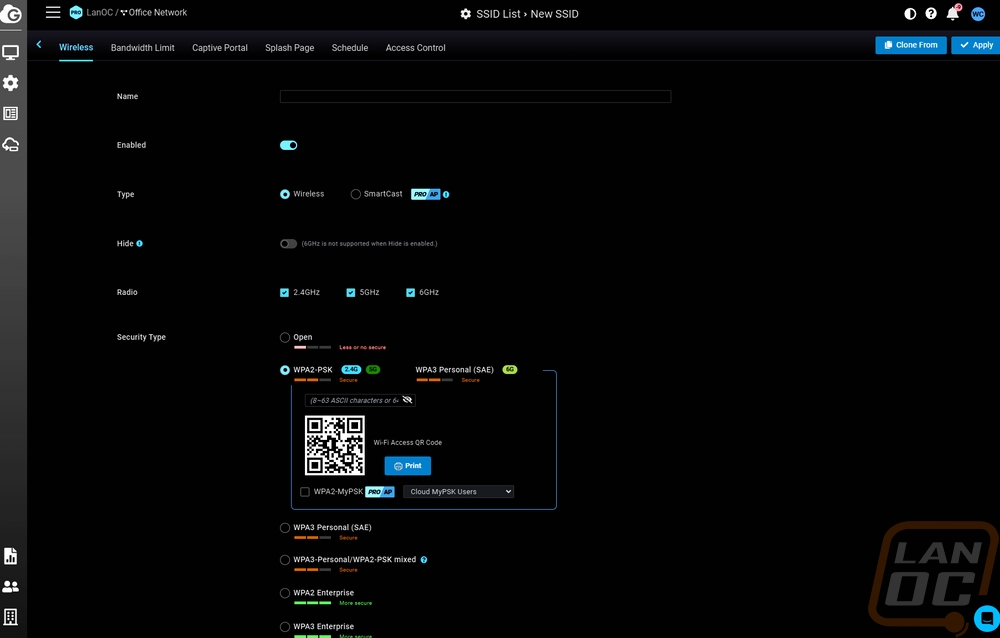
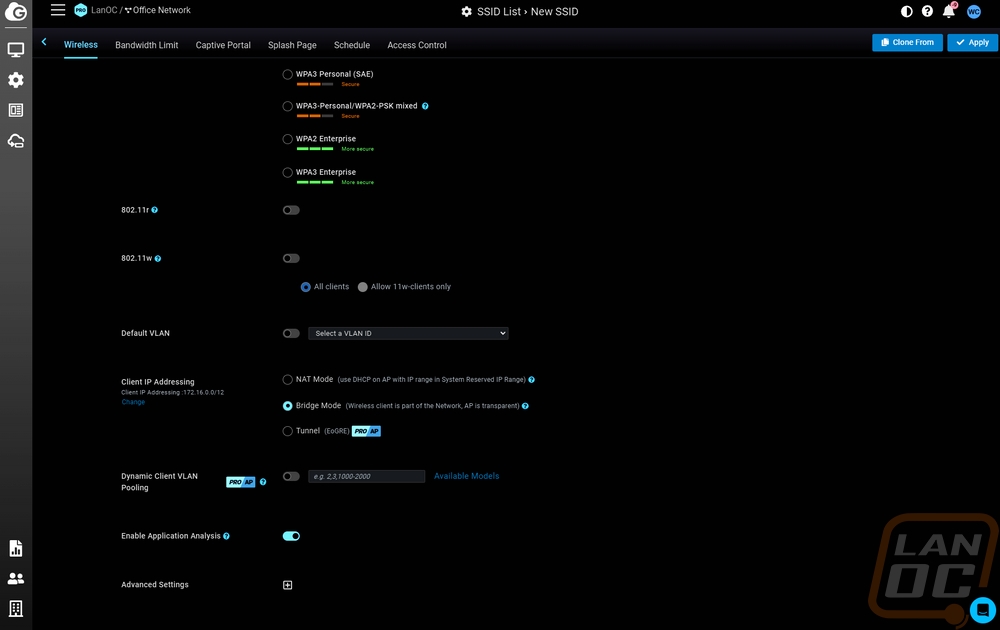
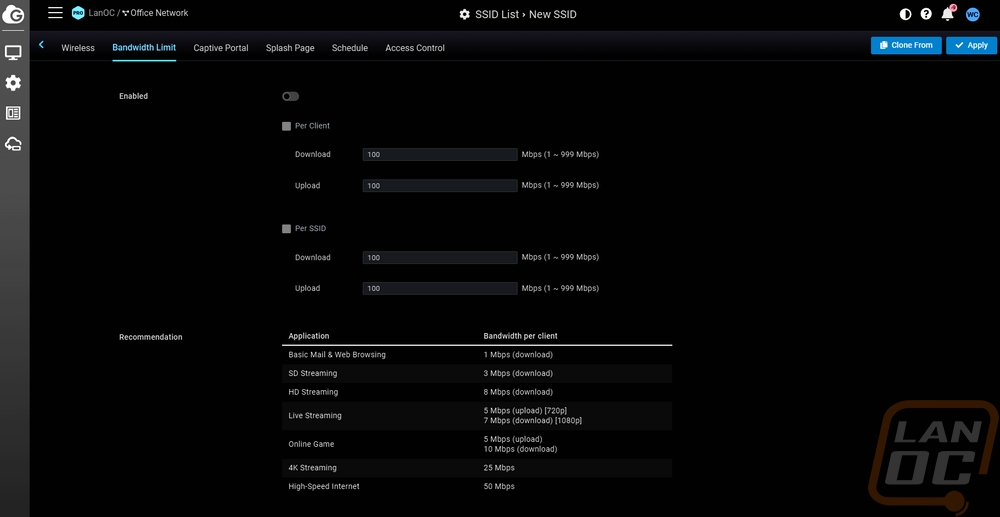
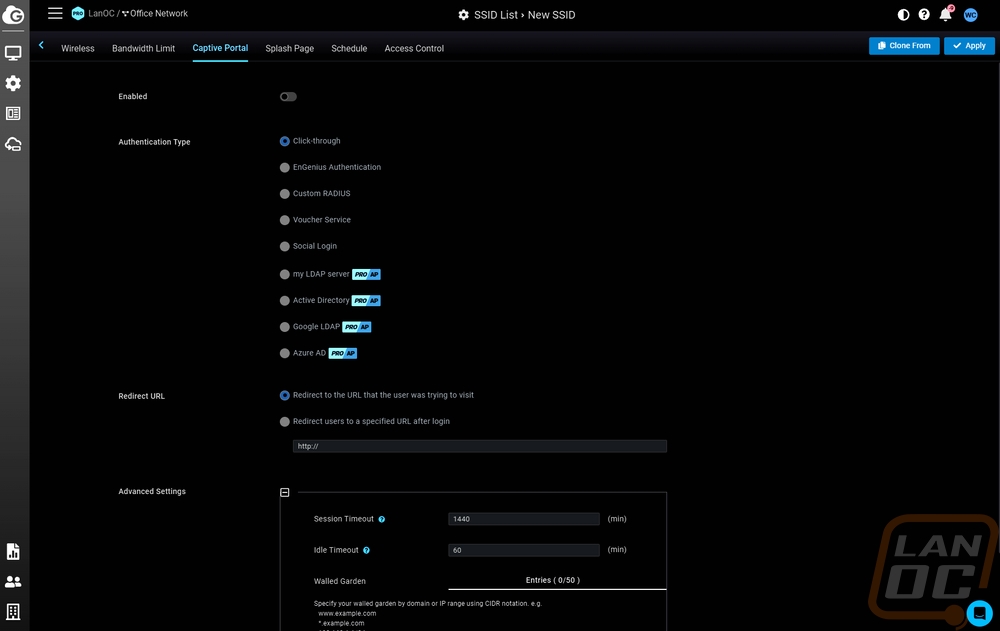
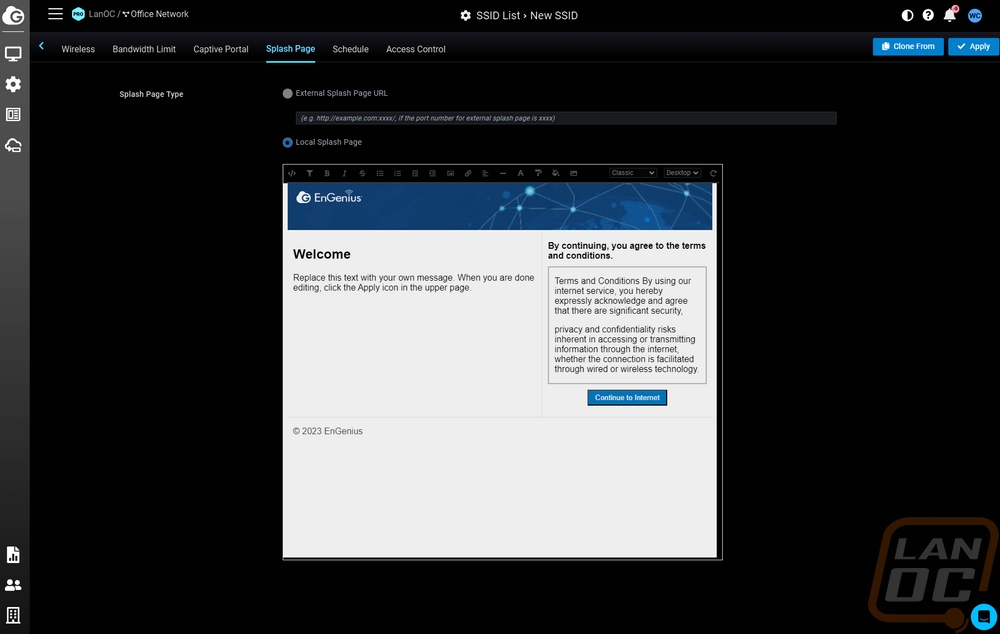
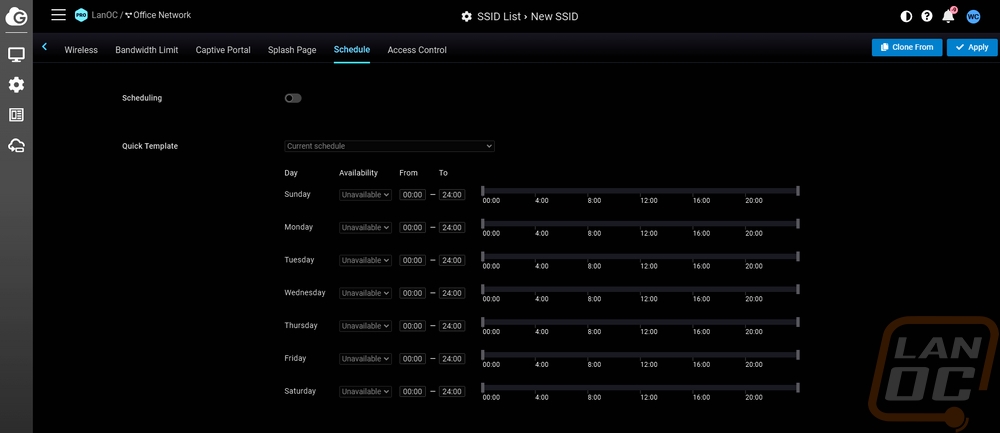
On the configure menu under access point, there are two options. The SSID option opens up a listing of all of the SSIDs you have configured across your network. Unless you change settings on a specific device all of these settings will propagate out to all access points that you add to your network. This is where you can set up a new SSID as well up in the top right the setup page has all of the same pages that you would find if you want to edit or change any of your current SSIDs. The first page of this has the SSID name option right up top and below that you can enable or disable. The option between wireless and smartcast is a pro feature but is an important one if you are using these devices in a hotel for example. By default, a hotel would set up their wireless as L2 devices to keep everything isolated from each other. But this option can let you still allow wireless connections from Chromecast for example, so for rooms with APs in each room you can let people cast to their TV but prevent them from doing it to other rooms. You can turn specific radio frequencies off by SSID then of course you have the security options which they have both personal and enterprise options with WPA2 and WPA3 as well as a mixed 2/3 option which will give you WPA3 security when it is supported but the availability of WPA2. They also make things easy with a QR code that you can print out in your business that will auto sign phones in. You can set up how you want the IP address to be handled including letting the AP handle DHCP if needed. There are then other pages up top with more settings. The first is a bandwidth limit page where you can cap bandwidth by the SSID or by client. With this being an enterprise AP the captive portal settings which has a long list of authentication types that keeps growing isn’t a surprise, you can also set up a splash page to take people to after they get signed in. The schedule and access control pages are both security settings and could be combined together. The schedule can turn an SSID on only during your business hours which is a great way to prevent someone from trying to access your network when no one is around. The access control page lets you block specific devices or give VIP access if needed.

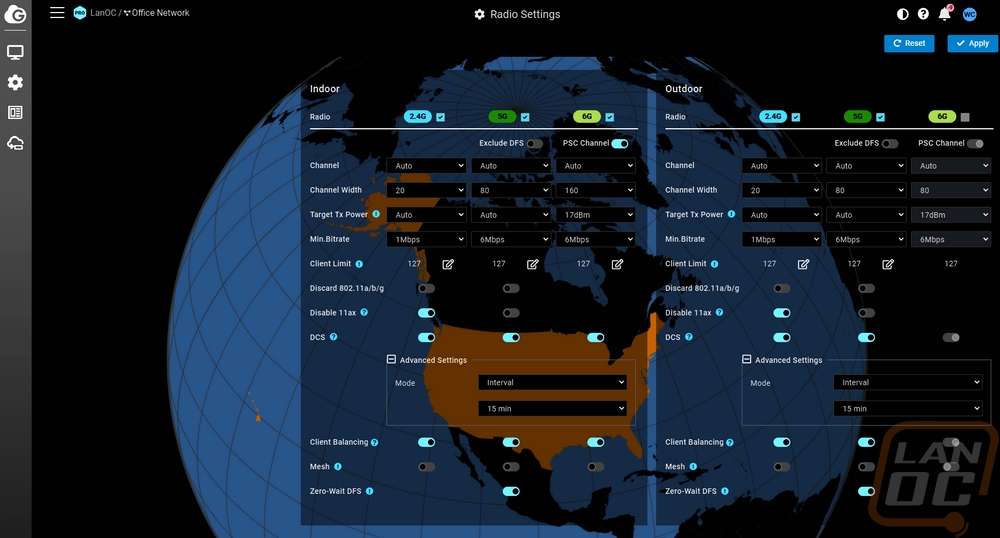
Also under the access point menu on the configure menu is the radio settings page. EnGenius has kept this simple with everything all on one page. Everything on the left is specific to indoor access points and then on the right you have outdoor access point radio settings. This lets you fine tune things inside and outside. From there, things are broken down by frequency with channel settings, channel width, target power, and minimum bitrate settings for each. You can also limit the number of clients here.
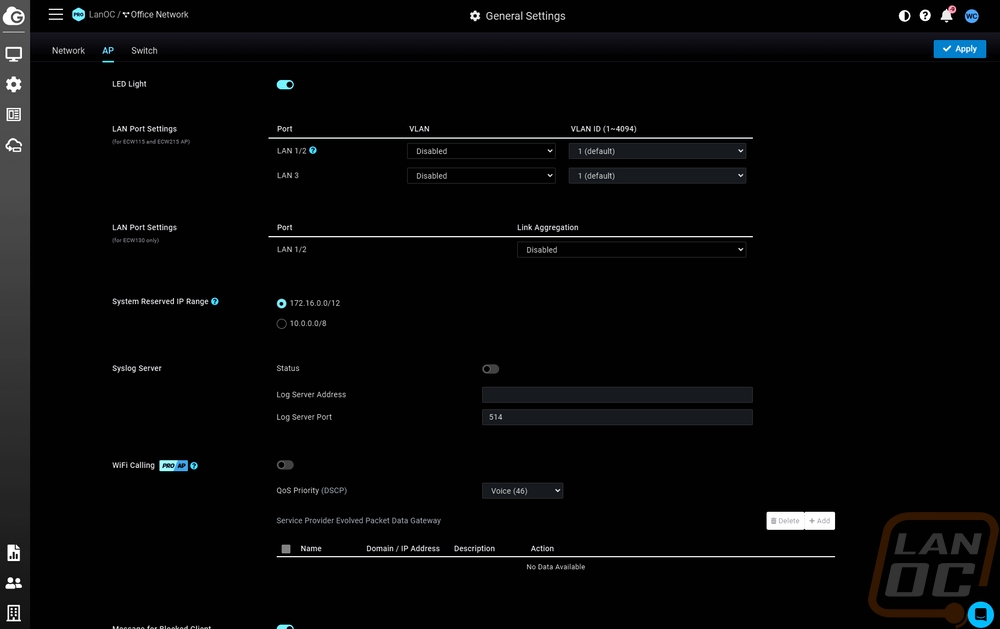
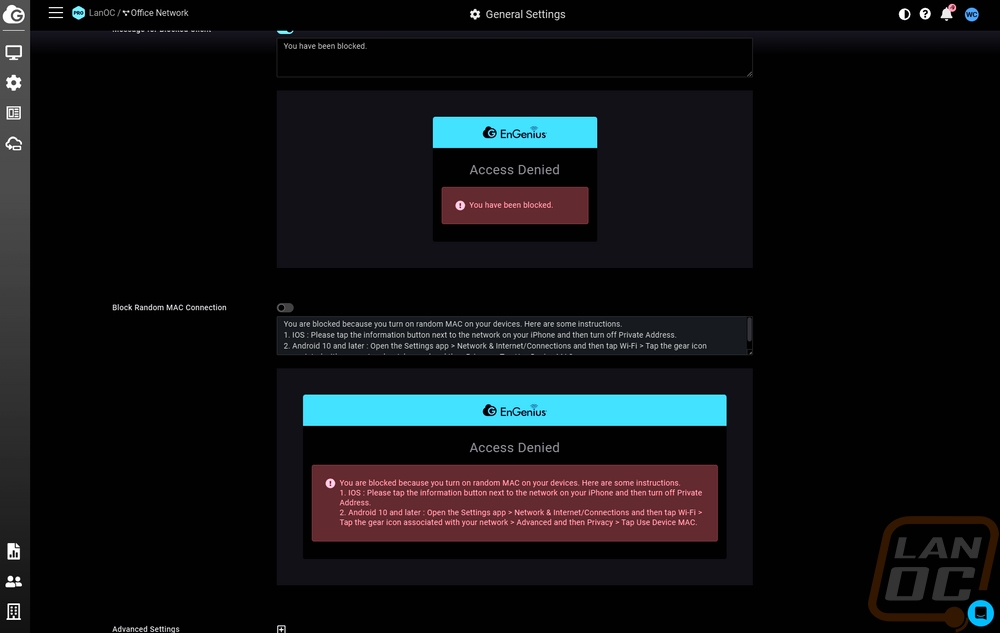
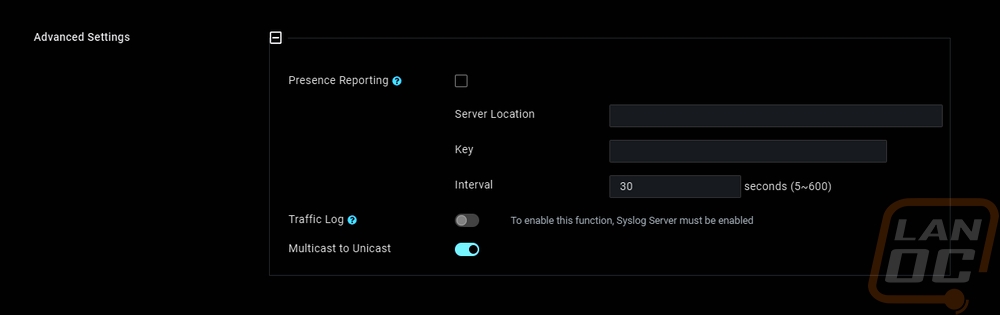
Under the configure menu there is also a general settings page. This has tabs up top for each device type but there are a few options for access points like the ECW270. These settings cover all access points on your network like the LED light option to turn lights off on all access points if you don’t want attention being drawn to them. You can set up LAN port VLAN settings and also set the reserved IP range. If you run a syslog server you can set that up here as well. WiFi calling support can be turned on here but it is also a pro-only feature. You can set up the message you want blocked devices to see and you can also set it up to block random Mac connections which you see on IOS and Android, this will even give the user a warning with instructions on how to fix it.
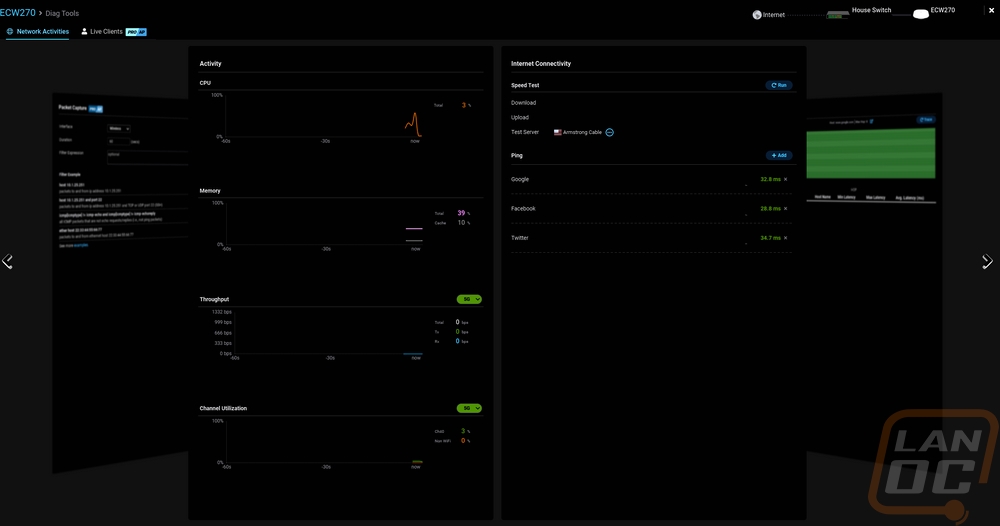
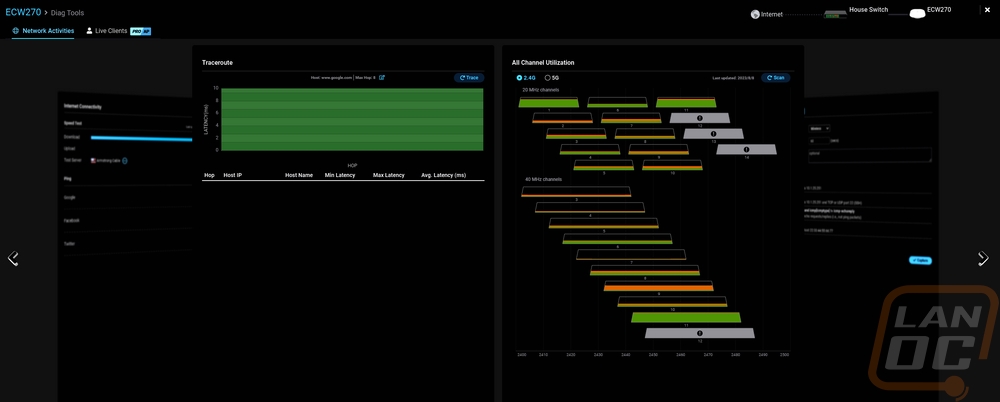
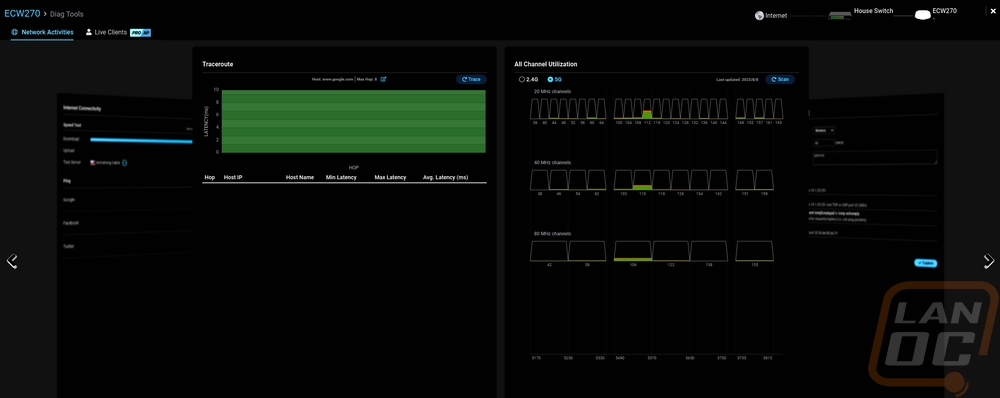
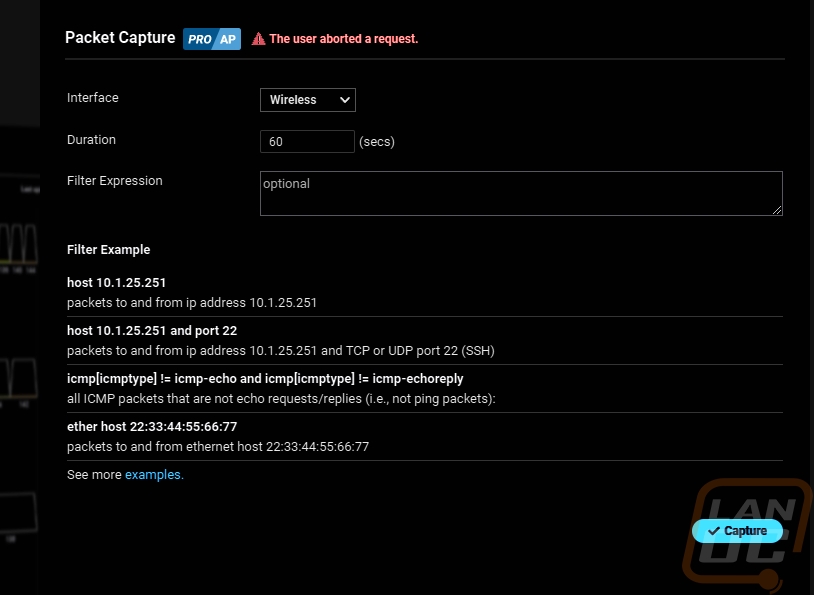
Opening up the diag page opens up a full-screen page which I have complained about in the past. It’s nice to have a full-screen option, but with this, if you have to check anything outside of the diag page it closes everything. There are two main tabs, the network activities page which has multiple pages of tools that you can flip through, and then a live clients listing which is only available to EnGenius Cloud Pro users. You have a page that just graphs out the activity including CPU, Memory, throughput, and channel utilization. You can also see the internet connectivity page which lets you run a speed test and see current pings to multiple websites and devices which you can add to. The traceroute page lists out a traceroute as you would expect but also graphs each hop up top to make it easier to see. Then the channel utilization page is two pages. You can set it up to see 2.4 GHz or 5 GHz and you have to run the scan before it will fill in the information, while doing that it turns off wireless activity unless you have a device like their S model security devices that have extra radios. This gives you a good look at all frequencies and shows wireless and non-wireless activity. You can see just how packed 2.4 Ghz is for me for example but 5 GHz is mostly clear. There is also a packet capture tool that lets you run a full packet capture to download and analyze.
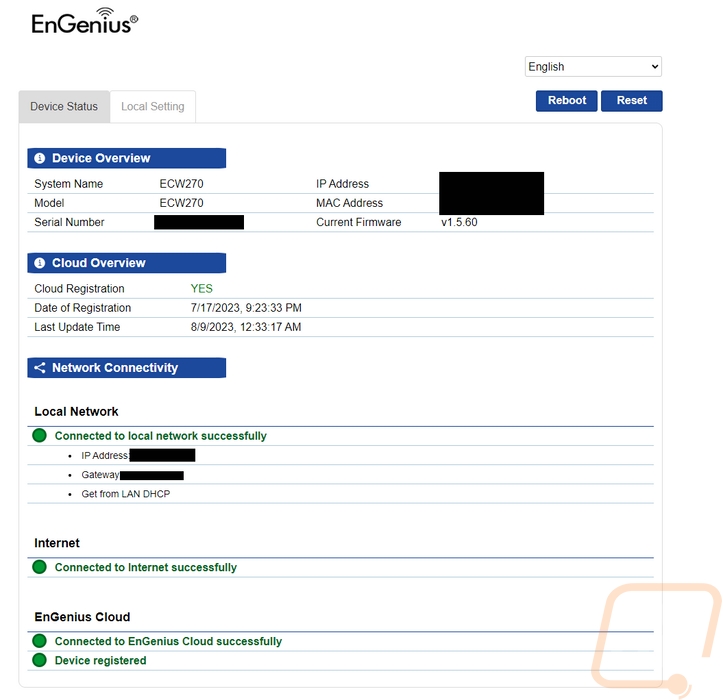
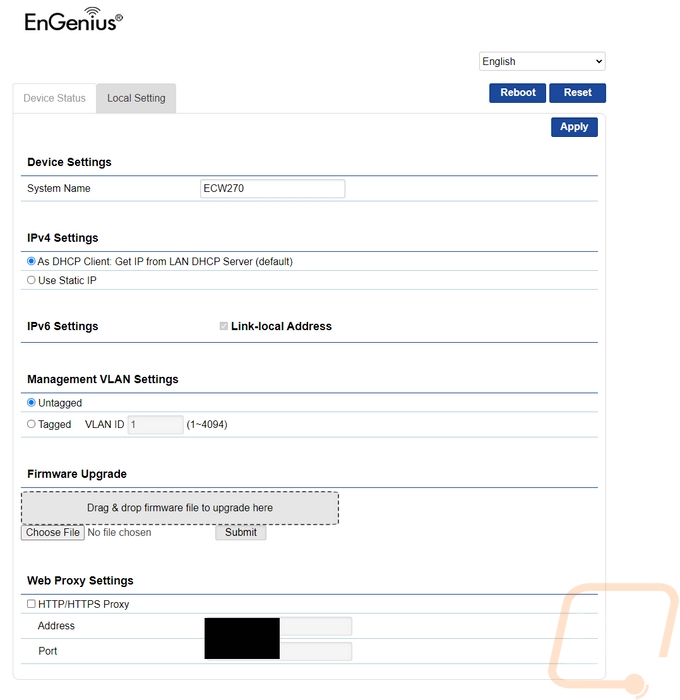
The EnGenius ECW270 does have its own web interface that you can log into outside of the cloud-based environment but it is extremely limited. Some of the EnGenius Cloud devices have a full web interface or you can even access features not available on the cloud but for their access points this is just a simple landing page where you can check the status of things, restart the device, reset the device, and update the firmware. The main page lists the device information including if it is registered to the cloud and the current status of its connection to the cloud, LAN, and internet. Up top, you can reboot or reset it. Then on the second page, you can change the device name and network settings. That includes static or DHCP and also setting it up on a VLAN as well as web proxy settings. There is also a manual firmware upgrade option here where the cloud software does it all for you, so this is a nice backup if anything goes wrong.
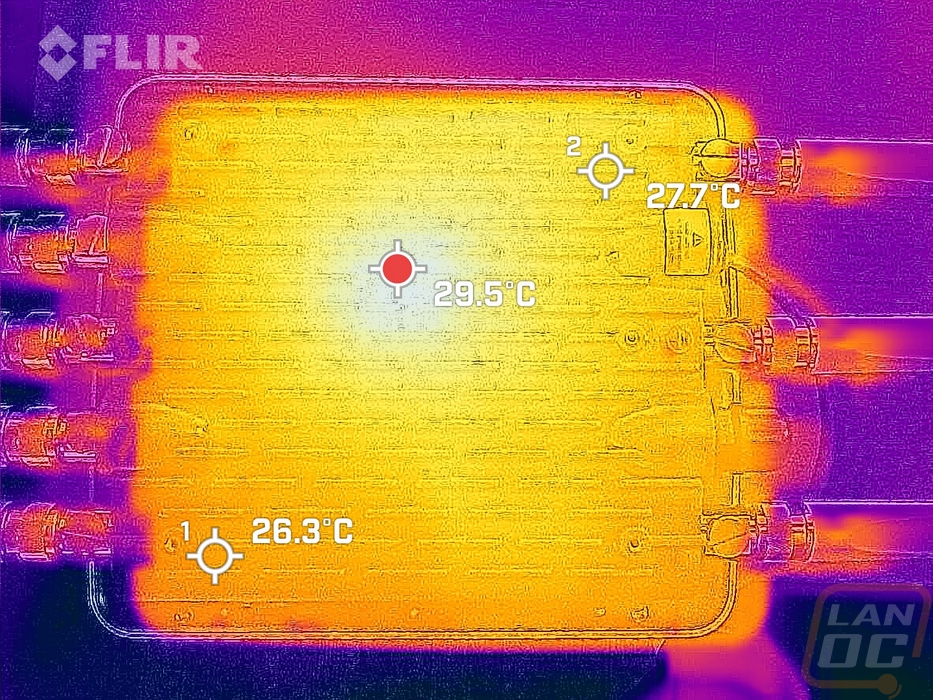
Before installing the ECW270 outside I did want to get a look at its thermals, especially with that large aluminum heatsink that covers the entire back of the device. For this, I was running it inside in a 74f room for a few days. With the thermal image, we can see there is one main hot spot but with it running 24/7 the heat did spread out across the entire back. That said the lowest temperature spot was just 26.3c or 79.34f which isn’t too far from our 74d room temperature and the hotspot was 29.5c or 85.1f. In other words, the ECW270 under normal use is hardly warming up enough to even notice it when touching it but the big heatsink is there to help keep things cool on hot days, especially with the ECW270 directly in the sun this could be very hot in some locations.
While testing I did also check out overall power usage and this is going to depend a LOT on how many devices you are running. But I compared the 4x4 ECW270 to the 2x2 ECW260 with a few basic devices connected to each. The ECW270 pulled 9.1 watts through PoE and the ECW260 pulled 7 watts. EnGenius does have the ECW270 rated at up to 46W and the ECW260 is rated at 15.9 watts. This is because of the LAN 2 port on the ECW270 which can pass PoE power onto a second device. The second device gets 802.3at or PoE+ but to support that you need to have the ECW270 connected at 802.3bt or PoE++. With that in mind, we can do some napkin math and remove the 25.5 watts for PoE+ from the 46-watt max rating to see that the ECW270 has a max power of 20.5 watts itself, 4.6 watts more than the ECW260 which is inline with the power usage difference I saw.
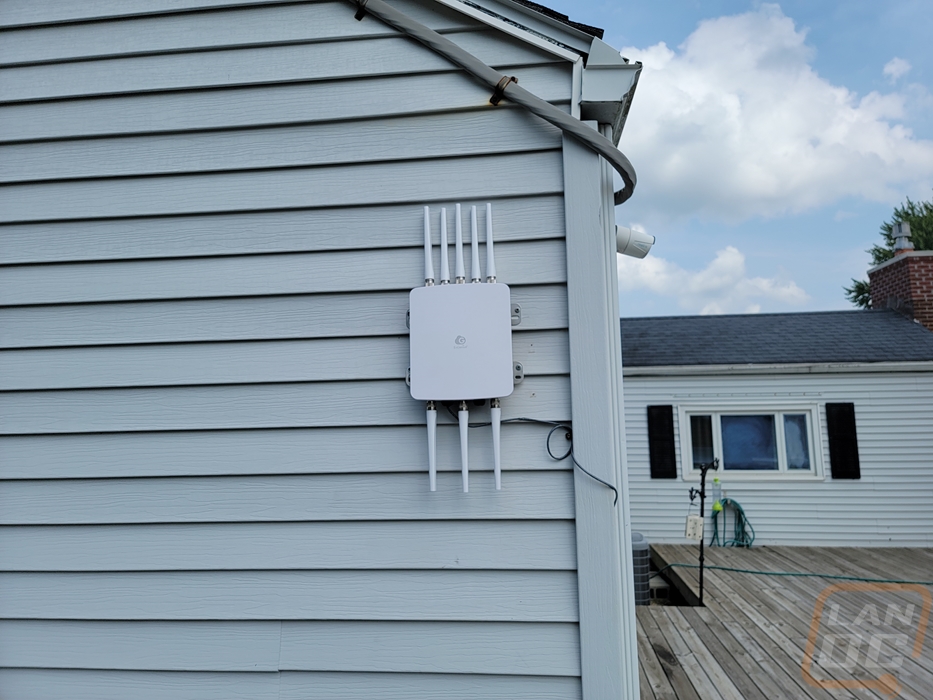
With that out of the way, I could finally install the ECW270 outside. I mentioned it in the photo section, but I do prefer the mounting design of the ECW260 which hides the mount completely behind the access point more than this new design which mounts to the ECW270 ahead of time and also means your screws/bolts are visible all of the time on the sides. For our situation I didn’t use the included bolts, going with large stainless screws. Either way however your best bet for any security is going to be mounting the AP in a location that isn’t reachable.
With everything set up, I did a few speed tests. For this I set up our own instance of OpenSpeedTest on the network and using a PC that supports WiFi 6 4x4 I ran a few tests. While doing this I also kept an eye on the Windows connection speed as well which isn’t a speed test but does give us another aspect to see how good the connection is. I tested the ECW260 as well as the ECW270 and while both performed well for my wireless environment there was a clear difference between the two. The ECW270 had upload speeds of up 1055.1 Mbps compared to the 643.5 Mbps on the ECW260 in the same situation. The download speed differences weren’t as big but it was still noticeable. Even on the Jitter and ping results the ECW270 outperformed the ECW260 and the Windows connection speeds showed that as well. The reason the performance is even close at all is because almost no client devices support 4x4 themselves so even our highest-end motherboards are 2x2 which caps out at 1200 Mbps. Because of that, it is very hard to test or even show the full capacity of the ECW270 but know that it is capable of doing the speeds below on two devices at once just as long as the wired connection and the server itself can handle it. That is where the ECW270 stands out, you can have multiple devices hitting your wireless network hard without slowdowns especially once you have devices spread out across 2.4 Ghz and 5 Ghz with all eight radios.
|
|
Down |
Up |
Jitter |
Ping |
Connection Speed |
|
ECW260 |
831.5 Mbps |
643.5 Mbps |
0.2 ms |
4 ms |
1020 Mbps |
|
ECW270 |
979.7 Mbps |
1055.1 Mbps |
0.1 ms |
2 ms |
1200 Mbps |
